Recording calendar time

Options
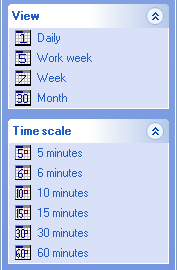
With a calendar entry timesheet you can select to display your Timesheet so that you:
- see the days of the calendar month you have chosen.
- can view the calendar month as a:
- Daily Timesheet
- Weekly Timesheet
- Monthly Timesheet.
- can change the start and end date of the view you choose.
- can break down the view you choose into different time intervals or scales:
- 5 minutes
- 6 minutes
- 10 minutes
- 15 minutes
- 30 minutes
- 60 minutes.
You can enter your time against these intervals or choose to use the automatic timer.
Enter time
-
Select Calendar Entry mode in the Timesheet User Settings window.
-
If you have chosen a Daily or Work week view, choose a Timescale if required.
You have a choice of different views and time scales to record time.
Choose any combination from the& Task Bar.
Select the Time scale from the Task Bar at the left of the Timesheet.
-
Right-click and choose Create Timesheet Entry from the pop-up menu.
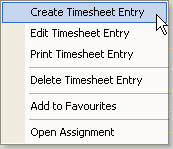
The Timesheet Calendar Time Entry window opens.
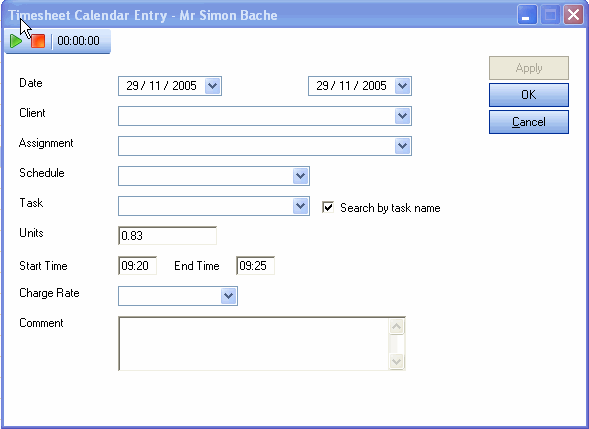
Note: if you untick the Search by task name box you can search by the task code.
-
Enter information into the following fields:
-
Client - Select the client from the drop down list.
-
Assignment - Select the assignment from the drop down list.
-
Schedule - If a selected assignment has a schedule/stage of tasks attached, it will allow you to select one from a drop down list. It does not apply if the field is greyed out.
-
Task - Select the task from the drop down list.
-
Units (hrs) or use the Automatic Timer to record the time - Type the amount of time spent on the task or click the automatic timer to insert the time.
-
End Time - Select the charge rate from the drop down list
-
Charge Rate - You may see this field and others depending upon the needs of your practice. Select the charge rate from the drop down list.
-
Comment (Type supporting information that might be needed about the task you completed into the Comment column). If necessary, you can type additional information about the task in this panel.
-
-
Click Apply and return to Step 4. Otherwise, click Apply and OK.
-
If there are:
-
more entries to add later, click the Draft
 button.
The Entry Status window does not change (from Draft)
-
no more entries to add, click the Submit
 button.
The Entry Status window will change to show Submitted.

-
Close the Timesheet.