Timesheet User Settings

Timesheet User Settings Window
The Timesheet User Settings window looks like this:
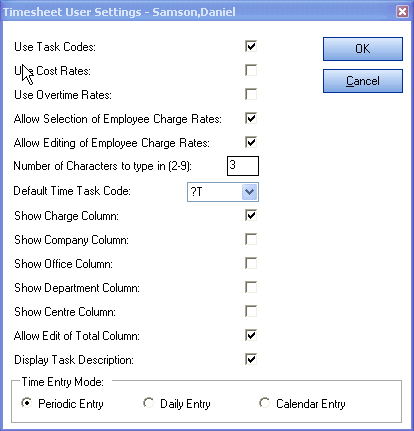
The fields in the Timesheet User Settings window are:
|
Field... |
What it does... |
|
Use Task Codes |
When selected, this setting enforces the use of task codes in timesheet entries. If this is not selected then the Task and T/C columns will be removed from the Sheets page. |
|
Use Cost Rates |
When selected, this setting allows the use of cost rates in timesheet entries. If this is not selected then the O/C column will be removed from the entry window. |
|
Use Overtime Rates |
If selected this setting allows the employee to apply overtime rates to the time being entered. If this is not selected then the O/R column will be removed from the entry window. |
|
Allow Selection of Employee Charge Rates |
This allows an employee to select from the different charge rates set up for them in their Employee page. The monetary value for each charge rate is defined for the selected employee. |
|
Allow Editing of Employee Charge Rates |
Allows the employee to use an over-ride rate, i.e. you can enter any charge rate as well as select from an existing rate. |
|
Number of Characters to type in (2 – 9) |
Enter in the number of characters (between 2 and 9) that an employee has to type before the possible options are displayed in the list box when locating the client and by name or code. |
|
Default Time Task Code |
Sets the default task code to be used for sheet entries. For example, if you selected ‘Admin’ in this list, then when the time is entered into the Timesheet window, ‘Admin’ will automatically be selected in the Task drop-down list. |
|
Show Charge Column |
If selected this setting adds the C/R column to the entry window, allowing the employee to view the total cost of the entries to the client. |
|
Show Company Column |
If selected, this setting adds the Company column to the entry window. |
|
Show Office Column |
If selected, this setting adds the Office column to the entry window. |
|
Show Department Column |
If selected, this setting adds the Department column to the entry window. |
|
Show Centre Column |
If selected, this setting adds the Centre column to the entry window. |
|
Allow Edit of Total column |
Periodic Timesheets only: If selected this setting allows the employee to edit one total time for a WIP item in the Total column rather than it being automatically calculated from the individual daily time entries. If the amount in the Total column is amended for an item, then all the individual entries that made up that total will be removed from the sheet. |
|
Display Task Description |
Tick if you want the Task column to display the full name of the selected task (for example 'Administration'). If you just want the code for the task displayed (for example ' ADM') leave this clear. |
|
Periodic Entry |
Select this radio button if you want to enter data into your time and disbursement sheets in the periodic entry mode. This means that the details are added directly into the fields in the Sheet window and all days that fall within the selected time processing period are displayed in the one sheet. Therefore each timesheet in periodic entry consists of a fixed number of days and is a ‘spreadsheet’ style view. The main advantage of using this entry mode for data entry is that you enter all details using the same window. This can be useful when you have repeated the same activity over a number of days. Once the task is entered, you only need to add the number of hours per day to each day within the time period. |
|
Daily Entry
|
Select this radio button if you want to enter data into your time and expense sheets in the daily entry mode. This means that you are required to create new time entries using the New button in the Sheet window. This opens the Timesheet Daily Time Entry window into which data is entered. However, a very useful feature available in this window is a timer that can automatically record how long you spend on a particular task. This enables you to leave the window open in the background while you work. Each timesheet in this entry mode displays one day’s entries only. Units are entered for the day or the clock may be used to time each job. It is possible to have several Timesheet Daily Time Entry windows open with clocks running simultaneously for different jobs. This method is used to enter tasks as they are being worked on throughout the day. You can use the daily view regardless of your time processing period selection. |
|
Calendar Entry |
This Time Entry Mode is only available to record time spent on tasks. You cannot record expenses in the calendar entry mode. When you select Calendar Entry you can choose to view the time period of your Timesheet in a combination of different views. The views are available from the Task Bar under View and Time scale. |