Maintaining Permanent Audit File data

Audit Automation maintains fixed record permanent file data and provides you with a filing structure within which you can access the background knowledge documents, create your own schedules and file other documents. The data maintained in the permanent file may be printed for inclusion within a physical permanent file, and merged into letters and documents using the mail-merge capabilities of the programs.
To enter or edit permanent data, select [Permanent file data] from the Documents menu.
The Permanent file data dialog will be displayed.

Permanent file data dialog
Editing the data
The system stores the documents in a file store controlled through the SQL database. This means that documents must be checked out to be edited and checked in when editing is complete.
- Check Out - Checks the selected document out and stores and editable copy in a local document store on your hard drive.
- Undo Check Out - Remove the record of you having checked out the document but does not check in any local changes. Hence if you have made changes and then undo your checkout any changes made since you checked the document out will be lost. The system does make a backup of your document in the local document store so if you do this by accident it will be possible to retrieve your work provided the backup has not been deleted during housekeeping.
- Check In - This option copies your local copy of the document back to the SQL database thereby saving any local edits you have carried out.
Status icons
When a document is checked out, the system displays the following icon to the left of the name of the document:
 Indicates document checked out
When a checked out document is highlighted, the system also indicates the local path where the document is stored together with the name of the document in the button bar:

There are a number of standard document which are defined in the system such as the points forward and general planning memorandums. If these have not yet been created, this is indicated by the following icon:
 Indicates document not yet created
Once one of these documents has been created, by opening it, the icon will change to the icon which indicated that a new document created but not yet checked in:
 Indicates document created but not yet checked in.
This icon will also appear by documents that have been created using Add until such time as they are checked in.
If you open a document that has not been checked out, for example by double clicking on it, you will be asked if you wish to check it out for editing:
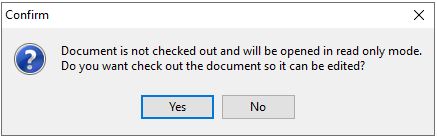
If you answer Yes, the document will be checked out and opened for edit. If you answer No it will not be checked out and will be opened in read only mode. In read only mode the document will either not be editable, or in the case of Word will accept your edits but it will not allow you to save the changes.
To edit the fixed data, click on the associated button in the left panel.

The system will respond as set out below.
Standing data
The Standing data dialog will be displayed.

Standing data dialog
In this dialog you may record:
* The date of incorporation
* The accounting reference date
* The trading name
* The company name
* The principal activity
You may edit any of the data displayed and then click on [OK] to save your amendments. If, however, you decide that you do not wish to save your changes, click on [Abort] and they will be discarded.
Addresses
The Addresses list will be displayed.
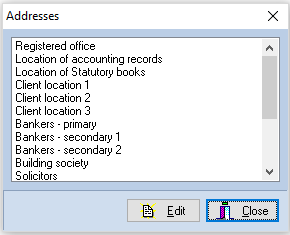
Addresses list
The list includes all the addresses that can be recorded by the system, and may be scrolled using the scroll bar. To enter or edit an address, either double click on the address name, or highlight it and click on [Edit]. The Details dialog will be displayed allowing you to enter or edit the information recorded.
The following addresses may be recorded in the system:
* Registered office
* Location of accounting records
* Location of statutory books
* Three client locations.
* Primary bankers and two secondary bankers
* Building society
* Solicitors
* Insurance brokers
* Pension advisors
* Software suppliers
* Main tax office
* PAYE office
* VAT office
The following information is recorded in respect of each address:
Name - up to 30 characters
* Four lines of address - up to 30 characters
* Contact name - up to 30 characters
* Reference - up to 25 characters
* Telephone number - up to 25 characters
* Fax number - up to 25 characters
* Free text notes
Make any changes required and click on [Save] to record them. If you decide that you do not wish to save your changes, click on [Abort] and the system will discard the revised information.
All of the information, apart from the notes, is available to merge into letters and memos, see page 260.
Shareholders, Directors, Key staff and Other contacts
These all operate in the same way. On selecting one of these, a list will be displayed containing the names of the existing records. To add a record, click on [Add], to edit a record either double click on it, or highlight it and click on [Edit], and to delete a record, highlight it and click on [Delete].
Adding a record
On selecting [Add], the Record dialog will be displayed.

Record dialog
The system will allocate sequential numbers to records, and you can enter the following information in respect of each record:
Name - up to 30 characters
Telephone - up to 25 characters
Fax - up to 25 characters
Ordinary shares - brought forward and movement for the period
Preference shares - brought forward and movement
Free text notes
When you have finished the entry, click on [Save] and the record will be stored and added to the list. You may now add another record, or carry out one of the other functions.
Editing a record
On selecting this option, the Record dialog will be displayed showing the current information stored in respect of the record. You are free to edit any of the information shown at any time. On completion, click on [Save] to save your changes and return to the list. Alternatively, if you decide that you do not wish to save your changes, click on [Abort] and they will be discarded.
Deleting an entry
On selecting this option, the system will ask you to confirm that you wish to delete the record before carrying out your instructions.
Balance forward
As explained on click here, when the client is balanced forward at the end of the year, the movement figures will be added to the brought forward data, and the movement for the following year set to zero.
Background information and Key business processes
These two buttons are shown at the foot of the left panel. These provide direct access to the list of Background information and the list of Key business processes.
Background knowledge and other documents
When the Permanent file data dialog is first accessed, the predefined background knowledge documents will be held in the Business environment, System notes and Planning documents folders. These textual documents are called:
• Nature of business
• Industry, goals, etc.
• Key operating facts
• Laws and regulations
• Computer systems
• Accounting systems
• Notes
• Points forward
• General planning memo
On selecting one of the text documents for edit, the system will look to see if the document exists for the client and, if it does, load it for edit. If no document exists for the client, the system will look to see if there is a default document stored in the master pack and load that. If no default is loaded, it will present a blank document for edit. In all cases the document will be presented in Word or the Internal Word Processor for you to enter/edit it. Refer to click here for information on how to use the Internal Word Processor.
The default may be used to present standard headings of information that the user can follow when entering data. The master packs contain templates for all text documents.
The Completion documents folder holds a link to the Opinion summary, which will either be a textual document or a list of notes. The other folders will be empty, indicated by their names being shown in grey.
Double click on a folder to open it and display its contents. The pop-up menu also provides an option to open all folders. To view and edit a document, either double click on it or highlight it and click on [Edit]. You may add new documents to a folder by highlighting the folder name and clicking on [Add]. This will cause the Client document dialog to be displayed, from which you can create a blank document, use a template, import or scan a document as required. Refer to Click here for details on how to do this. You may also drag and drop files onto the Permanent file data dialog.
If a document has been added in error, you may delete it by selecting it and clicking on [Delete].
A colour coding system is used to provide information about the documents listed. Any document that was present on a balance forward and has not been accessed during the current year’s audit will be shown in the outstanding colour (default red). This is to alert you to the fact that this document has not been reviewed since the balance forward. Once the document has been loaded it will be shown in the standard list colour from then on. Internal documents, such as the general planning memo, law and regulations, etc, will be shown in grey if no document has yet been created for the item, red if it has not been accessed in the current year and blue once it has been accessed.
User defined folders
It is possible to customize the structure of the permanent file by adding user definable folders to the permanent file. To access this, point to file area and press the right mouse button. A menu will appear on which 3 of the options are:
o Add a new folder
o Edit folder name
o Delete folder
Adding a new folder
Select Add a new folder and you will be invited to enter the folder’s name:

Enter the name and click on [OK] and it will be appended to the list of folders.
Editing the name of a folder
Select the folder, click on the right mouse button and select Edit folder name. The above dialog will appear with the name of the folder displayed for edit.
Deleting a folder
You may delete an empty folder by selecting it, pressing the right mouse button and selecting Delete folder. If the folder is empty, it will be removed, if it is not a message will be displayed advising you that the folder may not be deleted.
Any folders created here that contain documents will also appear on the Client documents dialog.
Moving a file in the permanent file
You may move documents to another permanent file folder if you have stored it in the wrong place. To do this, select the document to be moved, click on the right mouse button and select Move to another folder. The following dialog will be displayed to allow you to select the folder in which the document should be filed:

Either double click on the folder to be used, or select it and click on [OK]. As you are aware, the system allows you to use the same reference in more than one folder. Hence, it will first check that there is not another document with the same reference in the folder before completing your instruction. If there is a document with the reference it will advise you of this and leave the document in the original folder. You may then use the change document reference facility to change the reference of one of the documents before carrying out the move.
Copying documents between the permanent and current audit file
The facility exists to allow you to copy documents from the permanent file to the current audit file and vice versa.
From permanent file to current audit file
To access this option, display the permanent file, select the document in the index and click the right mouse button. Select Copy to current audit file and the following dialog will be displayed:
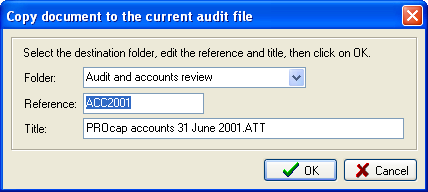
Select the folder in which you would like to store the document, enter the reference to be allocated to it and change the title, if required. Click on [OK] and the document will be copied.
Print permanent file data
A [Print] button is provided on the Permanent file data dialog to enable you to view or print the information held. Separate schedules are produced for the 12 sections and you may select any or all of these reports to be viewed or printed.
On selecting the [Print] button, the Print selection dialog will be displayed:
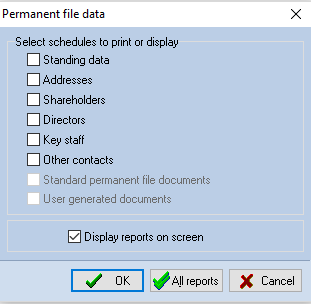
Print selection dialog
The dialog contains a Display reports on screen check box. If this box is unchecked, reports will be directed to the printer. If the box is checked, reports will be compiled for viewing on the screen, see page 56 for a description of viewing reports. The state of the check box is toggled by clicking on it, or on the narrative. It is not possible to select the memorandum or user generated documents for display on the screen.
When the dialog is first displayed, none of the schedules will be selected for printing. You may select a schedule, by clicking on its name, and the box by the name will be marked to indicate that it has been selected. To remove a schedule from the list of items to be printed, click on it again.
Select the reports to be displayed or printed and click on [OK]. If the reports are to be printed, the system will display the standard Windows Print dialog for you to change printer or printer options if you wish. Please refer to your Windows manual if you are unsure how to operate the dialog. If you have directed the reports to the display, they will be compiled and presented on the screen.
To select all reports, click on [All reports], and the system will ask you to confirm your request before proceeding to print or display the reports.
Ability to re-link a document
In the event that the system loses its link to a checked out document, the user would then be unable to check the document back into the file. You can, however, re-link the document to the file. From the Documents > User created documents area, there is an option when the right click menu is opened called Re-link document:

This routine will update the link of the document with the new computer name. It will only work for the user that checked out the original document and if the document is found in the checked out document path.

When the document has been re-linked successfully it can then be checked back file.