Internal Word Processor

The Internal Word Processor is the integrated word processor. When your system is set to use the internal word processor as your default text editing program. It is used at various points within the programs to allow the entry of textual information, letters and memos. When you select a memo to edit, for example the general planning memo, the system will load the Internal Word Processor and present the memo for edit. It is also possible to access the Internal Word Processor as a free-standing word processor from Edit other client documents from the Documents menu of the Pack window.
Whenever you create a document within Audit Automation the system names the document for you, stores it in the client data directory, or the document directory beneath it, and adds the document to the audit area index and the Client dialog. You do not have to specifically save the document at any time as the system will ask you if you wish it saved when you close the word processing window. However, there are options to open and save files on the File menu and also on the toolbar and you can use these to save a document elsewhere if you wish to use it outside Audit Automation.
Introduction
The Internal Word Processor is a basic word processor providing standard word processing functions and the ability to work with rich text files (RTF) a Windows standard word processing file format.
The following are the main features of the program:
* Text search facilities with both find and find and replace.
* Standard block facilities to cut, copy, paste or delete - also available from the pop up menu.
* Character formatting - use any font available to your Windows system with variable point size, style (normal, bold, italic, underline and strike out), superscript and subscript.
* Paragraph formatting with variable line spacing, indents, alignment (left, right, centred and justified) and gaps between paragraphs.
* Paragraph borders
* Basic tables
* Graphics
* Page settings allowing user definable page size and margins.
* Toolbar providing icons for the most commonly used functions.
* Button bar providing immediate access to fonts, attributes, alignment and tab settings.
* Ruler showing positioning and tab settings.
* Undo
* Spell checking
Creating a new internal word processor document
Once the Internal Word Processor has been opened you can use it as a free-standing word processor to create and edit other files that are stored outside Audit Automation. To create a new document, click on File | New. The system will create an Untitled document in memory and present the Edit document window for you to type your text. If you already have a document loaded, and you have made changes to it, the system will first ask you if you would like to save the current file.
When you have finished typing your document it may be printed or saved using the appropriate icon, or the menu options. You may then either close the Internal Word Processor using the File and Close option from the menu bar, or the [Close] ico on the toolbar, load another document or create a new document as required.
Opening a file
Once the Internal Word Processor has been opened you can use it as a free-standing word processor to create and edit other files that are stored outside Audit Automation. To open an existing file, click on File | Open, or click on the first icon on the toolbar. The standard Windows Open file dialog will be displayed and will default to the General RTF file type, which has an extension of .RTF. Use the standard features provided in this dialog to change drives, directories and select the file that you wish to open. If you do not know how to use the open file dialog refer to your Windows manual.
Pressing [Cancel] will close the dialog box without loading a file, whereas double clicking on a file name, or highlighting a file name and clicking on [OK] will cause the document to be loaded and displayed for editing or printing.
Whenever a document is loaded and offered for edit, the Internal Word Processor displays the name of the document in the title bar.
After you have finished with the document, it may be saved using the Save or Save as options from the File menu, or clicking on the floppy disk icon on the toolbar.
The edit window
When you have created a new document, opened an RTF file, or opened an existing Internal Word Processor file, it will be loaded and offered for edit within the Edit document window.

The Edit document window
The Menu
As the word processing window is part of the MDI, the menu options relating to it will be merged with the main application menu when the window is active. From this you will appreciate that you can have any number of documents open for edit at the same time. The menus that appear when you are word processing are shown before the main application menus and are as follows:
File
New - Create a new document
Open file - load an existing file for edit
Save - Save the current document under the same file name
Save as - Save the current document under a new file name
Save as text macro - save the current document for loading as a text macro
Insert merge field - insert a mail merge code at the current insertion point
Insert a hyperlink – insert a hyperlink at the current insertion point
Insert text macro – insert a text macro at the current insertion point
Insert table - insert a fixed column width table at the current insertion point
Insert graphic - insert a graphic at the current insertion point
Print - Print the current document
Print set-up - Change the printer or the printer options
Close - Close this Internal Word Processor window
Edit
Undo – Undo the last action
Cut - Delete any highlighted text and place a copy on the clipboard
Copy - Copy any highlighted text to the clipboard
Paste - Copy the contents of the clipboard to the current insertion point position
Delete - Delete any highlighted text
Lower case - Convert highlighted text to lower case
Upper case - Convert highlighted text to upper case
Select all - Highlight the whole document
Find - Find a string
Replace - Replace a string with another
Spell check whole document - Carry out a spell check on the document
Spell check from cursor – Carry out a spell check from the cursor position
Format
Character - Change the font attributes for any highlighted text or for text to be inserted at the insertion point position.
Tabs – Edit the tab positions using a dialog
Bullets – Put the text into bullet points with icons, letters or numbers
Paragraph - Change the attributes of the paragraph in which the insertion point is positioned.
Paragraph border - Change the style and sides on which borders are shown
Page - Change the page layout
Bold - toggle bold on and off
Italic - toggle italics on and off
Underline - toggle underline on and off
Insert mode - Toggle insert mode on and off.
Show control characters - Show spaces and line end characters.
Auto spell check
The Toolbar

The toolbar contains 21 icons which provide single click access to the following functions:

Clicking on the appropriate icon carries out the same procedure as selecting the item from the menu.
Button Bar
The button bar provides quick access to formatting options. It is divided into 2 main sections:

As you move through the document, the formatting status of the area at the insertion point will be reflected in the button bar. The font name, size and attribute will be shown, together with the text alignment.
The button bar may be used to change the formatting status, either of new text to be typed in or of any text that has been highlighted.
Ruler
The ruler is used to display and set tab stops and indents.

Pressing the right mouse button when the pointer is on the ruler produces a pop-up menu containing options to select the tab type and access paragraph and page formatting. You may also change the type of tab to be inserted by clicking on the tab icon to the left of the ruler.
Status Bar
The status bar displays information about the document and editing modes showing the current page and line number of the insertion point position. It also indicates if the document has been modified since it was loaded or last saved, if insert or overwrite mode is active and the path where the document is stored.

Pop Up Menu
The edit window also contains a right-click pop up menu to allow quick access to cut, copy, paste or delete text, insert a field or text macro and save the document as a text macro.
Saving a document
You do not have to run the save option for documents that you have created using Audit Automation, you will be asked if you wish them to be saved when you close the word processing window. However, you can save them at any time using the Save option from the File menu.
When you save a document the Internal Word Processor will take one of two actions, as follows:
Saving a document created with new
If the document was created using the New option from the File menu, the Internal Word Processor will not have a name recorded for the document. It will therefore display a Save as dialog box so that you can type a name for the document. For information about using the save as dialog box, refer to your Windows documentation.
Naming a document in Windows
In the Internal Word Processor you can use long file names. We recommend that you retain the standard file extension of either RTF as this is the extension which the Internal Word Processor will look for when it tries to retrieve the Internal Word Processor files using the Open option. You can use any character for the file name, except those prohibited by the Windows operating system.
Saving an existing document
In other circumstances, where the document was opened for edit using Open from the File menu or loaded via Audit Automation, the Internal Word Processor will already have a file name recorded for the document. In this case clicking on Save will cause the Internal Word Processor to save the file under the same file name and optionally create a backup of the document as it existed before the current run, storing the backup in a file with the same name and an extension of .BAK.
Saving a file under a different name
If you have loaded a file using Open from the File menu or via Audit Automation and you would like to save it under a different file name, this is achieved by using the Save As option from the File menu.
Clicking on this option will cause the Internal Word Processor to open the save as dialog box so that you may type a new name for the document. If you type the name of a file which already exists, the Internal Word Processor will assume that you wish to over write the file and proceed with the save.
Printing the document
Changing printer and print options
To change the printer to which printing is directed, click on File | Print Setup. The Windows print setup dialog box will appear and you may select the printer from the drop-down list which will appear when you click on the [Down arrow] button at the right of the printer name.
You may change the orientation of print by clicking on the Portrait or Landscape radio buttons and the paper size and source by selecting from the drop-down list.
Clicking on the [Properties...] button will display the print options which are relevant to the selected printer. For more information about these refer to your printer manual.
Once you have selected the printer to which you wish the printout directed, click on [OK] and the system will return to the document. If you do not wish to action the changes you have made, click on [Cancel] and the system will return to the document without changing the installed printer.
Printing the document
To print the active document, select File | Print from the menu bar.
The standard Windows print dialog box will appear and will default to printing one copy of all pages. The printer which will be used can be changed using the drop-down list and the print settings varied using the [Properties] button.
You may edit the number of copies to be printed and select whether multiple copies are to be collated into sets or printed a page at a time.
For more information on how to use the print dialog box, please refer to your Windows manual.
Once you are happy with your selections, clicking on [OK] will cause the Internal Word Processor to print the document, whereas clicking on [Cancel] will close the dialog box and return to the document without carrying out any printing.
While the system is printing it will display a dialog box showing the progress being made. You may abort the process at any time by clicking on the [Abort] button and the system will abort printing after the current page has been completed.
Typing and revising text
When you create or load a document, the Internal Word Processor will default to insert mode so that any text you type will be inserted at the insertion point. The Internal Word Processor automatically wraps text to the next line as you type, and you indicate that you have reached the end of a paragraph by pressing <Enter>. The Internal Word Processor inserts a non- printing character called a paragraph mark at the point where you press <Enter>.
Page breaks
You may insert a hard page break by pressing <Ctrl>+<Enter>. Hard page breaks are shown as a line of dashes on the screen.
The system will generate soft page breaks when you reach the end of a physical page and this is shown on the screen as a line of dots.
Scrolling
You can use the vertical and horizontal scroll bars to move quickly to a different part of your document. Point to the scroll arrow and hold down the mouse button to scroll in the direction of the arrow. This causes the Internal Word Processor to scroll a line, or character, at a time through the document until you reach the end.
To move more quickly through the document, you may click on the scroll bar itself below the scroll box to move down one screen at a time, or above the scroll box to move up one screen at a time. Finally, you may drag the scroll box up and down the scroll bar to move to a specific location in a document.
The horizontal scroll bar can also be used in the same way.
Moving the insertion point
You may move the insertion point by positioning the I-Beam mouse pointer to the desired position and clicking on the left mouse button. Alternatively, you may move the insertion point using the keyboard, as follows:

Selecting text
Before you can cut, copy, delete or format text you must select text to be affected, known as highlighting a block. You can use the mouse or keyboard to select the text, as follows:
Using the mouse
Position the I-Beam mouse pointer to the start of the text to be highlighted and hold down the left mouse button. Continue to hold down the button and move the I-beam pointer to the end of the text to be highlighted. As you move the pointer, the text will be shown in inverse video, and if you move the pointer outside the bounds of the current window it will scroll in the direction moved. When you have highlighted the desired text, release the mouse button and the text will remain highlighted. You are now free to select the edit or format option which you wish to apply to the selected text.
If you simply wish to highlight an individual word, position the I-beam pointer anywhere within the word and double click the left mouse button. To highlight a line, position the I-beam mouse pointer anywhere within the line and click on the left mouse button three times.
Selecting text using the keyboard
To select text using the keyboard, position the insertion pointer at the beginning of the text to include, hold down the <Left Shift> key and move the insertion pointer using the standard movement keys outlined above. As you move the insertion pointer, the text will be highlighted and will remain highlighted once the <Shift> key is released so that you can carry out the appropriate action.
Selecting the whole document
It is possible to highlight the whole of the document by selecting edit and Select All from the Edit menu.
Deleting text
You may delete text as follows:
Single characters
To delete individual characters, either position the insertion pointer after the character to be removed and press the <Back space> key, or position the insertion pointer before the character to be removed and press <Delete>.
Deleting a block of text
To delete a block of text, highlight the text, as described above, and either press the <Delete> key or select Delete from the Edit menu.
Copying text
To copy text to the clipboard, highlight the text using the features outlined above and click on the copy icon. Alternatively, you may highlight the text and click on Copy from the Edit menu, or click on the right mouse button and select Copy from the pop up menu.
Delete text and copy it to the clipboard
You may delete text from the document and copy it to the clipboard by highlighting the text and selecting the cut text icon, or Cut from the Edit or pop up menu.
Pasting text from the clipboard
To insert text from the clipboard into the current document, position the insertion pointer at the point where you wish the text to appear and click on the paste icon, or select Paste from the Edit or the pop up menu.
You can use copy, cut and paste to copy text within the same document or across documents where you have more than one document open.
Undo
The system now maintains a history of the changes you make to text and you can undo your changes on a last in first out basis.
Table formatting
There are 4 format toolbar buttons to assist with using tables. They allow you to select the current row, insert a row, delete a row and select the current column.
Finding and replacing
You can use the Find... command on the Edit menu to search for text and use the Replace... command to search and replace text. Icons are also provided for these functions.
Finding text in a document
Select Find... from the Edit menu and the Find dialog box will be displayed. Enter the text you wish to find and click on [Find Next]. By default, the system will search down the document from the insertion point and look for the text you have entered, seeking an exact match of the text as it has been typed. If you wish to search backwards from the insertion point you should select the Up radio button within the Direction group, and if you do not wish case to be taken into account, you should uncheck the Match case check box.
If a match is found, the system will move to the text in the document and highlight it. If it is not the occurrence you are looking for, you may click on [Find Next] to search for the next occurrence of the text, however, if it is the text you are looking for, you may click on [Cancel] to close the find dialog box. If no match is found, the insertion point will remain unchanged and the Find dialog box will remain on the screen allowing you to change the text to be searched for.
Replacing text
To replace text, select Replace... from the Edit menu and the Replace dialog box will be displayed. Enter the text to be searched for and that with which it is to be replaced, and click on [Find next]. The first occurrence of the text to be searched for will be highlighted. If you wish to replace that occurrence, click on [Replace] and the Internal Word Processor will make the change and then search for the next occurrence of the text, pausing on that text allowing you to select [Replace] if you wish it to be replaced. If you do not wish to replace an occurrence of the text, click on [Find next] and the Internal Word Processor will proceed to search for the next occurrence of the text without replacing that highlighted.
If you wish to replace all occurrences of the text, click on [Replace all] and the Internal Word Processor will search through the document replacing each occurrence as found. The document will scroll up the screen as this happens and, when all occurrences have been replaced, the system will return to the replace dialog box. To close the replace dialog box, click on [Cancel].
Formatting text
Options are available to allow you to format characters, paragraphs and the document as a whole.
Characters are letters, numerals, symbols, punctuation marks and spaces. To change the appearance of existing characters, select the text that you wish to change and, either change the format using the button bar, or select Format followed by Character... from the menu bar.
To change the formatting of a paragraph, place the insertion pointer anywhere within the paragraph and either select the alignment option desired from the button bar or select Format followed by Paragraph, or Paragraph border from the menu bar.
To change the format of the document, click on Format followed by Page... from the menu bar.
Text formatting
If you wish to select the format for new text to be entered, first place the insertion pointer at the point where the text is to be typed and then select the format as set out below. If, however, you wish to change the formatting of existing text, first highlight the text to be affected by the change and then select the format as set out below.
You can change character formatting from the button bar, or from the Format menu.
Using the button bar
To select a font, click on the font box in the button bar and a drop-down list will be displayed showing the fonts which are installed on your system. You may scroll up and down the list using the scroll bar, and select the font to be applied by clicking on its name. The drop-down list will disappear and the name of the selected font will appear in the font box.
To select the point size to be applied, either click on the font size box and type the point size to be used, or click on the down arrow button to the right of the font size box and select the point size from the drop-down list.
To change the colour of the text, click on the colour box and a drop-down list of available colours will be displayed. Select a colour from the list using the mouse.
To apply or remove bold, italic or underline, super and sub script, click on the appropriate button to the right of the colour box. When the attribute is applied the button is depressed and when it is not applied it is raised. You may click on the [Normal] button to cancel the style selections.
Using the font dialog box
All of the features available from the button bar, together with a few others, are available from the font dialog box. To open this dialog, click on Format and then Character... from the menu bar. The dialog box will be opened with the current font details displayed. You may select the font, name and size from the list boxes, check the attributes to be applied within the Attribute group and vary the position within the Position group. For more information on using the font dialog box, please refer to your Windows manual.
Once you have selected the settings required, click on [OK] and the new settings will be applied. Clicking on [Cancel] will return to the document without changing the current settings.
Alignment
The four text alignment options are available from the button bar with the four buttons next to the Underline button representing left, right, centred and justified text.
You may change the alignment of the paragraph within which the insertion pointer is currently positioned by clicking on the appropriate button.
Using the paragraph dialog box
Further paragraph formatting options are available within the paragraph format dialog box, which is displayed by selecting Format | Paragraph from the menu bar.
Indents
| First indent | the number of units by which the first line will be indented. This item may be a negative figure to allow the first line to be off set to the left. |
| Left indent | the number of units by which the left-hand side of the paragraph will be indented from the left margin. |
| Right indent | the number of units by which the right-hand side of the paragraph will be indented from the right margin. |
Indents can also be set using the ruler, see the next section on tab settings for details on how to do this. Units can be set to inches, cm or Twips using the drop-down list.
Toolbar buttons are available to allow the setting of a hanging indent and increase/decrease the left margin for a paragraph.
Spacing
| Space before | the number of units of space to leave before printing the current paragraph. |
| Space after | the number of units of gap to leave at the end of the paragraph. |
| Line height | the number of units to use for a fixed height line. If this field is left at zero the line height will be determined by the font and point size in use. |
After selecting the appropriate options, clicking on [OK] will cause the system to apply the options to the current paragraph, whereas clicking on [Cancel] will return you to the document without changing the current settings.
Page formatting
The page settings dialog box is displayed by selecting Format followed by Page... from the menu bar, and allows you to change the height and width of the page together with the margins to be left at the top, bottom, left, right and side of the page.
Default page settings
You can set the default page settings that are used as the standards for new documents via File [Control] Internal WP page settings from the Pack window. On selecting this option, a dialog is displayed that allows you to set the height and width of the page together with the margins to be left at the top, bottom, left, right and side of the page. All new documents created after these settings have been entered will be created with the information entered.
As described earlier, the tab settings for the current paragraph are shown in the ruler displayed at the top of the document. There are four tab types available:
| Left aligned | text will be left aligned to the tab position |
| Right aligned | text will be right aligned to the character position |
| Decimal | used to align numbers around a decimal point |
| Centred | text will be displayed centred around the tab position. |
Using the ruler, you may insert, remove or move tabs, change the left, right and first line indents.
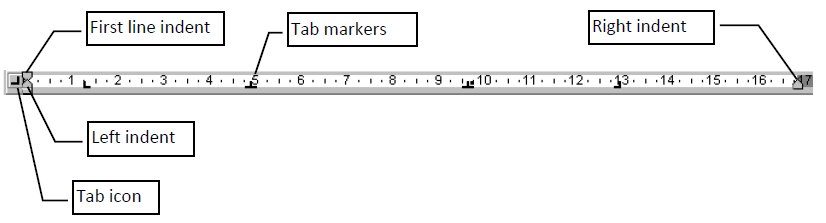
Change left indent
To change the left indent, position the mouse pointer over the lower pointer displayed at the left of the ruler and hold down the left mouse button. Drag the mouse pointer left and right to change the position. When the left margin is positioned as desired, release the left mouse button and it will be set.
First line indent
To change the amount by which the first line is indented, position the mouse pointer over the top pointer at the left of the ruler, hold down the left mouse button, and drag the mouse left or right to the new position desired. When you have moved the triangle to the new position release the left mouse button to fix it.
Both indents
To move both the left and first line indents together, position the mouse over the box under the lower pointer and drag the mouse left or right to the new position desired.
Right indent
The right indent is moved by positioning the mouse pointer over the pointer displayed to the right of the ruler, holding down the left mouse button and dragging the mouse left or right as desired to the new position. Releasing the left mouse button will activate the new setting.
Tabs
To insert a new tab, display the ruler pop-up menu, select the type of tab to be inserted, position the mouse pointer at the insertion point on the ruler and press the left mouse button. A new tab marker will appear. You may also cycle through the available tab types by clicking on the tab icon to the left of the ruler.
To remove a tab, position the mouse pointer over the tab marker and click the left mouse button. The only exception to this is if you have selected the cycle option from the pop-up menu. In this case clicking on an existing tab marker will cause it to change to the next tab type in the list.
You may also view and edit the tab positions for the current line from the Tab dialog displayed by selecting Format | Tabs.

Tabs dialog
You may insert a new tab by entering its position, selecting the tab type and clicking on [Insert]. Tabs can be deleted by highlighting them in the list and clicking on [Delete]. The default tab stop is set at each specified position after the last tab set in the line, or across the whole line if no tab stops are set.
Paragraph borders
You may define the type of border to be used for any paragraph, the colour, style, width and gap from the text, and select the sides of the paragraph to which it should be applied.
To define a border, place the insertion point in the paragraph to be affected and select Format | Paragraph borders. The Borders and Shading dialog will appear.

Paragraph borders dialog
Select the border style using the check boxes and drop-down lists, and the gap from the text. Then select the Draw box check box to surround the paragraph. The  option will place lines around the box. You may also select or deselect a line for each edge of the paragraph by clicking on the appropriate line icon.
Merger fields
To insert merge codes, position the insertion point where the text is to appear and select File | Insert merge field from the menu. Alternatively, you may click on the [Insert fields] button on the toolbar, or click on the right mouse button to display the pop up menu and select Insert field therefrom.
Whichever method is used the Code selector dialog will be displayed.
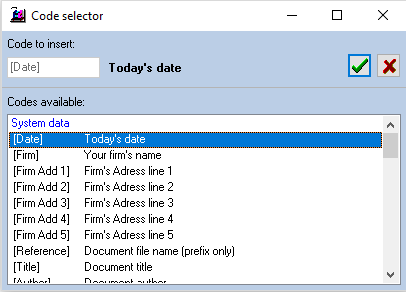
Code selector dialog
To select a code, scroll through the list using the vertical scroll bar until the code appears and click on it with the left mouse button. As you do this the code will appear in the Code to insert field and the name of the code will also be presented. To return the code to the selected position in the document, click on the [Tick] button or double click on the line containing the code in the list. If you wish to close the Code selector dialog without returning a code, click on the [Cross] button.
Where you select one of the reference codes, for example the primary bank, the information needs to know which data field you wish to insert. This is identified by an "*" appearing as the last character of the code in the Code selector dialog. It will therefore present the Transaction category dialog for you to select the field to use.

Transaction category dialog
Merge codes appear as a red “#” followed by the code name in square brackets. You can not edit the contents of the merge field. If you try, the system will display a message advising you of this fact, however, you can highlight the whole of the merge field including the # and the closing square bracket and delete it using the <Delete> key.
Hyperlinks
Hyperlinks to other working papers can be inserted in a document. At the point where you wish the hyperlink to appear, click on the [Insert a hyperlink] button and a standard Windows style Open File dialog will appear for you to choose which file to link to. Browse and select the file and click on [Open]. This will then give you a new dialog box to enter your narrative for the link to be attached to.

Enter the narrative and click on [OK]. The reference will appear in the document with a blue underline and the mouse pointer will change to the drill down pointer when you move over it. Double clicking on the reference will take you to that document.
Cross references are entered in the same way as for annotations on lead schedules or scanned documents. If the cross reference is prefixed with a section reference and a full stop, this specifies a document within the specified section. If no prefix is entered, it represents a reference to another document in the same section as the document being edited.
Text macros
Text macros are RTF files that have been saved in the MACRO_ directory for the data path with a file extension of .MAC. These files normally are used to hold standard paragraphs of text and the formatting thereof, and can be inserted into the current document at the insertion point position.
Creating a text macro
To create a text macro, launch the Internal Word Processor and enter the text of the macro to be stored. For example, a standard paragraph to include on an invoice for a special service provided. Select File | Save as text macro and the standard Windows save as dialog will be displayed with the MACRO_ directory selected and a default file extension of MAC. Enter a meaningful name for the file, up to 8 characters, and click on [OK]. The text will be saved and can now be loaded as a text macro.
Using a text macro
To load a macro, position the insertion point where you would like the text to appear and select File | Insert text macro. The standard Windows file open dialog will be displayed with the MACRO_ directory selected and a default file extension of MAC. Select the macro to insert and click on [OK].
Tables
The system supports fixed column width tables and cell borders. To insert a table, select File | Insert table and the Table insert dialog will appear.

Select the number of columns and rows to insert by dragging the blue cell right and down. If you do not wish to have borders around each cell click on the [Border] button to raise it and then on the [Tick] to insert the table. Even if you do not wish to have borders in the final document we recommend that you initially insert the table with borders so that you can easily identify the position of each cell and then remove the borders with the paragraph borders option.
Toolbar buttons are available to allow you to select the current row, insert a row, delete a row and select the current column.
Graphics
You may insert bitmaps and Windows meta file graphics and size these to fit your document.
To insert a graphic, select File | Insert graphic and the Insert picture dialog will appear.

Insert picture dialog
You may use the drive, directory and file lists to find a graphic to insert and as you click on graphic files in the file list a preview of the graphic will appear. If the Stretch to fit check box is ticked the whole graphic will be displayed, otherwise you will only see as much as can fit in the preview box. When you have found the graphic to insert click on [OK] and it will be placed in the document at the current insertion point.
Changing the size of the image
You may resize the image by highlighting it, just as you would highlight text, pointing the mouse to the little square that will appear in the bottom right corner of the image and dragging it to the new size. As you point to the drag box the pointer changes to a double headed arrow.
Word processor - spell checker
There are 3 aids to checking your typing, the first is to have typing errors highlighted as you are typing the document, the second is to run a spell check on the whole document and the third is to run a spell check from the cursor position.
The two spell check buttons on the toolbar run checks on the document, the first to check from the cursor position and the second to check the whole document. These are also available from the Edit menu. These operate as described on click here.
Auto spell checking provides “as you type” spell checking. This option will be turned on when you install Audit Automation, and will result in all words not found in the dictionary being underlined in red. As you type, words not found will be underlined and if you correct your typing to correct a word, the underline will disappear as soon as the word becomes known.
Placing the cursor on an unknown word and clicking on the right mouse button, will result in the pop up menu showing a list of up to 10 suggested replacement words and an option to add the word to the dictionary, if it is correct. To replace the word, simply click on the correct suggestion. To add the word to the dictionary, click on the option and it will be added without a confirmation prompt.
An option is present on the Format menu, called Auto spell check. If this item is ticked, then spell check as you type is on. Clicking on the menu item toggles the option on and off. If it is off when you load a document, turning it on will result in the immediate checking and underlining of all words not found. Toggling it off will immediately stop check as you type spell checking, but words that are already marked will not be cleared until the document is closed.
Word processor - document locking
The system flags any document that you open in the internal word processor as read only. This means that if you have created a document, or have opened a document on your terminal, anyone else who opens the same document will only be able to view it in read only mode. They will not be able to edit the document, or save it. As soon as you close the document, it is released for editing on other terminals.
Attaching risks and controls to audit areas where assertions are not defined
Some audit areas are defined in the master pack with no assertions associated with them, e.g. the final review section. To overcome this, for these areas where no assertions are defined, the system will list all assertions by displaying the Area and associations affected by… dialog. This will allow you to associate the risk or control with the area and with any assertion, by clicking on any relevant assertion checkboxes on the list then clicking on [OK]. All assertions will be added provided the area/associations are not already associated with the risk or control.
