Working Papers and Client Documents

CCH Audit Automation has an internal Word Processor that is used at various points within the programs to allow the entry of textual information, letters, memos and working papers. The system also allows you to use OLE links to Microsoft® Word at any point where the internal word processor is called, Excel and external program associations for the purpose of creating audit working papers.
CCH Audit automation textual documents and memorandums
An option is included on the System settings dialog that allows the System Manager to set whether CCH Audit Automation will use the internal word processor or Word for the standard textual documents that are available from the menus of the program. Details of how to access this dialog are contained in the System Manager's Manual. If the option is set, each time that you load a textual document from a menu, for example, the Points Forward memorandum, CCH Audit Automation will launch MS Word and display the document within that program. If the option is not set then the internal word processor will be launched with the document ready for edit.
User created documents and working papers
It is possible to create working papers and other documents using CCH Audit Automation and it will automate the indexing, naming and filing of these. As you create documents, the system creates links to it from the completion and index dialogs. It is therefore possible to attach a document to an audit test or checklist item and at the same time cross-reference the entry to the document and create it. It is also possible to create a document and enter it in the index for the audit area but not attach it to an audit programme or checklist, or simply create a document for a client that is not cross referenced from any other part of the audit pack.
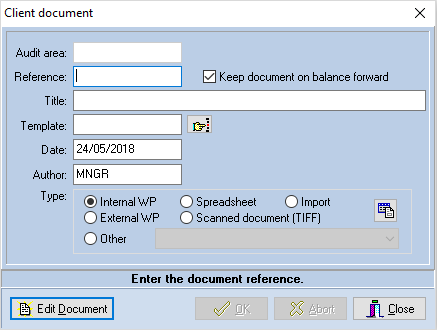
Whatever route is taken to create a document the system will display the Client Document dialog. The various points at which you can enter references to documents and create them are described later in this manual, but the main ones that you will use regularly are, from the working paper index (audit completion section under Fieldwork heading), the Audit test completion dialog (audit completion section under Fieldwork heading), the Checklist notes dialog (audit completion section under Fieldwork heading) and the Client documents dialog (User created documents section below).
You can also import documents into the audit file either through the Client document dialog or using drag and drop onto any of the dialogs where documents are listed.
Client document dialog
In this dialog you enter a reference and title for the document, select a template (if it is to be based on a template), and click on [Document] to load the relevant program to create and edit the document. Templates are covered on click here from which you will see that they contain merge codes that the system will replace with data appropriate to the client before presenting the document for edit.
To select a template, click in the Template edit box and, if it is currently empty, the Template dialog will be displayed.
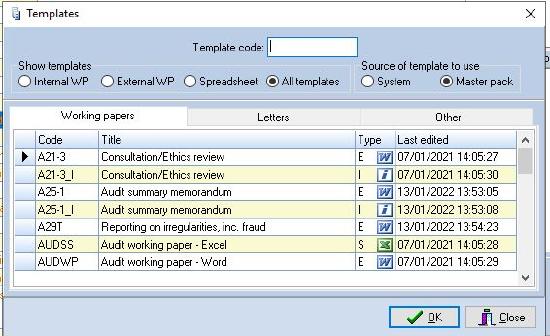
Templates dialog
This is a tabbed dialog which contains all the templates that are available to you. The three tabs are provided to allow the lists to be broken down into more manageable sections and to make it easier to find the template that you are after. When the dialog is first displayed the Working papers tab will be selected, to select one of the lists click on the tab name. Each entry is shown with an icon identifying the type of document (see below). You can restrict the contents of the list to documents of a specific type by selecting one of the radio buttons in the Show template group. You can also jump to a template in the list displayed by typing the first few letters of its code in the Template code edit box.
When the Template dialog is first displayed, the templates stored with the master pack are shown. As described in Document Templates section below, it is also possible to create your own set of templates that are pack independent and, if you have created some standard templates for your firm, you can display these by selecting the System radio button in the Source of template to use group.
Select a template by double clicking on its name, or by highlighting it and clicking on [OK] and the dialog will clear and the code will be returned to the Template edit box.
It is possible to retain documents that you create from one year to the next. If you tick the checkbox Keep document on balance forward the document will not be deleted. If this checkbox is not ticked the document will be removed when the client is balanced forward.
You do not have to base documents on templates, you can start off with a totally blank document and the Client document dialog also contains radio buttons to allow you to identify the type of document being created in these situations. To create a blank document, do not select a template code but select the radio button representing the type of document to create:
| Internal WP External WP Spreadsheet Other Scanned document Import |
Internal word processor document MS Word document MS Excel document A document based on one of the program associations Scan a document Import a file created by any other program |
If you select Other, the drop-down list will be populated and will show the first program association. If this is the type of document you wish to create, you can leave this showing. If, however, you wish to use one of the other program associations, click on the drop-down button and select the program to be used.
On selecting the [Document] button the system will ask you to confirm that you wish to proceed without using a template and then, if you have chosen one of the first three types listed above, the appropriate program will be loaded and you will be presented with a blank document. If you selected Scanned document, the system will proceed as set out in the next section.
For Other and Import, the system will proceed as follows:
Other
You will first be asked if you wish to load an existing file. If you indicate that you do the File Open dialog will be presented to allow you to select the file to load. This can be loaded from any directory, should be of a type that the associated program will recognise, and will be copied to the file name allocated by Audit Automation and stored in the Document directory. If you indicate that you do not want to load a file, the blank file defined in the association will be used to create a new file for the program and it will be displayed using the defined program for edit.
Import
The Windows file open dialog will be presented to allow you to find and select the file to import. Highlight the file and click on [Open]. The system will copy the file to the CCH Audit Automation document directory, and give it a file name based on the audit area and reference, thereby providing a name in line with the standard CCH Audit Automation naming convention. It is important to appreciate that CCH Audit Automation stores a copy of the document and any edits that you make to it from within CCH Audit Automation will only change the copy and will not affect the original file.
Icons
At any point in the program where the system shows a cross reference to a document, it will show the reference you have allocated to it and an icon to indicate that there is a stored document and the type of document. The icons used are as follows:
 |
Internal word processor document |
 |
MS Word document |
 |
MS Excel document |
 |
Scanned document |
For imported files, or for files created using program associations, CCH Audit Automation will identify the document title using the icon of the associated program and allow you to open the file. For imported files, you will be able to open them from within CCH Audit Automation providing an association is present within your Windows system i.e., if you can open the file by double clicking on it within Windows Explorer.
Double clicking on an entry by which one of these icons is displayed will allow you to drill down to the document.
Document filing - Support for Drag and Drop
In addition to being able to import files as set out above, CCH Audit Automation also provides drag and drop support for files. You may drag files from Windows Explorer and drop them on a folder in any of the dialogs that present documents in a tree view i.e. the Audit Document Completion dialog, the Client documents dialog and the Permanent file data dialog. On doing this, the system will ask you to enter a reference and title for the file with the following dialog:
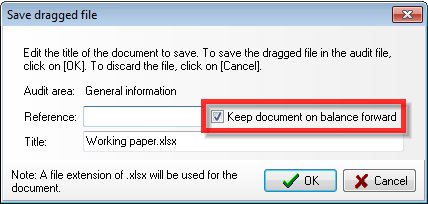
The dialog shows that folder in the destination dialog on which the document was dropped and the title will default to the name of the file dragged. Enter a reference, change the title to that which you require and select to keep the document on balance forward, and click on [OK]. If you selected more than one file for the drag, the dialog will appear once for each file.
In addition to filing documents in unknown formats, you may also file MS Word and MS Excel files using the import or drag and drop techniques. Documents filed in this way will show the standard MS Word and MS Excel icons as identification, rather than the CCH Audit Automation icons used for MS Word and MS Excel files created via CCH Audit Automation.
Useful Information! Excel documents should now open in the same instance allowing formulas' linked to other spreadsheets to open correctly.
Change working paper reference
The system allows you to change the working paper reference allocated to documents that you create. This is accessed from the pop-up menu, displayed by pressing the right mouse button while pointing to the tree view of documents in the following dialogs:
• Audit document completion
• Client documents
• Permanent file data
To change a reference, highlight the working paper, press the right mouse button and select Change working paper reference and the Change W.P. reference dialog will appear.
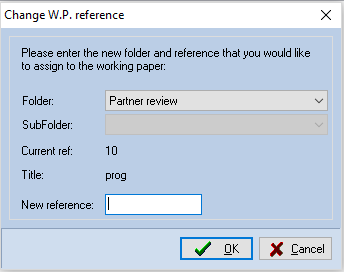
The dialog shows you the current reference and the title of the document, and invites you to enter the new reference. Enter the reference and click on [OK]. If the reference entered is already in use, the system will advise you of this and wait until you select one that is available.
Note: you cannot change the audit area, just the reference within the area, so do not include an area letter in the reference you enter.
On changing the reference, the system will change the index, current or permanent file structure and any cross references in audit programmes and checklists. It will also change any cross references in annotations on lead schedules, however, due to the structure of the data it is not possible to change any cross references on scanned documents, these will have to be edited manually.
Note: you must not have the working paper open at the time that you change the reference as CCH Audit Automation will not be able to change the name of the file and the request will therefore fail.
Scanning documents
It is also possible to scan documents and attach them as working papers to tests and checklists, or simply place them as documents in the index for the audit area. Once scanned, comments can be added and any print of the document includes a heading, any comments entered and the image of the document itself.
Scanning documents is covered here.