Editing the Group Header

Useful Information! A Group Header is the feature that inserts headings for any or all groups within a report.
In other words, if you choose to group data by the office name, the group header can display each office name as a header above that data as it appears within the report.
Another way of saying this is that the group header appears in a report whenever the group header value changes.
Using Group Headers
When you add a field to the grouping bar in the Change Report window, CCH Smart Reports automatically creates a group header, with the data field attached to it.
By default, the group header is titled, for example, 'ghClientOffice'. It also inserts the 'ClientOffice' field into the header area, and attaches a text label that identifies it as Client Office.
When you add data to the report, the name of the client office appears before each set of data for that office.
You can make any changes to the properties of the group header in the Report Designer window if you want. For example, you could bold the heading, or reposition it if the default does not suit your purposes. It is often easier to add grouping fields in the Change Report window and then adjust them as necessary in the Report Designer window.
Edit the Group Header
-
Open the report containing the group header you want to edit.
-
Click the Edit in designer button,
 to open the Report Designer page.
 -
Position the cursor over the right side of the text box in the group header area; the cursor changes to a double ended arrow.
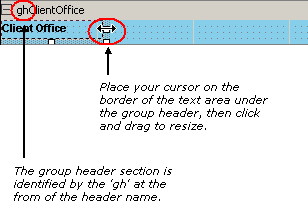
4. Click and drag the sizing handle to the full width of the page.
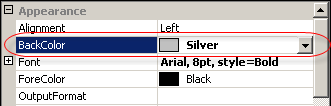
5. In the Property area, in the BackColor field, click the list button and choose a background colour from the options.
6. Close the Report Designer page to save the layout of the report.
Note: The group header does not contain any other information in your report, so by maximising its size, you can minimise the text wrapping.
Note: You will often find that you have to resize the Property area in order to view the drop down button or the Ellipsis button. Click the left-hand border of the Property area, the cursor changes to a double sided arrow and you can drag the border to resize as you want.