CCH KPI Monitoring : EventPaks

EventPaks
EventPaks are collections of KPI Monitoring events and may include triggers, events, reports, charts, and web service APIs. By building an EventPak you can “pack up” event-related data and send that data to another person or organization.
EventPaks have three primary uses:
- To package custom events to share with other people or organizations
- To move events from one system to another, or move events from a “testing” environment to “production”.
- To send events that you need help with to your business partner or KPI Monitoring
The Contents of an EventPak
Eventpaks contain event data that is associated with one or more applications within KPI Monitoring. In most cases, you will create EventPaks that contain ALL of the triggers, events, reports, charts, scripts or web service calls for one or more applications in KPI Monitoring. You can, however, create EventPaks with only one or two objects within them.
To do this, you would:
- Create a new application in KPI Monitoring called (for example) “Transfer EventPak”. This will store the objects that you wish to put into your EventPak.
- Copy-and-paste the desired triggers, events, et cetera from the application in which they currently reside to the application you just created.
- Build your EventPak, including only those objects from the “Transfer EventPak” application.
Accessing EventPak Functions
Eventpak functions are located within the Event Designer option.
Vendor Identification
You have the option to brand an EventPak with your identification, so as to allow the recipients of the EventPak to know from whom they came and whom to contact for assistance. To enter your vendor identification, follow these steps:
Within the Event Designer, click on “EventPak” and then on the “Vendor Identification” option:
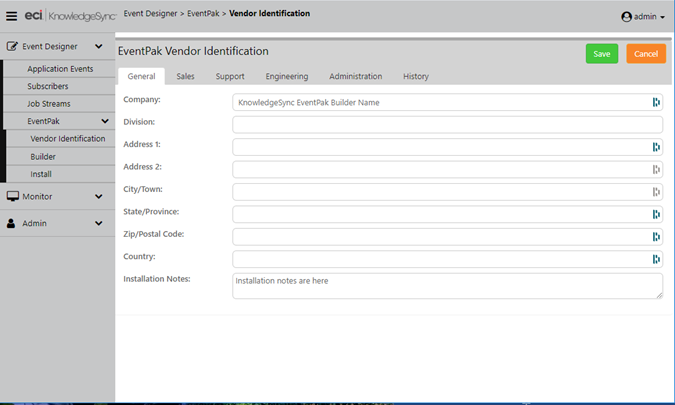
EVENTPAK VENDOR IDENTIFICATION
Fill in as many of these tabs as appropriate; the “General” tab lets you specify overall name and address information (along with notes about installing the EventPak), and the other tabs allow you to specify contact information for the various departments of your organization. When finished entering this information, click on “Save”.
Building an EventPak
To build an EventPak, follow these steps:
- From the Event Designer option, select “EventPak” and then the “Builder”option:
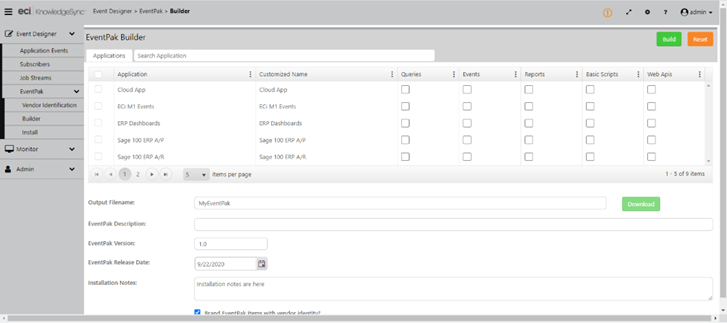
EVENTPAK “BUILDER” WINDOW
Note: that it’s best to display this option in full-window mode, or else some components on the window might not be readily visible.
2. The grid at the top of the EventPak Builder window displays a list of all of the applications that are currently defined in KPI Monitoring.
3. Place a checkmark in the “Include” box for any applications whose queries, events, reports, VB scripts and web APIs you wish to include.
4. For each application you select, place a checkmark in the columns that indicate which elements of event data you wish to include in the EventPak. You may choose from queries, events, reports, VB scripts and web APIs.
Once you have selected the applications, fill in the following fields:
- The name and location of the EventPak output file. Eventpaks require a file suffix of “.epk”.
- The description of the EventPak.
- The EventPak version number. This is very useful if you create updates to an EventPak, as it allows a recipient to tell the versions apart.
- The date that the EventPak was created/released.
- The EventPak’s installation notes. This will be displayed when a recipient prepares to install an EventPak.
Whether to “brand” an EventPak with the “vendor identification” details you have entered. Vendor information will appear in the “Help” menu under the heading “About EventPak Vendor.”
Click on the “Build” button to create your EventPak. (Eventpak files tend to be quite small and are ideal for distributing via email.)
Installing an EventPak
To install an EventPak, follow these steps:
- Under the Event Designer, select “Eventpak” and then “Install”. You will be prompted to “Choose File” – the name and location of the EventPak you wish to install.
- Once you have selected the eventpak and have clicked on the blue “Upload” button, you will see the following window:
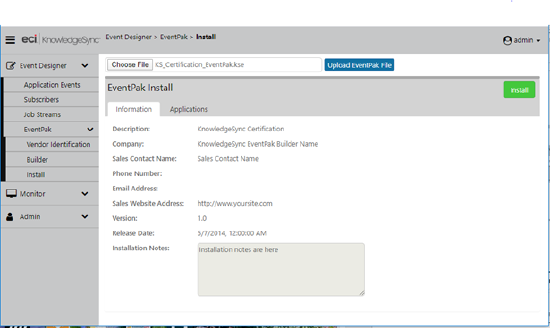
EVENTPAK INSTALLATION WINDOW
The “Information” tab contains information about the EventPak, who created it, when it was created, and any specific installation notes.
The “Applications” tab shows you (and lets you choose from) a list of the applications that are included in the EventPak. The column titled “Destination Type” controls how and where the EventPak will be installed:
o Install it as a new application in KPI Monitoring.
o Add its data to an existing application in KPI Monitoring
Note: KPI Monitoring will not overwrite existing queries or events but will prompt you regarding duplicate report definitions, web service APIs, and VB scripts.
(If you add the contents of an EventPak to an application that already has triggers, reports, or events of that name, you will end up with two objects with the same name.)
3. Click on the “Install” button when you are ready to install the EventPak.
Note! After installing the EventPak, go into the “Properties” option for that EventPak and specify the connection settings.
Eventpaks omit “connection” details (such as the Data Provider); thus, after you install an EventPak you must specify the connection data.