CCH KPI Monitoring : Event Designing

Event Designing
An event checks to see if certain conditions exist and (if so), the event executes one or more “deliverables”, such as sending alerts, generating and delivering forms, documents, and reports, and executing workflow actions, such as updating applications, calling web services, and so on.
How an Event Works
Most KPI Monitoring events run on a schedule, such as hourly, daily, weekly, or every ‘x’ minutes. An event may be configured without any “triggers” so that it always runs on its schedule (such as a weekly newsletter), or an event may use one or more triggers to determine if certain conditions exist, and (if so) execute the corresponding deliverables. (An event may also be triggered by the receipt of incoming email.)
The deliverables that an event can execute may include the sending of alerts, the generation and delivery of reports, and the execution of workflow, which can include application updates and web service calls.
Event Triggers
- Triggers enable an event to determine whether specific conditions have been met. Triggers fall into one of three categories:
- Database queries (.NET data provider, ODBC & OLE/DB)
- Web API (via a REST API web service)
- Visual Basic script
- Triggers are used to identify conditions within application databases, incoming e-mail messages, websites, and the operating system.
A single query may be used in one or more events. For example, a trigger designed to retrieve orders of more than ‘x’ dollars could include be used in one event looking at orders over $100 and a second event looking at orders over $500.
Event Alerts
Each event may have its own alert message content. An event’s message content may include data from the corresponding conditions that have caused the event to trigger.
- KPI Monitoring’s alert delivery methods include:
- SMS (text message)
- Web browser (aka “dashboard alerts”)
- Copy / FTP / SFTP
Event Files, Forms, Reports & Charts
As part of the message content, an event may generate and deliver forms and documents (such as invoices or statements), the contents of files (such as Excel and PDF files) the contents of one or more reports (Crystal & SSRS), and graphic displays (pie charts & bar charts).
Event Actions (Workflow)
- An event can execute workflow actions to:
- Add or update application database records
- Move data from one application to another
- Push or retrieve information from websites
- Trigger site-specific programs or procedures
Event Subscribers
The recipients of an event’s alerts are referred to as subscribers. Each event may send alerts to individual subscribers, to groups of subscribers, and/or to one or more computers designated for delivery.
Additionally, events may be configured to notify one or more people who are “related” to the triggering condition (e.g., notify the technician to whom a service call is assigned).
Event Schedule
KPI Monitoring events are “scheduled” to periodically (and automatically) check to see if the corresponding conditions have been met.
Each event has its own schedule; very time-sensitive events may have a very frequent schedule (e.g., every five minutes), whereas less time-sensitive events may be checked on a less frequent basis (e.g., daily, weekly, monthly).
Checked vs. Triggered
A “checked” event indicates that KPI Monitoring has successfully run the event. The conditions may have proven true, or they may not. An event that is “triggered” is one that has been checked and whose conditions have proven true.
Monitoring the Status of Events
The KPI Monitoring Monitor tracks the status of the event’s execution:
- Events that are pending submission
- Events that have been checked but not triggered
- Events that have been triggered
- Events with errors and have failed to run successfully
If an event errors because of an error in its configuration, the event goes into a “pending” state and will be automatically re-queued for submission. This means that you can modify the event (or its query) and KPI Monitoring will automatically re-run the event and use the modified version of it.
Note: The Monitor includes details and audit tracking of all an event’s deliverables – its alerts, generated forms, documents, and reports, and executed event workflow (e.g., adding or updating records in application databases).
An Event without a Query
Consider the following scenarios:
- Every Monday at 8:45 AM you want to remind managers to attend the 9:00 AM staff meeting
- Daily at 5:00 PM you want to transfer an “orders” file to a database server
These scenarios are examples of events without a query; they are scheduled to run on a re-occurring basis.
Before you Design Events
Make sure you have done the following:
- Reviewed query design
- Added yourself as a subscriber
Defined your email sending account (in the Admin component of KS)
Accessing Event Design
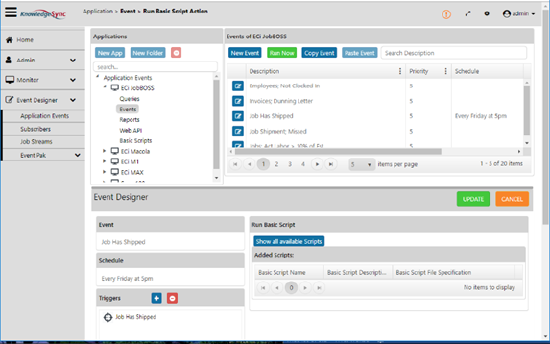
Log into KPI Monitoring, click on the Application Events branch, expand the application you wish to work with, and then click on the “Events” branch.
The following window opens:
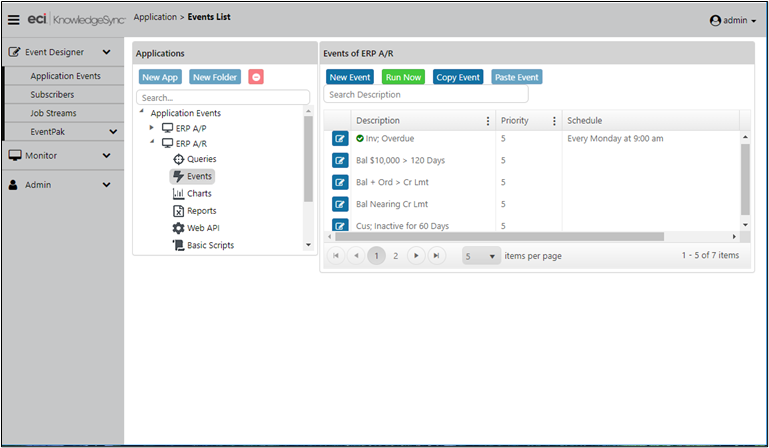
Event Listing for an Application
Create, View, Edit, Delete, Copy or Run an Event
- To create an event, click on the New Event button.
- To view or edit an event or its components click on the blue edit button to the left of the event name.
- Use the red minus sign at the far-right of an event to delete it.
- Use the Copy Event and Paste Event buttons to make a copy of an event. (And don’t forget to change the name/description of the copied event!)
If you wish to run an event once, right now, highlight the desired event and then click on the green Run Now button.
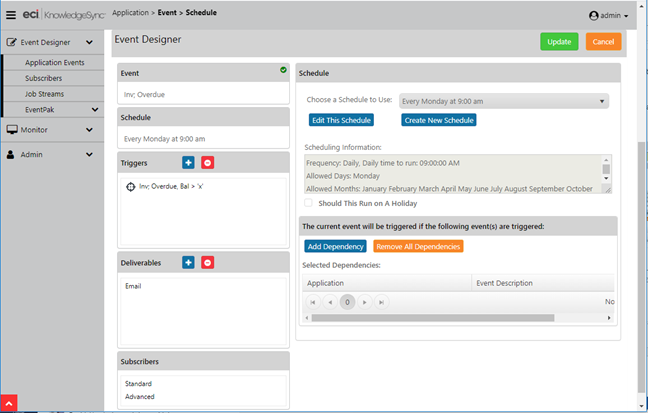
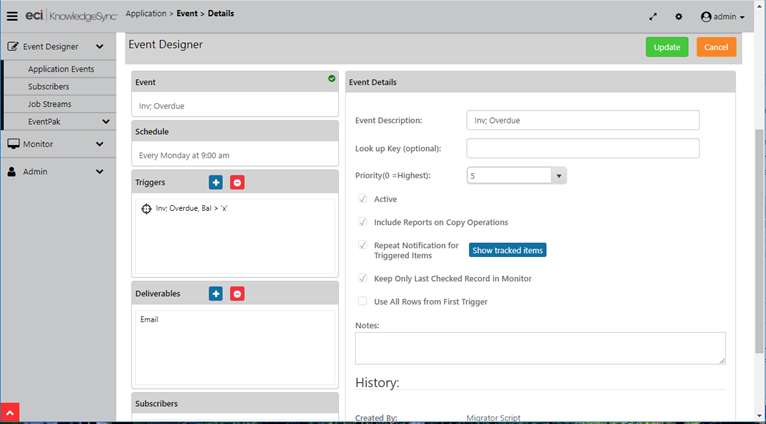
An Event's Components
When you create a new event (or open an existing one), you’ll see five sections on the left side of the event configuration window:
Event: The name and general settings of the event.
Schedule: How often the event is to run (check for its conditions and trigger its responses).
Triggers: The conditions that cause an event to execute its alerts and other response actions.
Deliverables: The alerts, reports, charts, and files associated with the event, the manner in which that content will be delivered, and the workflow actions that will be executed when the event’s conditions are met.
Subscribers: The users, groups, and/or computers that will receive alert content.
These components are identified by the shaded headings on the left-side of the following window:
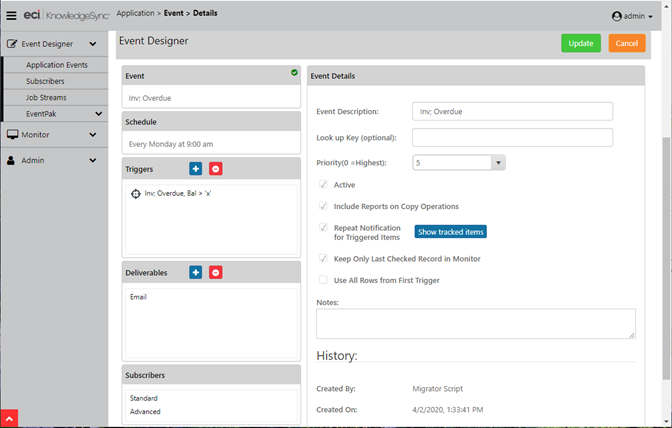
The 5 Components of An Event (on the left)
Event Summary
When you create a new event (or open an existing event), you’ll see the “Event Details” displayed on the right-side of your window as shown in the previous illustration. The event details window contains the following information:
- Event Description: Use a standard naming convention, such as “Subject; Condition”, as in “Accounts; Overdue”.
- Lookup Key: Leave blank, unless an event’s execution is to be “called” from an external application. (See “Utilities” chapter for details.)
- Priority: The order in which events with identical schedules (e.g., daily at 9 AM) will be submitted. Higher priorities (‘0’ being the highest) will be submitted first.
- Active: Whether an event is eligible to be scheduled (run) by KPI Monitoring.
- Include Reports on Copy Operations: If the event includes any reports (Crystal or SSRS) or charts, this option lets you control whether those reports and charts will be eligible to be “copied” (or ftp'd) to the recipients’ preferred location.
- Repeat notification for triggered items: Whether this event will repeat alerts for a record that meets this event’s criteria. See following section for details.
- Keep only last checked record in Monitor: Whether to retain the history of every time the event has run, or retain the history of only the last time the event was run.
Useful Information! KPI Monitoring keeps the history of every time the event has been triggered – that is, whenever the event’s conditions were met. The suggested setting for this field is checked on.
- Use All Rows from First Trigger: This pertains only to events with multiple triggers and allows you to specify that only the first trigger returns all records that meet the event’s criteria, as opposed to all triggers cumulatively retrieving all matching records. The default setting for this field is checked ON. See the next section for further details.
- Get All Results: All data from multiple triggers are retrieved. KS returns all results from all rows from all triggers.
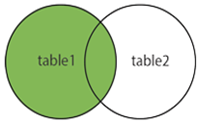
Multiple Event Triggers
If you have multiple triggers, KPI Monitoring uses the results from the first trigger as the master table for the event. Results from the subsequent triggers are treated like an SQL “inner join” or “left join” based on your “Use All Rows from First Trigger” selection. KPI Monitoring will not add rows to the table in subsequent triggers, only modify and/or remove them.
|
Use All Rows from First Trigger |
Example: Two triggers are required to get customer data. |
||||||||||||||||||||
|
Checked
Behaves like a “left join”: |
First trigger gets the customer list:
Second trigger gets the “Last Order Shipment Status” for each customer:
Three rows are processed even though only one “Last Order Shipment Status” was returned. |
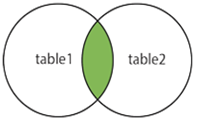
||||||||||||||||||||
|
Unchecked Behaves like an “inner join”: |
First trigger gets the customer list:
Second trigger gets the “Last Order Shipment Status” for each customer:
Only one row is present since only one “Last Order Shipment Status” was returned. |
Repeat Notification for Triggered Items
Consider an event that runs every hour, such as a “low stock alert”. Let’s say that an item in inventory causes this event to trigger at 9 AM. This item may still meet the event’s conditions when the event runs again at 10 AM. You need to decide if a record that initially meets an event’s criteria (and triggers) should (if the record continues to meet the event’s criteria) “repeat” its triggering each ensuing time the event runs. This is what “repeat notification for triggered items” is asking you.
For some conditions, you might want an event to trigger repeatedly, as long as a record continues to meet an event’s criteria. For other conditions, you might want an event to trigger just once for each record that meets its criteria. Consider the following two examples:
A salesrep is notified every day about overdue activities. If an overdue activity remains open for multiple days, you want to alert the salesrep each day. (repeat notifications)
Every hour, you check for new orders and send customers an order confirmation. Once a confirmation has been sent about a particular order, you don’t want to send another confirmation about that same order. (do not repeat notifications)
- If you want an event to trigger once for a record meeting an event’s criteria, do not place a checkmark in “Repeat notification for triggered items.”
- If you want an event to trigger repeatedly about a record until that record no longer meets the event’s criteria, do place a checkmark in this field.
Note: To configure an event to not repeat notifications, the event’s trigger must have a “unique” value identified. If the trigger has no “unique” column, the event will automatically operate in “repeat” mode.
How “Triggered” Records Work
When a record is “triggered” by an event, the triggered record will appear under the “Show Tracked Items” option for an event. If, the next time the event runs, the same record no longer meets the event’s criteria, the triggered record will be automatically removed from the event.
You can manually clear triggered records for an event using the “Delete Selected Items” and the “Delete All Items” options from the “Show Tracked Items” window. (Detailed at the end of this chapter.)
Using “Repeat” in a Field-Level Change Event
If an event is checking for a “change” to the value of one or more database fields, the “Repeat notifications” option must be checked on.
Schedule
An event’s schedule controls how often the event runs; if an event has no schedule, it will read “add a schedule”. Click on an event’s schedule to see the following window:
Event “Schedule”
From this window you may select a schedule for an event, create a new schedule, or edit the configuration of an existing schedule. KPI Monitoring comes pre-configured with frequently-used schedules; you may add to or modify these. Note the following:
If you wish to test an event, give it a schedule of “none” and then use the option to “Run Now” to submit the event immediately.
The schedule called “When email arrives” is for use only with events that are monitoring the content of incoming email messages.
If an event needs to execute in real-time, use a database trigger instead of scheduling the event for periodic submission.
For scheduling frequencies that are not available via the scheduling options, use the event’s query to restrict when the event can run. For example, to run an event on “the first Monday of a month”, use a schedule of “every Monday” and then use your query to check for a “day number” that falls between one and seven.
Creating/Editing a Schedule
When you create or edit a schedule, you’ll see a window like the following:
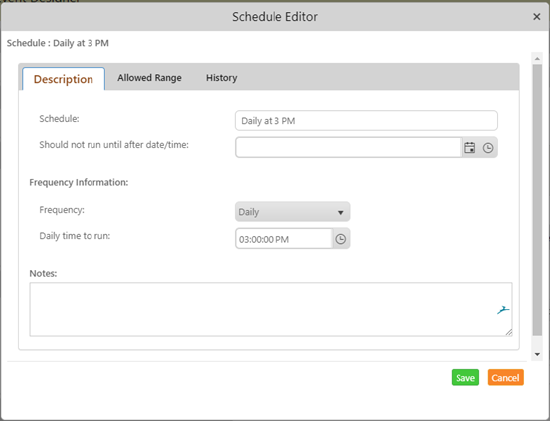
Schedule Definition Window
The definitions of schedules vary based on their frequency, but in general you’ll have the following fields to fill out:
- Schedule. Type in a description of the schedule (e.g., “Everyday at 3 PM”)
- Should not run until. Enter a date in the future when events using this schedule will begin to be submitted. Leave blank if this schedule is to be activated immediately.
- Frequency. Choose from:
o Every ‘n’ minutes
o Hourly
o Daily
o Weekly
o Monthly
o Annually
o When email arrives
o None (used only for events that have no schedule)
Based on the chosen frequency enter the additional scheduling details, such as the time of day to run, the day of the week, et cetera. When creating or editing a schedule, you may click on the “Allowed Range” tab. Specify the months of the year, the days of the week, and the hours of the day when this schedule is eligible to run events. Times are inclusive.

Schedule “Allowed Range”
Should run on holiday. Check if you do want an event to run on a holiday (holidays are defined in the Administrator module).
Event Dependencies
Dependencies let you define scenarios where event ‘x’ is automatically – and immediately – submitted by KPI Monitoring if one or more other events have been triggered. For example:
- If event ‘a’ is triggered, automatically submit event ‘d’.
- If events ‘a’ and ‘b’ are triggered, automatically submit event ‘e’.
You specify a dependency from the “dependent” (or child) event and not from the “parent” event. Thus, if you want “event ‘b’ to run if event ‘a’ is triggered”, you would go into event ‘b’, go to the Schedule tab, and make event ‘b’ dependent on event ‘a’ being triggered (having its conditions met).
Note: With event dependencies, a dependent event (‘b’) will be submitted as soon as it’s determined if event ‘a’ has been triggered, and not when event ‘a’ has finished all its processing. Thus event ‘a’ may still be running some alerts, reports, and actions at the time event ‘b’ is called.
If you need to make sure that an event has completed ALL of its processing before submitting a dependent event, please use “Job Streams” instead of event dependencies.
Triggers
An event may use 3 different kinds of triggers:
- Queries (.NET database provider, ODBC or OLE/DB). An event may use one or more queries. (See “Query Designing” chapter.) An event may also use a combination of queries and web API calls.
- Visual Basic (VB) Script. An event may use a single VB script. (See “Visual Basic Scripting” chapter.)
- Web API calls. (See “Web API” chapter.) An event may use one or more web API calls, and an event may use a combination of web API calls and one or more queries.
To add a trigger, click on the blue “Plus” sign in the “Triggers” section of an event. To view or modify a selected trigger, single-click on that trigger. (Once you select a trigger for editing, a blue “Edit” button on the right side of your window will take you into a trigger’s configuration.)
To delete a trigger, single-click on the trigger and click on the red “Minus” sign.
When you display a trigger associated with an event, a window like the following will appear:
Event Triggers (A Query)
Adding/Removing a Trigger
When you click on the blue “Plus” sign to add a trigger to an event, you’ll have the choice to add a query, a VB script, or a web API to the event.
An event that uses a VB script as a trigger cannot use any other triggers along with that script.
If you choose to add a query, you’ll be presented with a list of queries from the current application; you can choose to select a query from a different application, if you wish. If the query you select has any parameters, they will appear on the right side of your window, under “Event Trigger Parameters”.
(If you add or modify any answers to an event’s trigger parameter, be sure to click on either “Update” or “Save” to retain your work.)
If you select multiple queries for an event (or a combination of queries and web API calls), an “and” condition is automatically assumed between them. Note that you can use a combination of queries across multiple applications (e.g., one query based on data in a CRM application, and another query based on data from an ERP application).
An event that uses a query which looks for a change to a database value cannot use multiple queries.
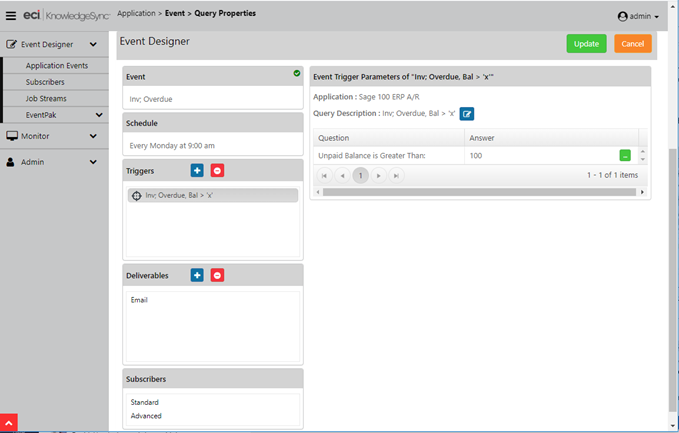
Event Trigger Parameters
A trigger may have conditions that are “parameter-driven”; those whose ‘compare value’ is specified on the event level.
When creating or editing an event, if the event uses a query (with “parameters”), a script (with “global variables”), or web API calls (with “request parameters”), those parameters will be displayed on the right-side of the event design window (under “Event Trigger Parameters”). You can type in (or select from a list, if appropriate) the “answers” to each of the parameters.
Parameters cannot be left blank (or else the event will fail to run successfully).
If an Event Trigger Parameter appears, the parameter will typically begin with a “Question” that instructs you on the type of answer required (e.g., “Please enter a beginning date range”).
Parameter Answer
Most parameters can be answered by keying in (or selecting) a specific value. You can manually type in the value, or (if available) you can choose a value from a list. KPI Monitoring is case-sensitive, so a compare value of “high” will not retrieve those records that have a value of “High”.
To select a value from a list, follow these steps:
- Click in the “Answer” field and type your answer, or;
- Click on the list button and choose from the list (which shows a list of values that have appeared in this field), or;
- Click and select any of KPI Monitoring’s date substitution variables.
Date Substitution Variables
Consider the following event:
Send an alert if there are any sales of greater than $20,000 due to close next week.
This event would use trigger parameters such as:
- Sales Due to Close Starting on?
- Sales Due to Close Ending on?
- Using “date substitution variables,” KPI Monitoring can substitute in “next week’s starting date” and “next week’s ending date” whenever the event is run. To use a date substitution variable in answer to a trigger parameter:
- Click on the list button net to the parameter’s “Answer” and review the list of “Available Values for Use” in the ensuing window. The variables are available in multiple formats; variables without any format use your system’s regional settings date format.
- Choose the value that you wish to use.
Once you select a variable as an answer, you can edit it to append specific values. For example, {%Current Date%} 23:59 means today at 11:59 PM.
Using a VB Script instead of a Query
You may use a visual basic (VB) script to monitor for conditions in databases, or even conditions within your operating system, such as:
- Low disk space, full mailboxes, or application errors
- Files that have arrived or grown too large
You first must create the VB script that will be used as a trigger; please see the chapter titled “Visual Basic Scripting” for details on the configuration of these scripts.
Once you have created a script for an event to use in this manner, select that script as a trigger for an event.
Note: An event can use only one script, and it cannot be combined with any other triggers.
Using Database Triggers
For information on how to use database triggers (such as SQL triggers) instead of a KPI Monitoring trigger, please visit the KPI Monitoring knowledgebase (at the KPI Monitoring website’s “Support” page) to download samples and instructions.
Attaching Files to an Alert
There are two ways that files can be attached to an alert:
- Via the Deliverable called “File”. This allows you to attach one or more specified files to an alert message.
- Via the variable “attachment_files” which is referenced in an event’s trigger. This variable allows a trigger to dynamically retrieve one or more files based on the results of the trigger. (See the “Query Designing” chapter for more details.)
The variable “attachment_files” may be used in all triggers – queries, VB scripts, and web API calls – to refer to one or more files that are associated with the records being retrieved. If using a query, your query must include a column with a customized name of “attachment_files”; if using a VB script or web API call, your script/call must include the response parameter or variable named “attachment_files”.
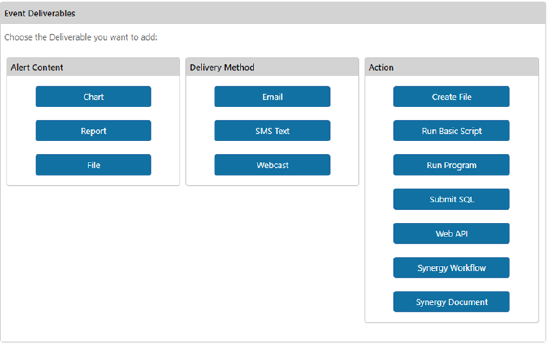
Deliverables
An event’s deliverables are divided into three groups:
- Alert Content (reports, charts, and files)
- Alert Delivery Method & Message (email, SMS text and webcast)
- Actions (create file, run VB script, run Program, submit SQL, and make a REST API call)
Monitoring the Status of Deliverables
The KPI Monitoring Monitor tracks the status of all of an event’s deliverables (alerts, reports, & workflow actions), including those actions that are pending, have been executed, and those that are in an error state.
If a deliverable fails to complete successfully because of errors, you may (depending on the deliverable) be able to: 1) correct the error within KPI Monitoring, 2) delete the erroring deliverable, or, 3) set the erroring condition to “manually completed”. KPI Monitoring will attempt to re-execute an erroring deliverable every minute.
In regards to option #1 above, the KPI Monitoring Monitor module includes an option called “Corrective Actions”. This option is available only if the logged-in user has the permission to “take corrective action on monitor screens”, in their user profile.
If users have this permissions, there will be an “Edit” button on the corresponding “Errors” tab within the Monitor. The function of this button will vary, based on the specific error being encountered.
(E.g., for email errors, you have the ability to update the email address; for file delivery errors, you have the ability to update the file delivery location.)
Alert Message Design
The method by which you design alert messages is identical regardless of the type of alert that you are sending (email, text, webcast). Thus all design options are detailed in the “Email” section of this chapter; the other delivery methods will address only the unique aspects of each.
If an event has one or more deliverables already configured, you will see them listed under “Deliverables” and you may click on any of these deliverables to view or modify them. To add a new deliverable, click on the blue “Plus” sign next to “Deliverables” and then (on the right-side of your window) select the desired deliverable.
Email Deliverable
When you create an email deliverable, you may choose whether the alert message will be in plain text (check the “Plain Text” option box) or in HTML (do not check “Plain Text”).
The plain text editor looks like the following:
Email Alert: Plain Text Editor
Whereas the HTML editor looks like the following:
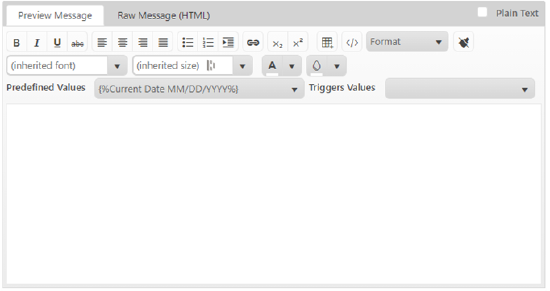
Email Alert: HTML Editor
Once in the Email deliverable, you will see the following:
Values Available for Message Content. Two scrolling windows here; the one of the left is a list of “date variables” (such as “today” & “tomorrow”), HTML commands, and “repeat” text commands. The list on the right displays all the data fields from the event’s triggers. These fields may be used anywhere in your alert message. Note that these variables are displayed in the HTML editor and (when working with plain text alerts) those variables are displayed at the top of the Email Deliverable window.
The two HTML commands should be used ONLY if you are creating a plain text alert message AND wish to have part of that message displayed in HTML format. When you use the HTML message editing window, the two HTML commands are automatically inserted around your content, so you don’t need to add them manually.
The two “repeat” commands tell KPI Monitoring to repeat the details of all (or multiple) records in a single alert message. (More on these functions in the following sections.)
Email Account to Send from. This refers to the email account (configured in the Admin option) that KPI Monitoring will send the email alerts from. Click on the list button and choose a corresponding account. An event will not be able to send an email alert if this field is left blank.
Email Reply Address. (Usable only if sending email via an Internet/SMTP method.) You have three choices for this field:
o Leave blank. The default “from” and “reply” name configured in the setup of the email sending account will be used.
o Hard-code, e. g., Tech Support <support@yourcompany.com>
o Use a database field’s value (e.g., the email address of a salesrep associated with an order). To use such a value, the database field must be one of the columns selected in the event’s trigger. (Click on the list button in this field to select from the list of values from this event’s triggers.)
The address used must be a valid email address. If not, the email alert will fail to be sent.
Message Subject. Enter the subject of the outgoing alert message. You can use any “available values” in the subject field (position your cursor in the subject and double-click on the selected value you wish to appear there). This includes date variables.
Message Text. Enter the content of the alert message; typically, a combination of hard-coded text and field values. The message text may be formatted in either plain text or HTML. If using plain text, be sure to click in the “Plain Text” checkbox.
Note: When you select the Plain Text checkbox, your message is sent as-is, even if it contains some HTML markup. KPI Monitoring will not parse the message to add any headers or metadata that might be required for the message to render.
Important Note: that KPI Monitoring’s Email server must be enabled to process if you will be sending email alerts. To view the status of (or start) the Email server, click on the Monitor menu option, select the “Activity” option and locate the “Email Server”. The status of this server is shown and you and may toggle the server “On” or “Off”.
Note: that if you go to the “Email Delivery” branch of the Monitor, you may view email alert messages that have been sent and are waiting to be sent.
Plain Text Email Design
The following is an example of a plain text email alert message:
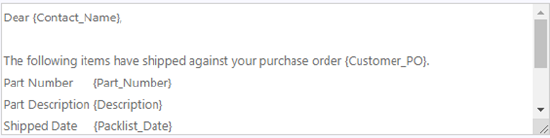
The Email Alert Message In Plain Text Format
You may select database fields for your message by positioning your cursor where you want the field to appear within your alert message and then double-click on the desired field from the list of “Available values”.
HTML Message Design
The HTML editor is available from the Email and Webcast delivery methods and is available (for email) only if you are using an Internet/SMTP mail sending account. You create your HTML content by clicking on the “Preview Message” tab and then directly entering your desired HTML content (and formatting) from within this tab.
If you prefer to directly enter (or cut-and-paste) HTML syntax for your alert message, you can click on the “Raw Message” tab and do so – and KS will automatically insert the commands {BEGIN*HTML} and {END*HTML} at the beginning and end of your raw HTML syntax once you click off of (and back onto) the “Raw Message” HTML option.
In addition to more advanced formatting (fonts, colors, etc.), the HTML editor is often used to create alerts that contain tables – an option not possible with plain text. One of the most useful HTML formatting tools is the
“create table” button: 
With this button you can insert a table of ‘x’ rows and ‘y’ columns, and then insert the corresponding column headers and data field names as shown in the following illustration:
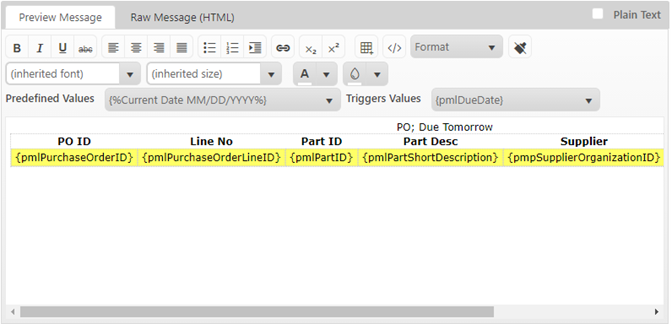
Email Alert: An Example of an HTML Table Configuration
(The yellow section indicates usage of the “begin and end repeat” functionality discussed in the following section.)
Begin and End Repeat (Aggregate Vs Non-Aggregate Events)
Every KS event is either an aggregate event or a non-aggregate event; if an event includes the commands {BEGIN*REPEAT} and {END*REPEAT}, it is an aggregate event. If an event does not make use of these commands, it is a non-aggregate event.
In a non-aggregate event, each record that meets the event’s criteria triggers an alert (via email, text, and/or webcast), each record triggers the generation of a report or chart associated with the event, and each record triggers the execution of any actions associated with the event.
In an aggregate event, all records are put into one alert; they collectively trigger a single generation of a report or chart associated with the event, they collectively trigger a single execution of any actions associated with the event.
Please review all of the following sections on the use of the {BEGIN*REPEAT} and {END*REPEAT} commands.
The commands {BEGIN*REPEAT} and {END*REPEAT} (located at the bottom of the list of date variables “available values for use in message content”) control whether an event “repeats” the details of multiple records within a single alert message. For example:
An event that generates one alert message for each record that meets the event’s criteria does not use {BEGIN*REPEAT} and {END*REPEAT}.
An event that puts the details of multiple records that meet the event’s criteria into a single alert message uses {BEGIN*REPEAT} and {END*REPEAT}.
If you have a report associated with an event that uses {BEGIN*REPEAT} and {END*REPEAT}, the report will generate once per alert message that is sent. Similarly, if you have an action associated with an event that uses {BEGIN*REPEAT} and {END*REPEAT}, the action will execute once per alert message that is sent.
If you do not use {BEGIN*REPEAT} and {END*REPEAT} in an event, the event will execute its alerts, its reports, and its actions once for each record that matches the event’s criteria.
The {BEGIN*REPEAT} and {END*REPEAT} commands can appear in one or more of the following tabs within an event: Email, SMS Text, Webcast, or Create File.
Note: that an individual event may send either one alert per triggered record, or one alert per group of triggered records; an event may NOT have some delivery methods send one alert per triggered record and other delivery methods send one alert per group of records. (You would need to configure two separate events to do this.)
Important:
Be careful when using {BEGIN*REPEAT} and {END*REPEAT} in an event, as it must not be used if an event needs to trigger its alerts, reports, or actions once for each record that matches the event’s criteria.
Repeating Text in an Alert Message
{BEGIN*REPEAT} and {END*REPEAT} let you configure an alert message to contain the details of multiple triggered records. Consider the following alert message configuration:
The following order was shipped later than the customer's required date:
Order ID: {OrderID}
Company: {CompanyName}
Required Date: {RequiredDate}
Shipped Date: {ShippedDate}
Salesperson: {FirstName} {LastName}
If you leave the message like this, KPI Monitoring will send out one alert message per triggered record (i.e., one alert per late-shipping order). But if you wanted to send out one alert message with the details of all matching records (all late-shipping orders) in it, you would use the “repeat” commands as follows:
The following orders were shipped later than the customer's required date:
{BEGIN*REPEAT}
Order ID: {OrderID}
Company: {CompanyName}
Required Date: {RequiredDate}
Shipped Date: {ShippedDate}
Salesperson: {FirstName} {LastName}
{END*REPEAT}
Advanced uses of the {BEGIN*REPEAT} and {END*REPEAT} commands are detailed later in this chapter.
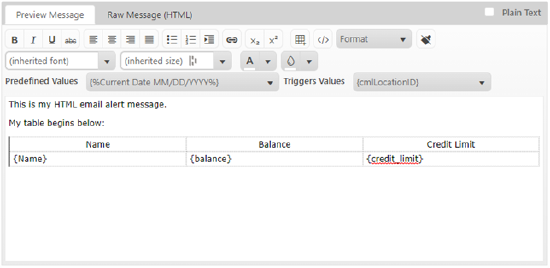
Using an HTML Table
If you are creating an HTML alert that includes a table, your HTML alert text will resemble the following (very basic) example:
HTML Table
The “raw” HTML syntax will look like this:
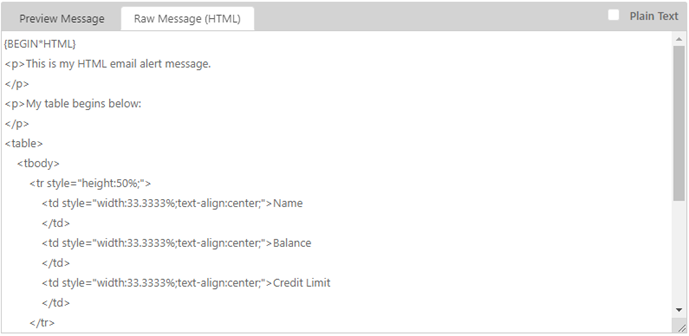
Raw HTML Syntax
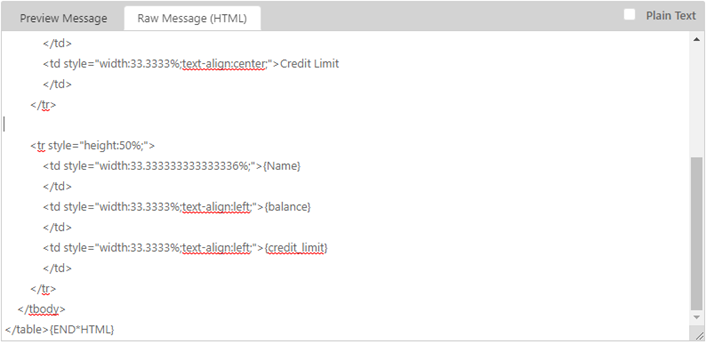
Repeating Records in an HTML Table
The {BEGIN*REPEAT} command needs to go directly after the table’s column headers, and before the table’s detail lines:
Insert a Blank Line to Accommodate {BEGIN*REPEAT}
When you double-click on the {BEGIN*REPEAT} command, the following line will be inserted into your HTML:
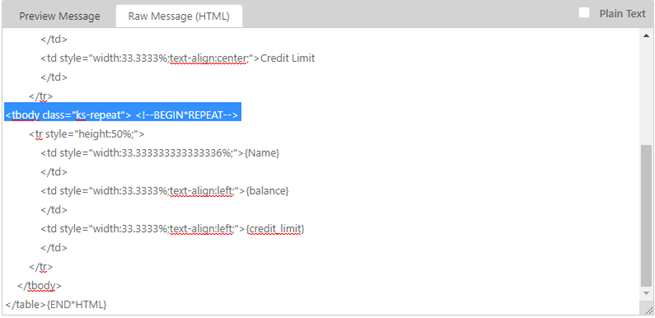
{Begin*Repeat} Inserted Into HTML Table
You’ll notice that the {BEGIN*REPEAT} command is accompanied by some additional HTML syntax; please leave this syntax as is.
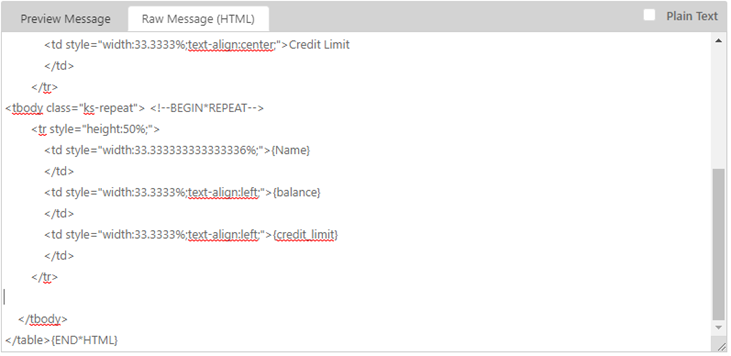
Your next step is to insert the {END*REPEAT} command; begin my inserting a blank line after all of the data fields for the table’s rows have been specified:
Insert a Blank Line to Accommodate {END*REPEAT}
When you double-click on the {END*REPEAT} command, the following line will be inserted into your HTML:
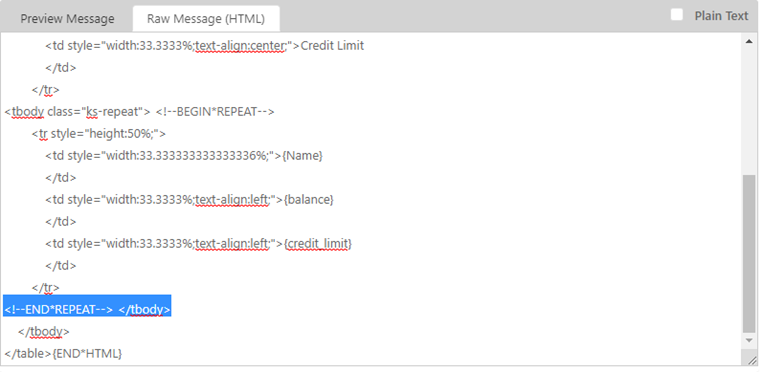
{End*Repeat} Inserted Into HTML Table
You’ll notice that the {END*REPEAT} command is accompanied by some additional HTML syntax; please leave this syntax as is.
To see what the HTML table – with “repeat” enabled – will look like, click on the “Preview Message” tab and you’ll see a display similar to the following:
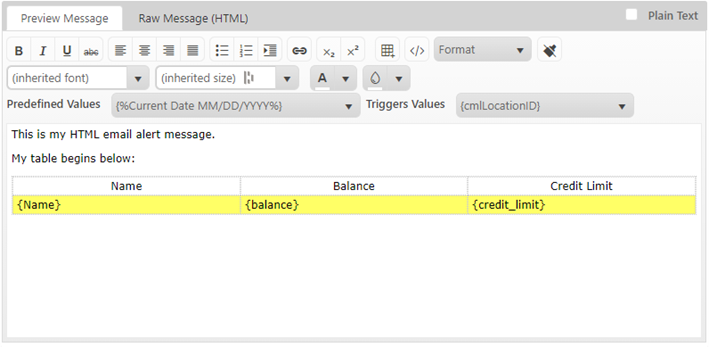
HTML Table with “Repeat” Section Highlighted
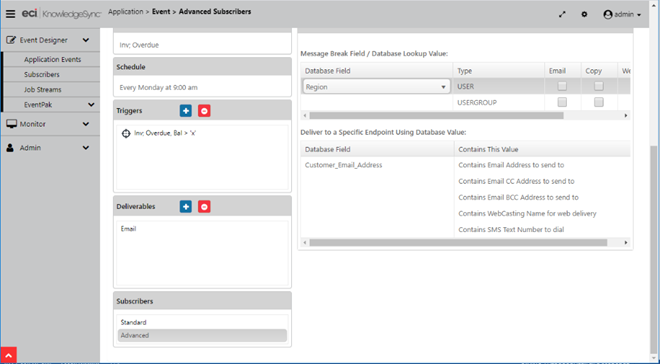
Grouping Messages (“Repeat” with a Break Field)
The {BEGIN*REPEAT} and {END*REPEAT} commands allow you to send one message that contains all matching records. There is a second “repeat” option – sending one message per “group” of matching records.
For example – if you had an event that retrieved sales orders, you might want to send your CFO one message for each region in which sales occurred; each message containing a list of all of the sales in a specific region.
This is referred to as “grouping messages” and to do so, you need to do two things: 1) “sort” the event’s trigger’s matching records so that similar records are grouped together, and, 2) tell KPI Monitoring what field it should use to indicate when it should “break” to a new message. Follow these steps:
- Edit the event’s trigger and make sure the field that you wish to sort on (e.g., the region field) is among the data being retrieved.
- Sort the trigger according to this field (e.g., sort by sales region).
- Go to the event’s alert message and include {BEGIN*REPEAT} and {END*REPEAT} in the message.
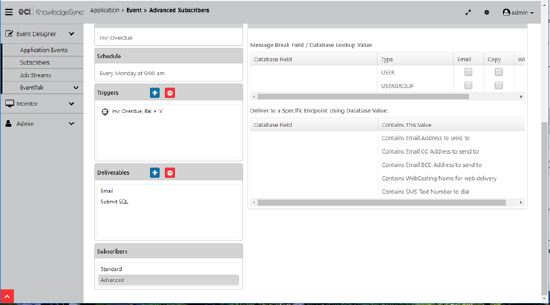
- Go to the event’s “advanced” subscribers and click in the first field in the upper grid (under “Message Break Field”). Click on the list button select your trigger’s break field (e.g., sales region). Do not select anything else in the upper grid.
When this event runs, the trigger will group matching records by region. Because of the “break field”, KS will break to a new alert message whenever the sales region changes. The configuration looks like this:
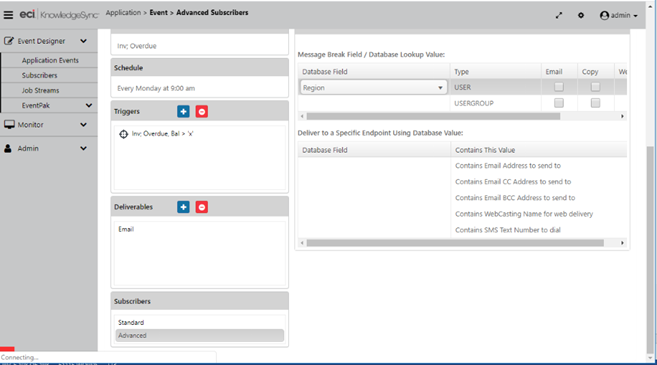
Repeat Alert with a Message Break Field
Grouping Messages by Recipient
One of the most common uses of “grouping” records is to group messages by recipient.
For example – an event that sends overdue invoices to customers. You want to send each customer one message that contains all of their overdue invoices.
When you wish to group records by recipient – and deliver those records to those recipients – you do not use the message break field in the upper part of the Subscribers à Advanced grid. Instead, you use the first field in the lower part of the Subscribers à Advanced grid (“Contains email address to send to”).
When an event uses {BEGIN*REPEAT}/{END*REPEAT} and, at the same time, has specified a value in the Subscribers à Advanced grid field titled “Contains email address to send to”, KPI Monitoring automatically breaks to a new message when the alert recipient changes.
So – here’s what you’d do to configure an event that sends each customer a single email alert containing all of their overdue invoices:
Edit the event’s trigger and make sure the field that contains the recipient’s delivery address (e.g., the customer’s email address) is among the data being retrieved by the trigger.
Sort the trigger according to the recipient’s delivery address (e.g., the customer email address).
Include {BEGIN*REPEAT} and {END*REPEAT} in the alert message.
Go to the event’s “Subscribers > Advanced” option. Click in the first field in the lower grid and click on the list button that appears there (“Database Field”).
Since you want to deliver the alert to the email address of the customer who has overdue invoices, select the data field that contains the customer’s email address.
This event could send alerts to both the customer and their salesrep. You would make sure that your trigger also retrieves the email address of the customer’s salesrep, and then you’d select the salesrep’s email address field as the field that “Contains the Email CC Address to send to”.
Sending an Alert to “Related” Parties
(The Customer & the Salesperson)
Grouping Messages Per Recipient AND Break Field
Consider the following scenario: You want to send each salesrep a list of their sales per region – one alert for each region in which they have closed sales. To configure this, you would:
- Go to the event’s trigger and make sure the field that contains the recipient’s delivery address (e.g., the salesrep’s email address) is being retrieved.
- Make sure that the “break field” (e.g., the sales region) is also retrieved.
- Sort the trigger’s matching records first by the recipient (the salesrep’s email address), and second by the event’s break field (the sales region).
- Include {BEGIN*REPEAT} and {END*REPEAT} in the alert message.
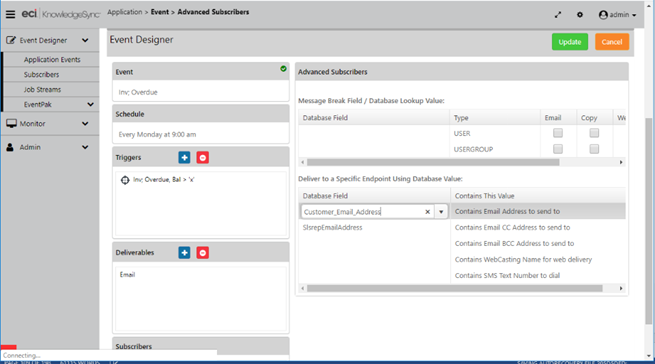
- Go to the “Subscribers > Advanced” option in the event.
- Click in the first field in the lower grid and select the recipient’s delivery address (the salesrep’s email address).
- Click in the first field in the upper grid and select your break field (the sales region).
When this event runs, the trigger will group matching records by recipient (salesrep). Because of the “break field” specified in the upper grid, KPI Monitoring will break to a new alert message whenever the value of the break field (the sales region) changes. Thus each salesrep will get a separate email message for each region in which they had sales.
The configuration looks like this:
Message Break with Dynamic Recipient
This kind of configuration is very typical in sales order related events (order confirmation, shipment confirmation, etc.), where an order consists of multiple lines. You need KPI Monitoring to create a separate message for each order (and email it to the corresponding customer and/or salesrep). Thus the lower Advanced Subscriber grid would refer to the fields containing the customer’s and salesrep’s email addresses.
At the same time, since an order may consist of multiple lines, you need KPI Monitoring to put all the lines for an order in a single email – and break to a new email only when there are no more lines for a given order.
Thus the upper Advanced Subscriber grid would refer to the “order number” field – telling KPI Monitoring to “break to a new message” when a new order is encountered.
Advanced Message Formatting Options
The following sections cover additional formatting controls for alert messages.
Controlling the Display Length of a Text Field
You can control the display length of a text field in an alert message. To specify the maximum display length, add a colon followed by the maximum display length, followed by the plus sign (‘+’) as in:
{Item_Description:25+}
Depending on the email font that an alert recipient uses, this function may also be used to line fields up in a columnar format, as in:
{Item_Description:20+} {Item_Type:6+} {Item_Class:10+}
This method will work if an email recipient is not using a proportional spacing font; if they are using proportional spacing, it is suggested that you use an HTML table instead.
Currency Formats
Currency values are formatted according to the regional currency settings for the server on which KPI Monitoring is installed. If a currency field’s length is shortened, KPI Monitoring will allocate the indicated number of characters when the field is placed in an alert message.
| {sales_amount$} {sales_amount:10$} {sales_amount&}{sales_amount:10&} |
$1250.00 (right-justified) $1250.00 (right-justified; allocate 10 spaces) $1250.00 (left-justified) $1250.00 (left-justified; allocate 10 spaces) |
Numeric Formats
Numeric values are formatted according to the settings for the server on which KPI Monitoring is installed. If a numeric field’s length is shortened, KPI Monitoring will allocate the indicated number of characters when the field is placed in an alert message.
|
{sales_units#} {sales_units:10#} |
85.50 (right-justified; 2 decimal places) 85.50 (right-justified; 2 decimals; 10 digits) 85.50 (left-justified; 2 decimal places) 85.50 (left-justified; 2 decimals 10 digits) 85 (right-justified; no decimal places) 85 (right-justified; no decimal; 10 digits) 85 (left-justified; no decimal places) 85 (left-justified; no decimal; 10 digits) |
Skipping Fields With Null Values
When formatting an alert message, you may wish to “skip” (allocate no space) to a field if its value is null. (This function checks for “null” only; not for blanks.)
Here’s an example:
{ItemNo:15+~}{NonInvNo:15+~}{MiscChgCode:15+~}{CommentCode:15+~}
The tilde (~) indicates that if a field’s value is null, no space will be allocated to it. This tilde must be the final formatting command in a field.
Including Both HTML & Plain Text
You can create a single e-mail message that contains both HTML and plain text. For example:
The following customer had more than 2 shipments arrive late last quarter:
Company: {CompanyName}
Number of Late Orders:{Late_Order_Count}
{BEGIN*HTML}
Your HTML content would go here
{END*HTML}
If the recipient’s email system does not support HTML, they will see only the top section of the message; the content of the HTML will appear as an attachment. If the recipient’s email system does support HTML, they will see only what is between the {BEGIN*HTML} and {END*HTML} labels.
Embedding URL Links in a Message
You can send an email with a URL link in it (such as a link to track a shipment). Make sure that any information required within the URL link (such as the tracking number) is one of the chosen columns in the underlying trigger.
Then, you could embed a link such as the following (a FedEx example):
http://www.fedex.com/cgi-bin/tracking?action=track&tracknumbers={fedexnumber}
{fedexnumber} is the value from the underlying trigger.
Advanced Formatting - Using a Crystal or SSRS Report
If you need more sophisticated formatting for your alert message (e.g., headers/footers, page breaks, sub-totaling, etc.), or you wish to send a standard form or document (like an invoice, quote, statement, et cetera), it is suggested that you configure your KPI Monitoring event to use a Crystal or SSRS report as the alert content. KPI Monitoring can populate and generate these “report forms” and then deliver them to their intended recipients. (More on this in the chapter on “Reporting”.)
Email Attachment handling
- Include Reports as email attachments. If an event has associated reports, you may specify whether the reports will be attached to the outgoing email. If you will be using KPI Monitoring to generate and distribute a large number of reports, it’s more efficient to distribute the reports via FTP/SFTP or webcast and use email to notify people when those reports are available.
- Include Files as email attachments. If an event has associated files, you may specify whether the files will be attached to the outgoing email. If an event’s trigger includes an object called “attachment_files”, the files referenced in that object will also be attached.
- Email notifications should wait until reports are completed. If an event has associated reports which are not going to be attached, you should have the alert wait to be sent until the reports are finished generating.
What needs to happen to send Email Alerts
In order to send email alerts, all of the following need to be true:
- The event must have an email subject, message text, and a valid email sending account.
- There must be at least one subscriber (standard or advanced) selected to receive alerts via email who is “active” with valid email addresses, and their “delivery times” must allow message receipt.
- The Windows or Desktop service and the email server must be running.
- The event’s trigger must retrieve matching records and if the event has been triggered (and no new matching records exist), you must either remove triggered items or the event must “repeat notifications for triggered items”.
SMS Text Messaging
A subscription to the Twilio text messaging service is required to utilize this option.
SMS texting generally follows the same rules as configuring a plain text email alert – except that due to the brevity of a typical text message, you will most likely not be using the begin and end “repeat” commands.
In addition to specifying the contents of the text message, be sure to specify the following:
- The name of the SMS account used to send the text. This is configured in the KPI Monitoring Administrator.
- The phone number that the text will be sent from. Note that Twilio requires phone numbers to be registered before you can send texts from them. For trial accounts, Twilio assigns a single phone number that you can send from. With a paid subscription, you can register your own numbers and send from any of them. This number cannot come from the event’s trigger, it has to be one of the numbers in the dropdown – KPI Monitoring connects with Twilio to retrieve the numbers associated with the specified account.
- The contents of the message (which can be any combination of hard-coded text, date variables, or data variables from the underlying triggers)
- (If the event has any associated reports or charts) Whether the text message should wait for those items to complete their generation before the text message is delivered.
Webcast (Dashboard Alerts)
The webcasting (“dashboard alerts”) module requires a few additional steps for configuration; please refer to the chapter titled “Dashboard Alerts” for details.
Charts & Reports
Charts and/or reports are associated with events for three reasons:
- To generate a form (such as an invoice or statement; designed with either Crystal Reports or Microsoft SQL Server Reporting Services) that is to be delivered as part of the alert.
- To generate an analytical report (Crystal or SSRS) associated with the event being triggered.
- To generate a chart or graph (designed within KPI Monitoring) that contains useful information.
Please refer to the chapters on “Reports” and “Charts” for more details on these options.
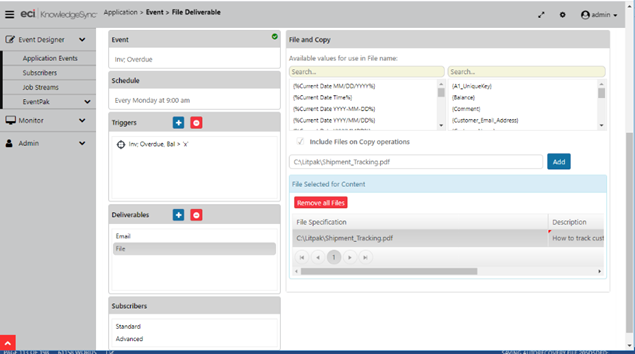
Files
You may associate static files to an event, such as MS Word or MS Excel files. Associated files may be delivered via email, FTP/SFTP, or webcast. Potential uses of static attached files include:
- To send a “Policies and Procedures” document along with a message
- To attach a product brochure to an email going to a prospect
- To send an HTML newsletter to recipients
- To send an MS Excel spreadsheet to specific recipients
If you wish to add a static file to an event, go to the event’s “Deliverables”, click on the blue “Plus” sign, and under “Alert Content”, select the option for “File”.
Copy and paste a file path from your File Explorer of the file you wish to add to the event.
Note: If you are running the KPI Monitoring Windows service and web portal app on different machines, you will need to make sure that any such files are in a network path that is accessible from both machines
Once you have specified the file path, click on the “Add” button.
You have the following additional options when associating files:
Include Files in Copy operations. Whether files selected for this option will be included for any subscriber for whom the “Copy” (FTP/SFTP) delivery method has been selected. (Do not refer to mapped drives in your file specifications; use UNC format instead.)
File Description. An expanded description of the file’s contents.
Ascii. Whether the file’s contents are in ascii format (check ‘on’ for ascii format).
Your selected file(s) will appear as follows:
An Event’s Static Files
File 'Alternative Text' option
This option is available only if sending email via Internet/SMTP method.
KPI Monitoring gives you an easy way to deliver HTML documents without having to specify their contents in the Email component of an event. This uses the “alternative text” option from within the “File” deliverable.
Once you have selected a file for an event, click in the “Description” field of that file and click on the list button that appears there. You may choose from three “alternative text/html” options (HTML, richtext, enriched). When you do so, the associated file will appear within the body of the outgoing email message sent by an event (as opposed to being delivered as an attachment).

Event File “Alternative Text” Options
If an event delivers content to some users whose mail system can display HTML and other users whose mail system cannot display HTML, you can both associate an HTML document as “alternative text”, and also specify the same text (in plain text format) within the email deliverable of an event.
No trigger data fields may be included within the alternative text file option and the multiple “alternate” format options allow you to have multiple alternative files of various formats for the same event.
Actions (Workflow) Deliverables
The last group of an event’s Deliverables are its “Actions”:
Event “Actions” (Right-Hand Column)
Remember: If an event needs to execute one action per record that meets the event’s criteria, the event must not use {BEGIN*REPEAT} and {END*REPEAT} anywhere in the event’s configuration.
The 7 types of Workflow Actions
An event may execute any combination of the following actions:
- Create a file containing content from a triggered event.
- Run VB (visual basic) scripts.
- Run executable programs.
- Execute SQL (structured query language) statements
- Make REST web API calls.
- Create a workflow request in the Exact Synergy application (not available in all versions of KS)
- Create a document in the Exact Synergy application (not available in all versions of KS)
All of these may incorporate data from the corresponding triggered event and the order in which they are executed is the order in which they appear in the window.
If you have an event which needs to execute an action once per triggered record, and also needs to generated a summarized alert message (using {BEGIN*REPEAT} and {END*REPEAT}), you’ll need to configure two events – one to do the summarized alert, and another to do the workflow action.
If an event has associated files – either from as “Files”, or if the event’s trigger uses the “attachment_files” column -- those files will be stored in a variable called “attachment_files” which may be used in your workflow actions.
Except for the “create file” action, if an action is associated with an event, it (the action) typically needs to run once for each record returned by the event. In such a case, the event to which the action is associated must not use the {BEGIN*REPEAT} and {END*REPEAT} commands anywhere in its configuration.
Create File
An event can take its “triggered” data and write it out to a file as in the following example:
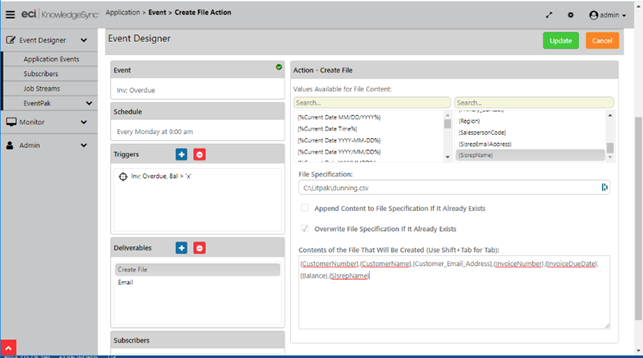
Workflow Action: “Create File”
Files created in this manner can be used for import into another application, to create log files of triggered event data, or to create a file for a mailing or fulfillment house. The file can contain hard-coded text, triggered field values, and date variables. For each file you need to specify:
File Specification. The name of the file to be created. This name may be hard-coded or it may include field and date variables. Do not reference mapped drives.
Append content to file. If the named file already exists, checking this box will cause the event to add its data to the existing file.
Overwrite file specification. If the named file exists, checking this box will cause the event to delete the existing file and overwrite it with new contents.
Click in the box beneath “Contents of the file” and begin entering any combination of hard-coded text and field (and date) variables. You may separate fields by using a comma, semi-colon, or any other valid punctuation. Use Shift/Tab to create tab-based separations. If the event’s trigger uses the {attachment_files} function, you may reference this field as a data field variable.
You can use {BEGIN*REPEAT} and {END*REPEAT} in your file as well as the field formatting commands (detailed earlier in this chapter).
Run Basic Script
The second action that an event can execute is to run a Visual Basic (“VB”) script.
Before you can select a script for an event, the script must be defined within KPI Monitoring; you can define scripts by expanding an application’s events and selecting the option called “Basic Scripts”. From here you can view, create (as well as copy & paste), modify, and delete scripts. Once you have created VB scripts, you may select them for use by an event – when the event’s conditions are met.
All of the data returned by an event’s triggers can be used by the script.
To associate a script with an event, go to the Deliverables for an event and click on the blue “Plus” sign. Select the action called “Run Basic Script” and select the desired script.
“Run Basic Script”
Note! The use of VB scripts in KPI Monitoring require expertise in Visual Basic programming syntax. Sample scripts are available from KPI Monitoring’s Support department by submitting a request to:
http://www.KPI Monitoring.com/support_email.php
KPI Monitoring Support Services does not include support of custom VB scripts. Quotations for fee-based consulting services for the creation and/or implementation of VB scripts are available on request.
You can display a list of currently-defined VB scripts, select one or more desired scripts and use the “Add” button to add them to your event. As all KPI Monitoring events run in an automated manner, please be sure that all scripts used in KPI Monitoring do not prompt for any user input.
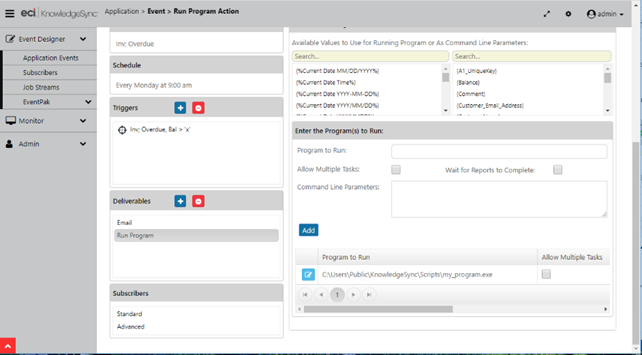
Run Program
The option to configure an event to “Run a Program” when an event’s conditions are met looks like the following:
“Run Program”
Program to run. Type in (or copy and paste) the name of the executable program you wish the event to run. The file specification must not use mapped drives.
Allow Multiple Tasks. This lets you specify whether the event will run only a single copy of this task at any one time, or allows multiple copies to run simultaneously. (The suggested setting is unchecked, to optimize system resources.)
Wait for Reports to Complete. If the corresponding event has associated reports, you may wish for the reports to generate before your program is executed. (E.g., you may wish to run a report on data before it is updated by a program associated with this event.)
Command Line Parameters. Events can make use of command line parameters to pass data from triggered records into an executable program. Parameters may include hard-coded values and data field (& date) variables; be sure to enclose all date and text-based data field variables within single quotes as in ‘{ACCOUNT_ID}’ (not necessary with numeric fields). Data fields may also use any of the formatting controls detailed earlier in this chapter.
If an event trigger uses the {attachment_files} function, you may also use this as a field variable.
To add parameters, click in the “Command Line Parameters” field and then drag and drop the values you wish to use from the “Available values” lists. Once you have specified any parameters, click on the blue “Add” button to add the program to the current event.
Any program an event runs must not prompt for user input. And, if a program calls any “dll” files, be sure to put those dll files in the KPI Monitoring Windows Service machine’s “windows/system” directory.
Submit SQL / Stored Procedure
SQL statements (& stored procedures) can be used to add, update, or delete records from an application database.
Note the following:
If performing a database update, your SQL must include a “where clause” to ensure that it updates only the appropriate records. (There is no implied where clause.)
All standard SQL syntax (for the database & driver selected) is supported
To add one or more SQL actions (or stored procedures) to an event, go to the Deliverables for an event, click on the blue “Plus” sign, select the option for “Submit SQL”, and click on the blue “Add Row” button. You’ll see a window like the following:
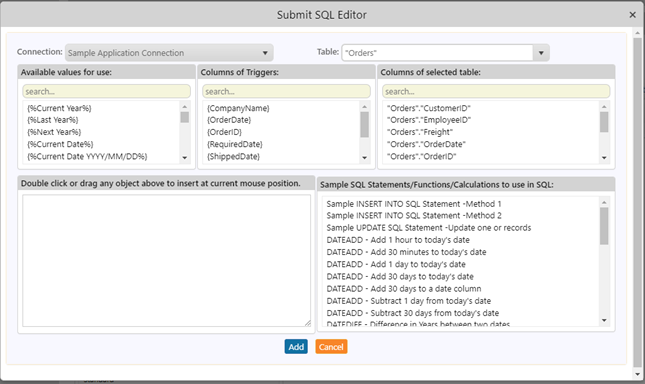
“Submit SQL”
Connection. Click in this field and select the database connection that will be used by the SQL statement or stored procedure.
Table. Click in this field and select the table whose column names you wish to display.
SQL Statement. Enter (either manually type or drag-and-drop) the SQL syntax that will be executed by this event, such as:
update sysdba.ACCOUNT set sysdba.ACCOUNT.TYPE = 'Inactive'
where sysdba.ACCOUNT.ACCOUNTID = '{ACCOUNTID}'
You may use any combination of SQL syntax and data field (& date) variables in your SQL syntax; if the event’s query uses the {attachment_files} function, you may reference this field as a data field variable.
All standard SQL commands (such as “insert”, “update” and “delete”) are supported in the SQL action tab.
The “where clause” in your SQL tells KPI Monitoring which records to update.
For assistance with your SQL statement, please refer to the window titled “Sample SQL Statements / Functions / Calculations”.
Wait for Reports to Complete. Once you have added a SQL statement to execute, you may scroll the window containing your statement to the right in order to access the option whether your SQL statement should “wait for reports to complete”.
If the corresponding event has associated reports, you may wish for the reports to generate before your SQL is executed. (E.g., you may wish to run a report on data before that data is subsequently modified by your SQL.)
To run a stored procedure instead of a SQL statement, choose your database connection and then specify the procedure name, as in “dbo.myprocedurename”. To pass parameters into your stored procedure, use the syntax:
dbo.myprocedurename ’{account}’,’{rep}’,{amount}
Make a REST API Call
Please refer to the REST API chapter for details.
Synergy Workflow Creation/Synergy Document Creation
These two options will be enabled only if you are using the “Exact Synergy” application and wish for the triggering of an event to create either (or both) a Synergy workflow request, and/or a Synergy document. All of the information from the triggered event may be passed into the components of the Workflow or Document being created in Synergy.
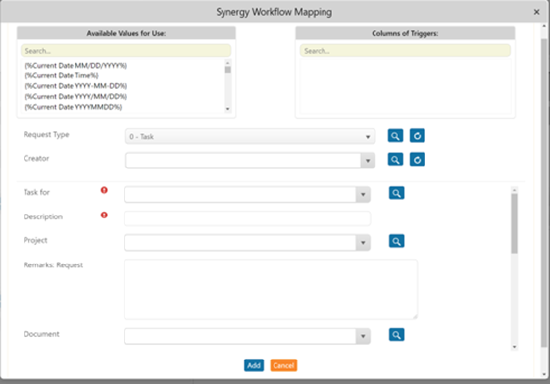
“Create Synergy Workflow Request”
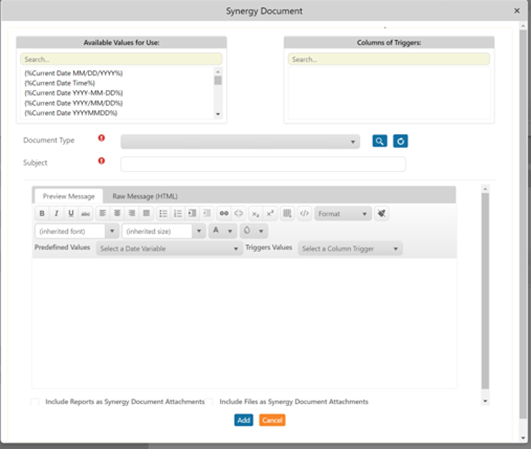
“Create Synergy Document”
Note: that the two Synergy options will appear greyed-out if you are not using the Synergy application.
Subscribers
“Subscribers” are individual people, groups of people, and computers that will receive alerts, reports, charts, and files that are associated with an event. In addition to specifying who will receive this content, the Subscribers option also lets you specify the method by which this content will be delivered (email, text message, Copy/FTP, or webcast.
To add, view, modify, or remove a subscriber associated with an event, click on the “Standard” or “Advanced” options beneath the “Subscribers” section of the event design window.
The “standard” option is used when you know the names of the groups, individuals, or computers that you wish to delivery event content to.
The “advanced” option is used when you want an event to deliver its content to one or more addresses that are related to the records being triggered – such as delivering an alert to the customer associated with an orders, and/or to the salesperson associated with corresponding customer.
Adding/Changing/Removing Standard Subscribers
To add, change, or remove standard subscribers for an event, go to the “Subscribers” section of an event and click on the “Standard” options. A window like the following will appear:
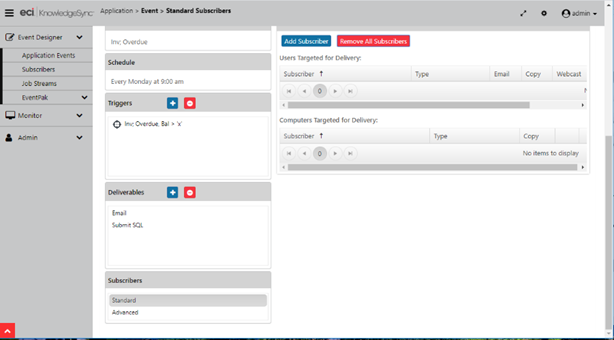
Event “Standard” Subscribers
To add “standard” subscribers (individuals, groups, and/or computers), click on “Add Subscriber” and a window like the following will appear:
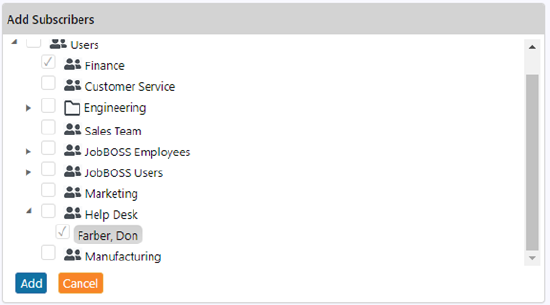
Selecting Standard Subscribers
Once you place checkmarks next to the desired individuals, groups, and/or computers for an event, click on the blue “Add” button and a window like the following will appear:
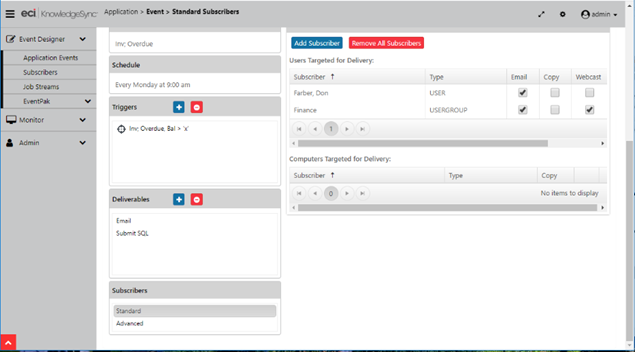
Standard Subscribers – Selected
Place a checkmark beneath the selected content delivery methods for each standard subscriber. Note that the subscribers window scrolls to the right to show the “SMS” (text messaging) alert delivery method.
Adding/Changing/Removing Advanced Subscribers
To add, change, or remove advanced subscribers for an event, go to the “Subscribers” section of an event and click on the “Advanced” options.
A window like the following will appear:
Event “Advanced” Subscribers
The top grid in the “Advanced” tab can be used for two things:
- To control the “breaking” of messages that contain the details of multiple records that meet an event’s criteria (see section on message breaks earlier in this chapter).
- To make use of the “subscriber lookup key” function (detailed in the chapter on “Subscribers”).
The lower grid lets you specify that an event will deliver its content to one or more addresses that are associated with the records matching the event’s criteria (such a delivering an order confirmation to both the customer who placed the order and the salesperson who is assigned to the customer’s account).
Notice that the description of the fields in the lower grid refer to values that are returned by an event’s trigger – such as a trigger’s value that “contains the email address to send to” – e.g., a query’s field that contains a customer’s email address. When you click in any of the fields in the lower grid, a list button will appear, and that button will present a list of values from the triggers associated with this event. Select the values that contain the desired delivery addresses.

Two “Advanced” Subscribers Selected
If an event needs to send alerts to multiple addresses for any one of the fields in the lower grid, you’ll need to concatenate the address fields (in the event’s trigger) into a single database field. Separate multiple email addresses in that concatenated field with a comma.
An event may contain a combination of both standard and advanced subscribers.
Monitoring the Status of an Event's Deliverables
The KPI Monitoring Monitor tracks the status of all deliverables for an event, including whether those deliverables are “pending”, have been “completed”, and those that are in an “error” state. If any of an event’s deliverables fail to complete successfully because of errors, you may try to correct the error, mark the action as “complete”, or manually delete the erroring deliverable. (The Monitor allows for the use of “corrective actions”.) KPI Monitoring will attempt to re-deliver an erroring deliverable ‘x’ times (determined by you).
To see the deliverables for an event, follow these steps:
- Open the Monitor, click on the “Application Events” branch and then click on the “Triggered” tab.
- Single-click on the blue plus sign next to the triggered event whose deliverables you wish to track.
- View the “Deliverables” (alerts, reports, actions) and the event’s email alert message (if such a message has been configured for the event).
Job Streams
A job stream is a series of events that need to run in a sequential fashion, one after another. Job streams have the following unique characteristics:
There is a single schedule for all events in a stream. That schedule indicates when the first job in the stream will be submitted.
Each event in a stream completes all of its components before the next event in the stream begins. The “completion” of an event in a stream is defined as its successful execution -- regardless of whether the event is triggered or not.
Note! This last point is very important; if a job stream has 3 events within it, all 3 events will always execute whenever the stream is run. Whether any one of those events is triggered is based on the triggers associated with the event.
Job streams are very useful in situations where you need precise control over the order of execution of multiple events; for example, when you need to have an event execute an action to update an application and then wish to have a report run on that updated data. (Two events; one job stream)
Note: Regardless of how many components an event has – alerts, reports, and/or workflow actions -- the next job in a stream will not execute until all the components of the preceding event are complete.
Job streams are valuable when:
- You have a series of events that need to be submitted in a specific order, such as an initial event that logs a support ticket from an incoming email, and then a subsequent event that triggers alerts about that ticket.
- You have a group of events related to the same business condition, such as a “new hire”. Job streams are an excellent way to group related events together, and easily manage them.
- You have a business process with decision branching, e.g., a stream that triggers alerts based on either high or low priority support tickets.
In this last example, a stream would contain two events; one event that triggers alerts for ‘high’ priority tickets, and another event that triggers (different) alerts for ‘low’ priority tickets. For any one support ticket, both events will always run, but only one event will ever trigger.
The following illustration is an example of how job streams are represented in KPI Monitoring:
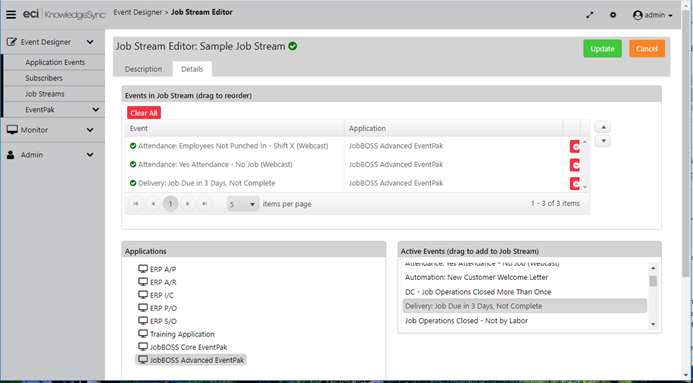
Job stream example
Add/Edit a Job Stream
To create a job stream, click on “Job Streams”. Use the blue “Add” button to create a new stream, or click on the blue “Edit” menu to view or modify an existing stream.
The following information is associated with a job stream:
Job Stream Name. The name that uniquely identifies the job stream.
Schedule. Click on the List button and choose a schedule that represents when the job stream (the first job in the stream) will execute. It is suggested that the events used within a stream each have their own schedule of none.
Active. Whether the stream is eligible to run.
Notes. A more detailed description of the purpose of the job stream.
Selecting Events for a Job Stream
To add an event to a job stream, click on the “Details” tab within job streams.
- Under “Applications”, select the application that contains the first event you wish to add to the stream; and you will see a list of all active events for that application.
- Double-click on (or drag & drop) an event for the stream from the list of “Active Events” to the window titled “Events in Job Stream.”
- Repeat the preceding step for each event you wish to add to the stream.
- Click on “Update” when done.
You can drag and drop events in a job stream to re-order them.
Delete a Job Stream
From the initial list of job streams, you can use the red “Minus” sign to delete a job stream from the system.
Show Tracked items
Within an event’s details (once you click on the name of an event in “Edit” mode), you can see whether an event has been checked, has been triggered, and the “unique” IDs of the triggered records.
To see this, click on the option called “Show Tracked Items” as shown in the following illustration:
Show Tracked Items Button (Middle-right)
The resulting window will look like the following:
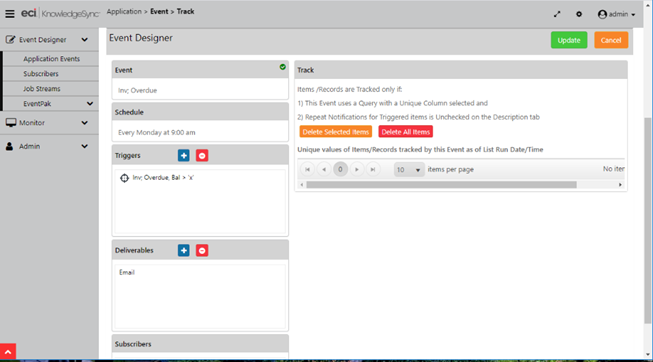
Tracked Items for an Event
From this option you can “un-trigger” (or clear out) the triggered records for an event and thus enable it to be triggered again. You can clear out some or all triggered records for an event.
Clearing Triggered Records
To un-trigger a specific record for an event, highlight the record and click on the “Delete Selected Item” buttons. To clear all triggered records for an event, click on the “Delete All Items” button.
Troubleshooting Events
If Your Event Isn’t Executing
Check the Monitor and see if the event appears under 'Application Events' that are 'pending', 'checked', 'triggered', or have recorded 'errors'.
Here are the top reasons why an event may run but not trigger:
- The event’s conditions are not met. Preview the event’s triggers to ensure that there are matching records (if the trigger checks for changed records, the preview will show all records, regardless of a change to their value).
- The event is already triggered. Use the “Show Tracked Items” option to see if any triggered records are listed.
- The email sending account is blank. Review the event’s “Email” deliverable and make sure that the “account to send from” has a valid value.
- There is no alert message text. If you’ve chosen to send alerts via email but have not specified any message text, no alert will be sent out.
- The subscriber does not have a valid delivery address. Review the subscriber’s profile to see they have a valid address for the chosen method.
- The subscriber is disabled to receive alerts for that day or time. Review their profile to see if their “work hours” exclude certain days or times.
- The corresponding delivery server is disabled. If an event is configured to send email alerts but the email server is disabled, no alerts will go out.
- The event is waiting for its report to finish. If an event has an associated report, it may be configured to “wait” until the report is done before sending its alert.
If your Event Triggers 'over and over'
Check the event trigger’s “unique” value. If a trigger doesn’t have a unique, the event will trigger repeatedly for the same record, until that record no longer meets the trigger’s criteria.
Also check the setting of the event’s “Repeat Notification for Triggered Items” checkbox and make sure it is not checked.
Run an Event right now
To run an event once – right now – go to the list of events for a specific application, single-click on the event you wish to submit (to highlight it) and then click on the “Run Now” button. The KPI Monitoring Windows Service must be running to use this option.