CCH KPI Monitoring : REST API Triggers

Monitoring Events
This section documents the features of the REST API trigger.
If you are new to interacting with web apps via REST APIs, please review the “KPI Monitoring REST API Introduction” document for a prerequisite look at the concepts needed to work with REST APIs.
KPI Monitoring Technical Support assists with the proper use of REST API application features, but they will not assist with troubleshooting individual trigger and action parameters, authentication, JSONpath, and variables.
Create a New App
Create a new app as shown in the previous section. If you are only calling a web API, you do NOT need to create a database connection. After creating the Application, click on the “Web API” tree item to display the list of defined APIs. The following window opens if no API definitions have been created yet:
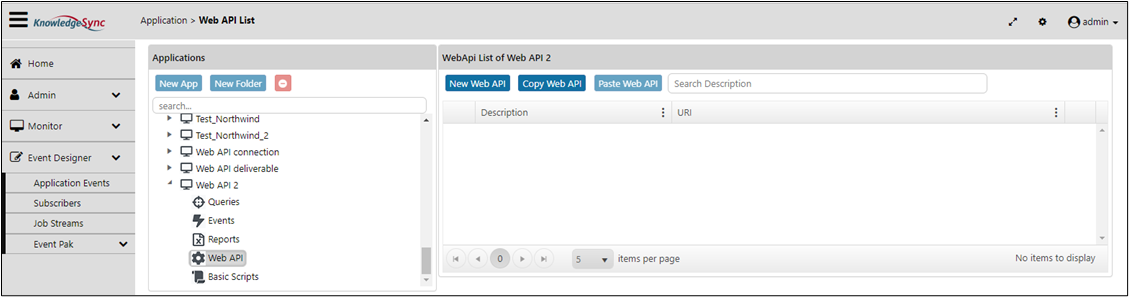
EMPTY WEB API LIST
Web API Definition
Click the New Web API button to display the Web API Designer.
Web API Designer Definition Tab
On the Web API Designer Definition tab, fill in the following values:
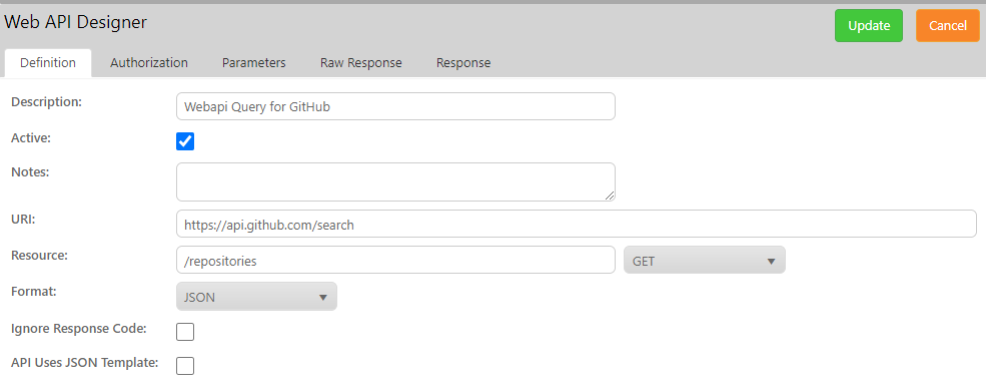
- Description: The title for your entry, such as “New York Times”.
- Active: Check this box if you want this trigger to run.
- Notes: Any additional notes you want.
- URI: The base web address for the API, such as “https://api.nytimes.com/”.
KPI Monitoring will replace {bracketed} variables in this field if the variables were defined in a previously-executed trigger, or if it’s a standard variable, such as a date variable.
KPI Monitoring will replace {bracketed} variables in this field if you define them using a “URL Segment” parameter as described below.
- Resource: The sub-path for the API call, such as “svc/movies/v2/reviews/search.json”.
KPI Monitoring will replace {bracketed} variables in this field if the variables were defined in a previously-executed trigger, or if it’s a standard variable, such as a date variable.
The URI and Resource fields are appended to each other without a delimiter to create the full URI path. In the examples above, the full URI will become “https://api.nytimes.com/svc/movies/v...ws/search.json”.
• Verb: This is the REST API call verb to use. GET is the default and will be appropriate in most cases.
• Format: Select JSON or XML. The parsed XML response and the structure of the XML data are displayed on the Response tab.
• Ignore Response Code: Check this box to ignore incoming HTTP response codes from the Web API.
Note: KPI Monitoring is coded to only accept 201,202 or 204 HTTP response codes. If any other code is sent, KS throws an InvalidWebAPIResponseException. This prevents users from being able to use Web API’s that use path parameters as part of the URL; for example, a single “404 not found” message breaks the event. By checking this new box, KS will ignore the incoming response code.
-
API Uses JSON Template: Check this box if the data parameters in the Web API are defined in a JSON template. KPI Monitoring generates a complex JSON object using the template. (Currently, this is only available for Web API triggers.) See next section for more details.
Web API Calls with Advanced JSON
By default, the API Uses JSON Template box is not checked if the following is true:
- For new/existing Web API definitions
- For copied/pasted Web API definitions
- If an eventpak does not contain a value for this flag
- If format is in XML
If the Web API trigger has API Uses JSON Template checked:
- JSON is created for every parameter that has a template, using response data from previous query or Web
- API triggers.
- After the Web API is triggered, all response data from previous triggers is cleared.
- A new response data set is created with the results from the Web API.
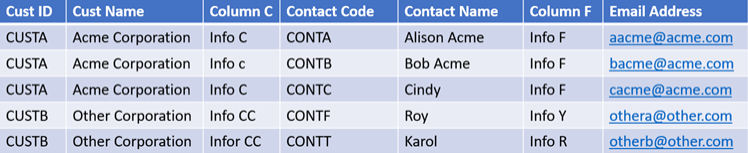
The following examples use this data table:
Advanced JSON Example 1
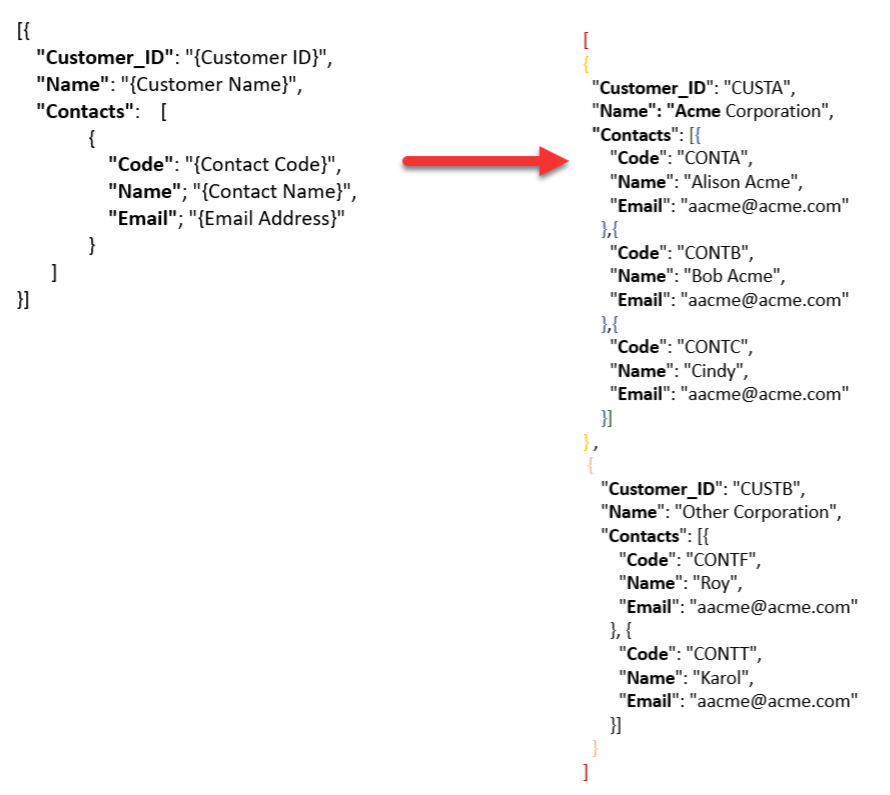
If the JSON template has a top-level collection (e.g., square brackets [] surround the entire JSON code), a single call is made to the Web API and the JSON collection is passed as a parameter:
Advanced JSON Example 2
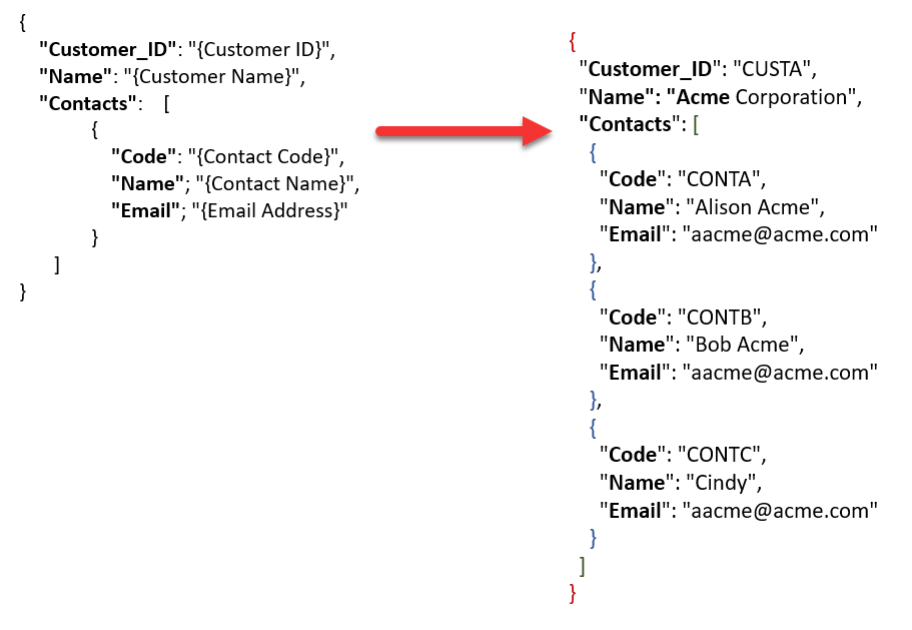
If the JSON template does not have a top-level collection, there will be multiple calls to the Web API based on the results in the data table. There is one call per top-level entity. In the example below, the top-level entity is Customer. There will be two calls to the Web API, one for CUSTA and then one for CUSTB:
Web API Designer Authorization tab
On the Authorization tab, pick the authorization type. If you are using an API key, do not use the Authorization Type setting and instead pass it using a key-value pair in the Parameters tab.
- No Auth: Do not pass authorization credentials.
- Basic Auth: Enter the username and password you created for the API.
- OAuth 2.0: Please see the section below.
OAuth 2.0
- OAuth 2.0 is the industry-standard protocol for authorization which allows third-party applications to grant limited access to an HTTP service, either on behalf of a resource owner or by allowing the third-party application to obtain access on its own behalf.
- OAuth2 requires the use of HTTPS for communication between the client and the authorization server because of sensitive data passing between the two.
When selecting OAuth 2.0 as an authorization type, additional information is needed for authentication:
- Access Token: Click the Request Token button at the bottom of the screen and a token is sent from the third-party application and it is automatically populated. Access Token is masked. The token is saved by selecting the Use Saved Access Token for All Requests check box and used for all requests to this API during event execution. If unchecked, a new Access Token will be generated for each new request.
- Grant Type: The method of acquiring an access token. Choose one of the following types:
o Authorization Code: Use when the client is a web server. Allows you to obtain a long-term access token since it can be renewed with a refresh token if the authorization sever enables it. The following information is required for this grant:
- Callback URL (This is generated by KPI Monitoring.)
- Auth URL
- Access Token URL
- Client ID (masked)
- Client Secret (masked)
- Scope
- State
o Authorization Code (with PKCE): Proof Key for Code Exchange, use to authenticate native or mobile application users. Because a client_secret isn’t required, this reduces security risks. The following information is required for this grant:
- Callback URL
- Auth URL
- Access Token URL
- Code Challenge Method
- Code Verifier
- Client ID (masked)
- Client Secret (masked)
- Scope
- State
o Implicit: Use when the client is running in a browser and using a scripting language, e.g., JavaScript. This grant type does not allow for the issuance of a refresh token. The following information is required for this grant:
- Callback URL
- Auth URL
- Access Token URL
- Client ID (masked)
- Client Secret (masked)
- Scope
- State
o Password Credentials: Use when the client has been developed by the same authority as the authorization server. With this type of authorization, the credentials (and thus the password) are sent to the client and then to the authorization server. The following information is required for this grant:
- Access Token URL
- Username
- Password
- Client ID (masked)
- Client Secret (masked)
- Scope
o Client Credentials: Use when the client is himself the resource owner. There is no authorization to obtain from the end-user. The following information is required for this grant:
- Access Token URL
- Client ID (masked)
- Client Secret (masked)
- Scope
Client Authentication: Chose one of the following types for sending client authentication:
o Send as Basic Auth header
o Send client credentials in body
o Send Query String
Check the box for Use Saved Access Token for All Requests when creating a new connection with credentials that will be used for several events and eventpaks. When creating an event, users can select from a list of established connections to auto-populate the credential information.
Web API Designer Parameters tab
On the Parameters tab:
- Variables: Search for a system variable here, and then double-click it to insert the variable into the Value field.
- Parameter Type: Choose what works best for you:
- Get or Post: This behaves differently based on the verb. In both cases, name and value are URL-encoded.
- Get: Parameters are appended to the URL in the form URL?name1=value1&name2=value2.
- Post or Put: Parameters are sent in the request body.
- Query String: This works like “Get or Post”, except it appends the parameters to the URL in the form URL?name1=value1&name2=value2 regardless of the selected verb.
- URL Segment: When the request executes, this parameter type replaces a {bracketed} variable in the URI field having {Name} with the Value.
- Http Header: Adds the parameter as an HTTP header sent along with the request. The header name is the name of the parameter and the header value is the value.
- Request Body: If this parameter is set, its value is sent as the body of the request. Only the first Request Body parameter is accepted.
Request Body does not work on Get requests, as they do not actually send a body. If you have “Get or Post” parameters as well, they will replace the Request Body parameter.
- Cookie: Adds the parameter to the list of cookies sent along with the request.
- Request Root: If this parameter is set, its value is sent as the root of the request.
- Get or Post: This behaves differently based on the verb. In both cases, name and value are URL-encoded.
- Key: The key portion of the key-value pair.
- Value: The value portion of the key-value pair.
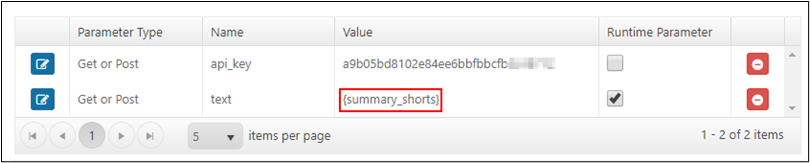
You can also insert system variables in {brackets} that were defined in previously executed web API triggers. This example shows how you can include a “summary_shorts” variable as a value. Your custom variables will not display in the Variables list, but you can manually type them.
- Event Parameter: Specifies where the web API definition will get the value for this parameter:
- Checked: KPI Monitoring will get the value from the event that uses this Web API as a trigger. To set the value, go to the Trigger properties section in the event’s screen. If the event does not provide a value, KPI Monitoring will use the value entered in this web API definition as the default.
- Unchecked: KPI Monitoring will get the value from the Value field within the Web API definition.
- Combine All parameters into a JSON (XML) Request Body: Check this option if your web API requires all parameters to be combined into a single JSON or XML object in the body of the request rather than sent as individual parameters. (The parameter shown defaults to the Format selected on the Definition tab.)
Note: Web API filters use SQLite syntax on all calculated fields on the Parameters and Response tabs. Users can enter their own filters using SQLite syntax.
Web API Raw Response Tab
Raw JSON or XML responses from the API is displayed on the Raw Response tab. This tab contains a simplified view of the response structure. Users can directly add values from the Response tab and KPI Monitoring formats the path appropriately by detecting the data type of value (simple, list/array, object, file) from the response.
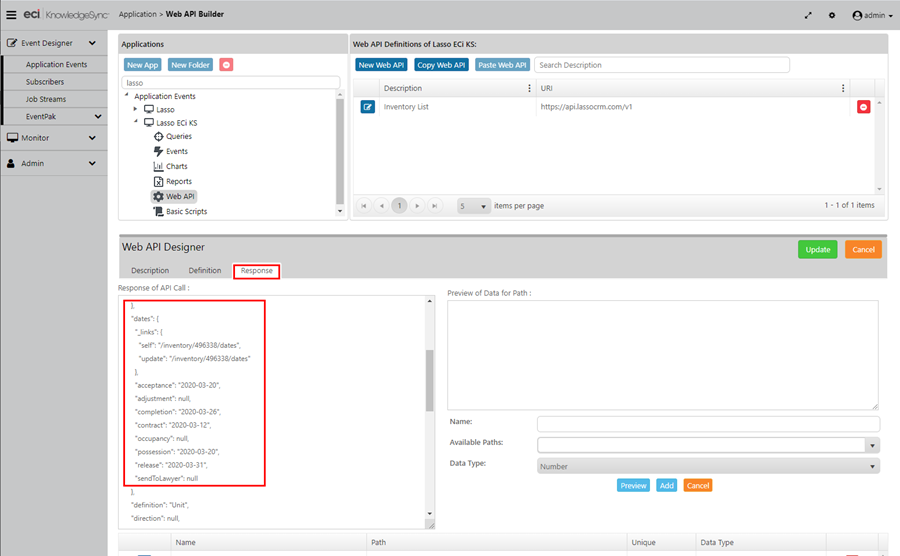
Web API Designer Response Tab
The Response tab calls the REST API using your settings from the Definition tab. A tree structure representing the JSON is displayed. The path is automatically filled in and represents the branch or node of the JSON tree that is selected.
• Response of API call: The response is displayed here in native JSON format. Click on headers to review the header information received from the API call:
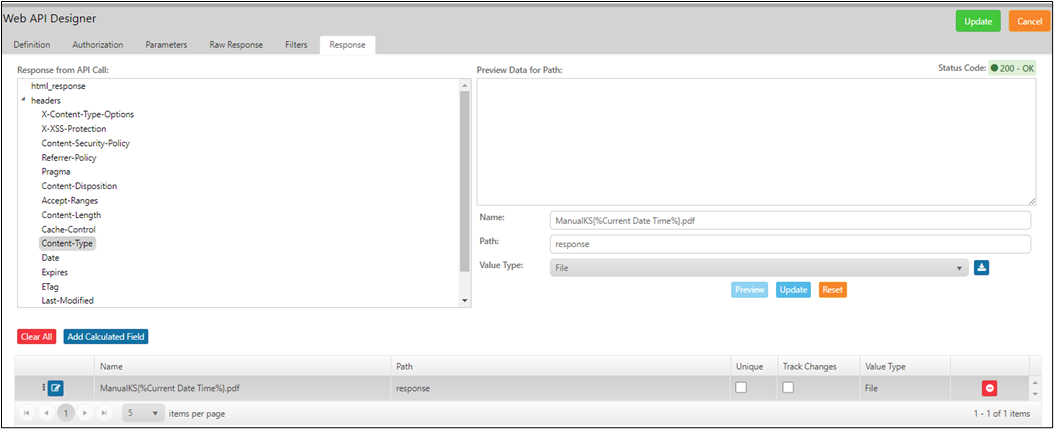
- Preview of Data for Path: The path you chose is displayed for confirmation, and then the value of the path is displayed. Select the data to preview in the Response from API Call module and then click the Preview button.
- Name: The name you want for the system variable. When working with a downloaded file, the name of the file from the response is automatically inserted. When working with the file later, the name can be dynamic or use Calculated Fields to hardcode a name to use with every event.
- Path: When KS ITC receives the REST API response, it will generate a list of possible JSON paths. Pick from the available path or type your own.
- A common path in KS is to replace “[0]” with an asterisk “[*]” to cause KS ITC to retrieve a list, such as changing “results[0].display_title” to “results[*].display_title”.
- Value Type: Assign the data type that KS ITC should use for this variable: number, string or date.
Filtering Results
You have two options for filtering results from a REST API:
If the REST API supports querying, refer to the documentation for creating such a query. Examples may include:
If the REST API does not support querying, you can pass the dataset returned from the REST API trigger to a second database trigger and use the SQL’s where clause to filter the results.
The examples below show both methods. Both examples are high level since they skip individual clicks and data entry and show the material changes needed to accomplish the task. See the relevant sections of this manual for more detailed instructions.
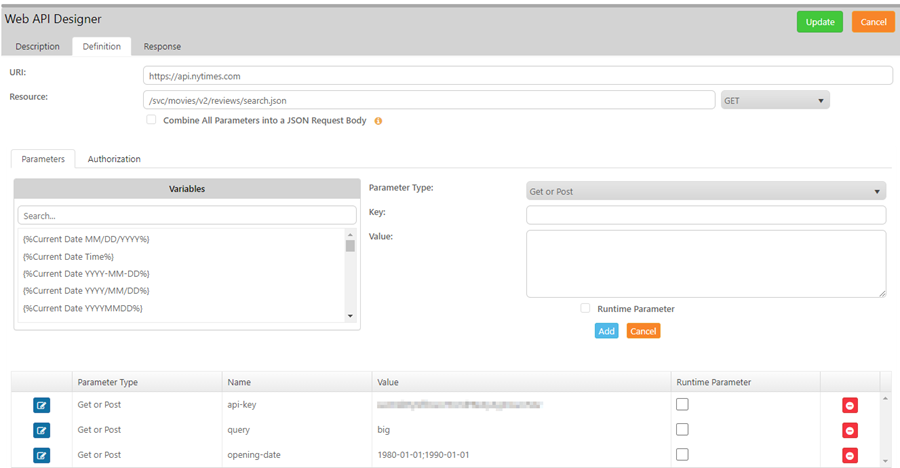
Filtering API Example: Filtering New York Times Movie Reviews
The New York Times Movie API allows you to pass filter using several methods. This permits you to have the API perform the filtering. No further filtering is required once the data is in KPI Monitoring.
Movie Title
The “query” parameter accepts the value of the movie title, as shown below:
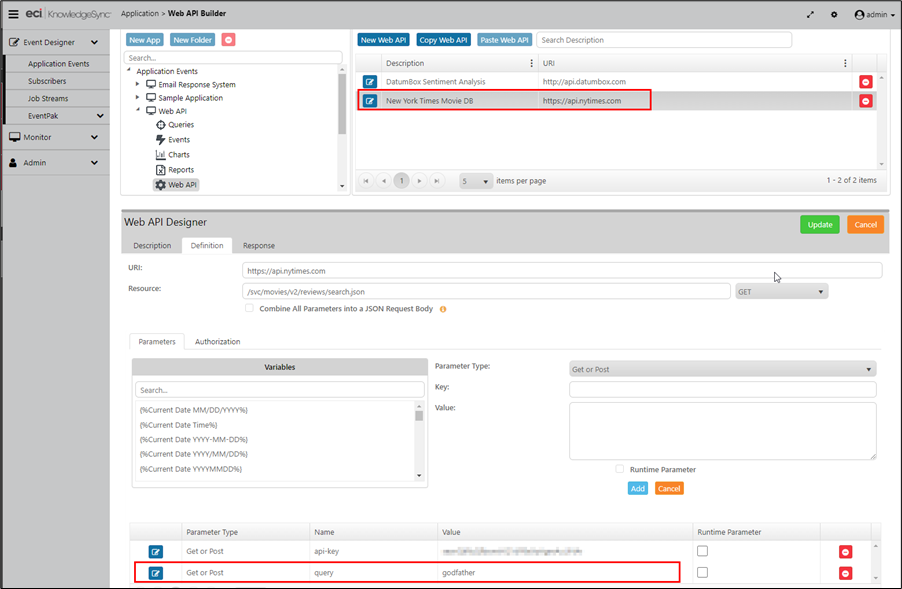
You could substitute a KPI Monitoring variable in the place of “godfather”.
Movie Title and Opening Date
Additional filtering can be performed on many different fields on this API. This example finds movies with “big” in the title opening during the 1980s.
Non-Filtering API Example: Filtering on Date for Lasso CRM
In this example, we’ll get a list of properties from Lasso CRM. We want to email property owners three days before their property possession date. In this case the REST API does not support filtering, so to do this we’ll get a list of properties from the API, use the database engine to filter the list, and then send an email.
Getting Keys in Three Days
- Create REST API Trigger
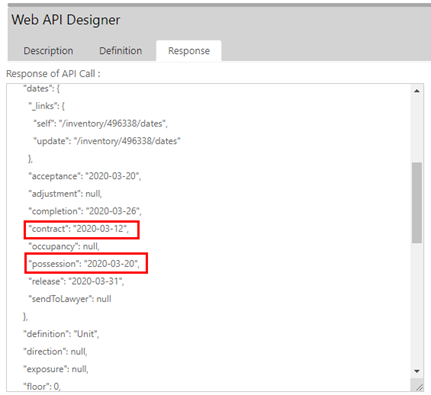
Create a new Web API object. From the example below, you see the API response includes dates.
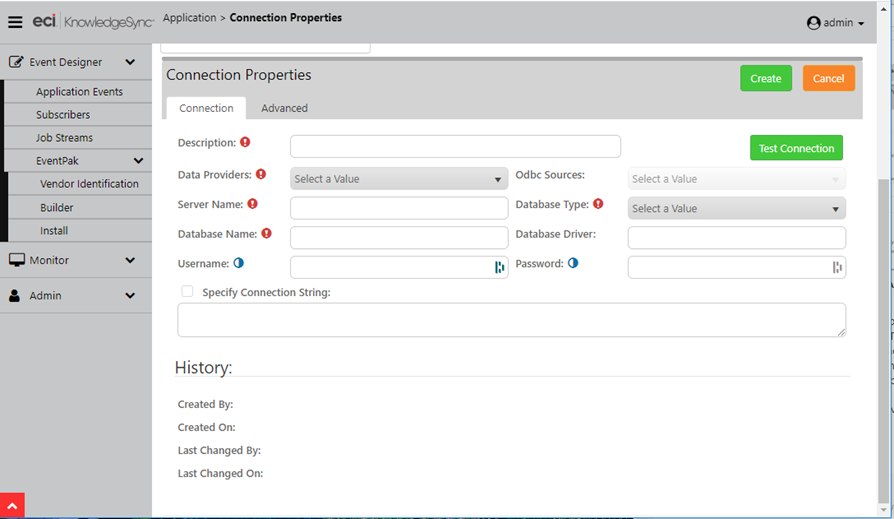
Create Database Connection
Create a database connection to use in the next step. We connected to KS_Object, but the actual database doesn’t matter since we’ll only use the query engine for our date comparison, and we won’t read or modify any data tables.
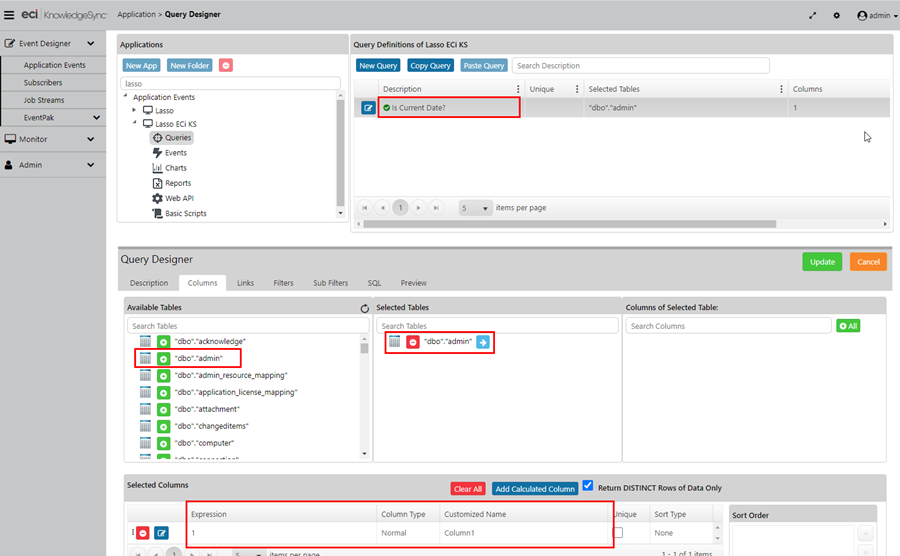
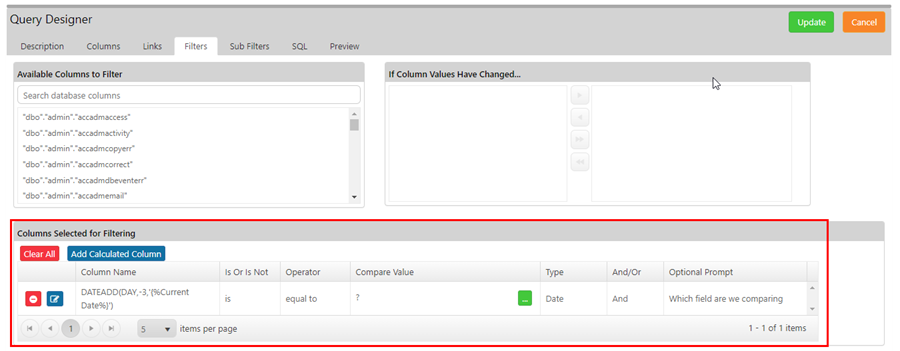
Create Query
Create a query using any database table. In the example below, we used the “admin” table.
- Use the database connection from the previous step.
- Add a calculated column with value = 1. This column isn’t used, but KPI Monitoring requires at least one field in a query.
- Set Return Distinct Rows of Data Only = Checked.
- Go to the Filters tab and create a SQL filter statement. This statement is:
DATEADD(DAY,-3,'{%Current Date%}')
This statement is SQL language intended for SQL Server. It subtracts three days from the current date. It will be used in the event in next step to compare with the property possession date.
There are several settings in addition to the SQL statement, such as Type = Date.
Create Event
- Add two triggers, which must appear in this order
1. Inventory List (Gets the list of properties)
2. Is Current Date? (Compare each item in the Inventory List using their possession date with the date that is “three days from now”)
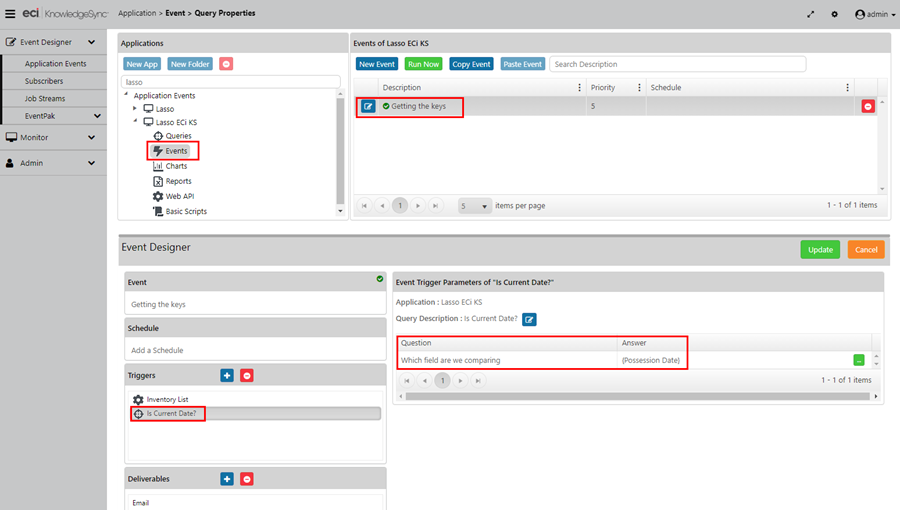
- For the second trigger, set the Parameter Value to “{Possession Date}”.
Note: Variables from the REST API trigger will not appear in the “Available Values for Use:” box, but if you type the value, it will be accepted and will work.
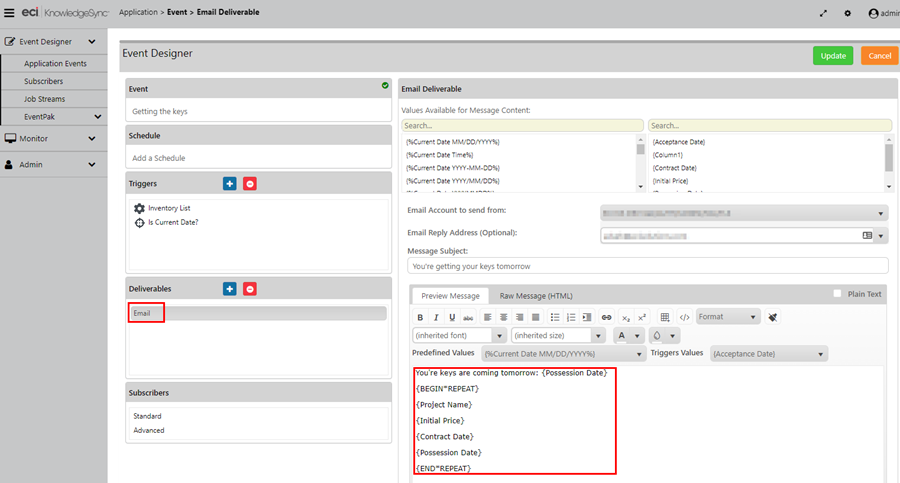
Create Email
Create a standard KPI Monitoring email action. We used a BEGIN/END REPEAT to group properties.
Contract Date within 7 Days of Possession Date
Create REST API Trigger
Create a new Web API object like the same step in the previous example.
For reference, we will compare the two values from the response shown:
Create Database Connection
Create a database connection like the same step in the previous example.
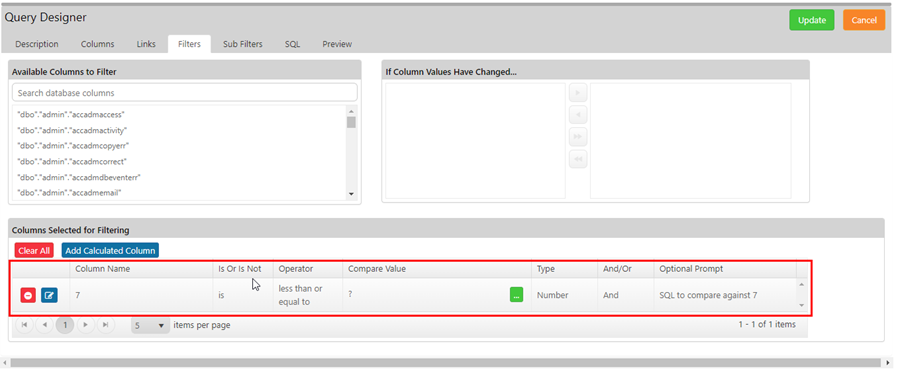
Create Query
Create a query using any database table. In the example below, we used the “admin” table.
- Use the database connection from the previous step.
- Add a calculated column with value = 1. This column isn’t used, but KPI Monitoring requires at least one field in a query.
- Set Return Distinct Rows of Data Only = Checked.
- See §3.1.3 for a sample screen shot for the progress to this point.
- Go to the Filters tab and create a SQL filter statement. This statement is:
7
This statement is a single numeric value that will be later combined with SQL language intended for SQL Server.
Create Event
Add two triggers, which must appear in this order:
- Inventory List (Gets the list of properties)
- Date 1 Within 7 Days of Date 2? (Compare each item in the Inventory List using their possession and contract dates with the value 7 in “Date 1 Within 7 Days of Date 2”)
Create Email
Create a standard KPI Monitoring email action like the same step in the previous example.
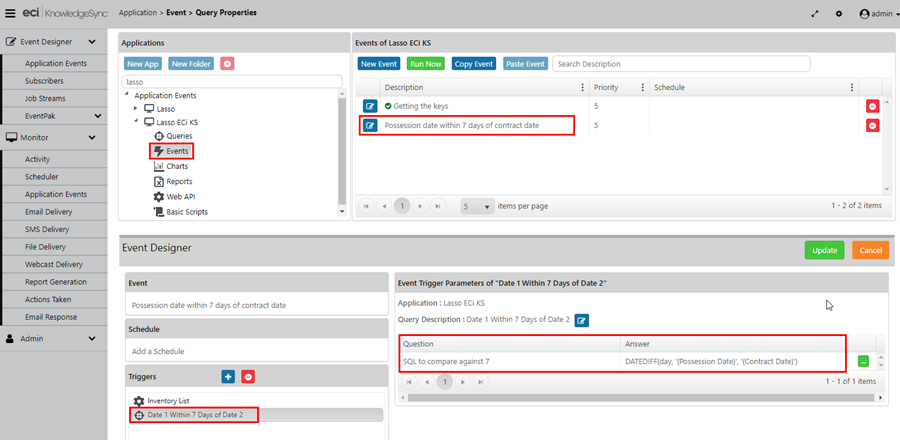
- For the second trigger, set the Parameter Value to “DATEDIFF(day, '{Possession Date}', '{Contract Date}')”.
Note: We are defining the “where” portion of the SQL statement here in the event, which is then compared against the value 7 when KPI Monitoring combines the values, as in SELECT … WHERE 7 = DATEDIFF(day, '{Possession Date}', '{Contract Date}').
Variables from the REST API trigger will not appear in the “Available Values for Use:” box, but if you type the value, it will be accepted and work.