CCH KPI Monitoring : Configuration

Installation
For new installation or upgrade from V9 (or later) of CCH KPI Monitoring, please contact us to arrange Installation and Configuration of the product.
Click here to read the Upgrade Guide.
Welcome to KPI Monitoring!
Welcome to KPI Monitoring (“KS”), the industry’s leading Business Activity Monitoring (BAM) technology. This guide helps you configure and use KPI Monitoring according to the needs of your organization. We hope you enjoy working with KPI Monitoring and encourage you to contact us with your feedback. Now let’s get started with KPI Monitoring!
Log into the KPI Monitoring Portal
Open your web browser and log into the KS portal (default user 'admin'; password is 'password'); you’ll see the following window.
KPI Monitoring Home Window
Clicking on the 'KPI Monitoring' name in the top-left of the portal will always return you to this display. Below this are three buttons that take you into the main KS modules:
- Event Designer. KPI Monitoring event and subscriber configuration.
- Monitor. Audit trail of KS events that are running and have been run.
- Admin. KPI Monitoring configuration and maintenance settings.
Install EventPak(s)
- KPI Monitoring includes pre-configured collections of events (called 'EventPaks') for over 70 popular front-office and back-office applications. These are available from the same download page as the KPI Monitoring application.
There are often multiple EventPaks for the same application – sometimes for different versions and sometimes for different types of events. Feel free to download and review any EventPaks.
- To install an Eventpak:
- Expand the Event Designer option, click on the 'EventPak' option and select 'Install'.
- Click on the 'Choose File' button and locate the EventPak you wish to install. (You must first download the desired EventPak(s) from the KPI Monitoring website.)
- Click on the 'Upload EventPak File' button. You will be shown some general information about the EventPak and its origin; if you click on the 'Applications' tab, you’ll see a list of the individual KS 'applications' that make up the EventPak, as shown in the following illustration:
EventPak Installation Window
Click on 'Install'. The EventPak will be loaded into KPI Monitoring, and you will receive a confirmation message when this process is complete.
Using KPI Monitoring to Monitor Application Data
There are four ways that KPI Monitoring can connect to and monitor data within application databases (web-based and on-prem) and within websites:
- .NET Data Provider (preferred & most efficient connectivity method for on-prem application databases)
- ODBC (32bit)
- OLE/DB
REST API web service (for monitoring hosted apps and data from websites)
The REST API features are discussed in their own chapter ('REST API Triggers'), as web services may be used both as the 'triggering' mechanism for a KS event as well as an 'action' that a KS event executes as a result of being triggered.
Initial Setup
By now you should have successfully installed KPI Monitoring using the instructions in the Installation guide. The next steps in the set-up of KPI Monitoring are:
- Connecting KPI Monitoring to the application(s) you wish to monitor.
- Creating & testing the email account that KPI Monitoring will use for the sending of email alert messages.
- Creating a 'subscriber' (alert recipient) record for yourself to use during event testing.
The following sections will detail connecting KPI Monitoring to an on-prem database; for details on connecting KPI Monitoring with a web or cloud-based app, please see the chapter of this guide titled 'REST API Triggers'.
Step 1: Connect KPI Monitoring to Your Application(s)
KPI Monitoring uses 'events' to monitor for certain data conditions and respond to those conditions by triggering any combination of alerts, reports, and workflow (data updates). All KPI Monitoring events are grouped by 'application'.
An application may refer to a specific product (such as 'My ERP Solution'), a specific module ('Accts Receivable'), or any source of data being monitored ('Manufacturing Newsfeed').
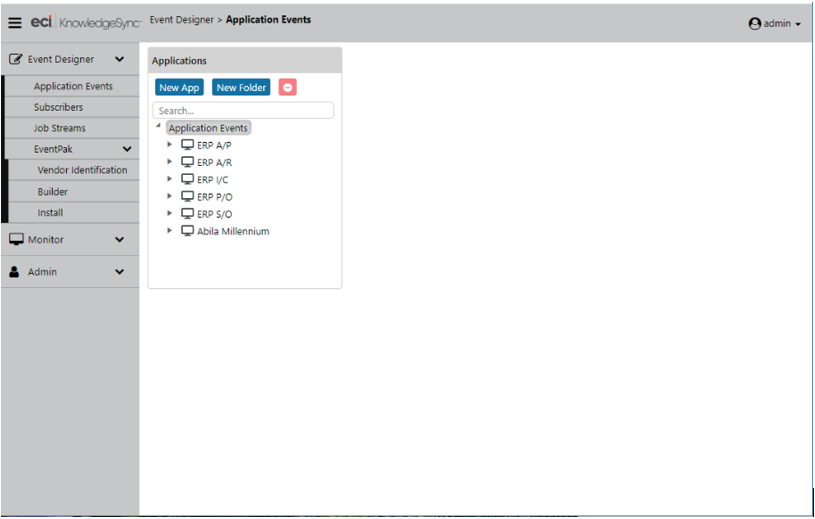
Expand the 'Event Designer' option and then click on 'Application Events'. This will present you with a list of all the applications currently defined within KS; this includes applications that have been created through the installation of one or more EventPaks, as shown in the following illustration:
KPI Monitoring Applications
To connect KPI Monitoring to an application:
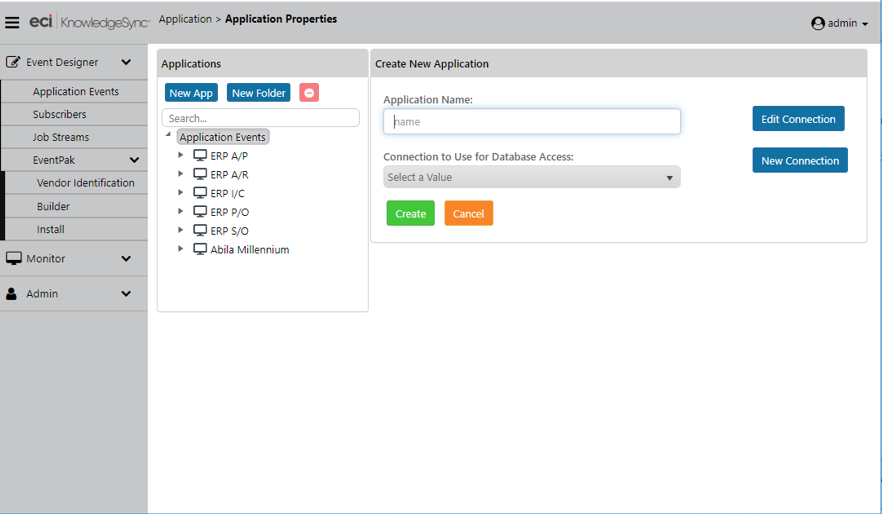
Click on the name of the application you wish KS to monitor. The 'Application Properties' window will appear:
An Applications 'Properties'
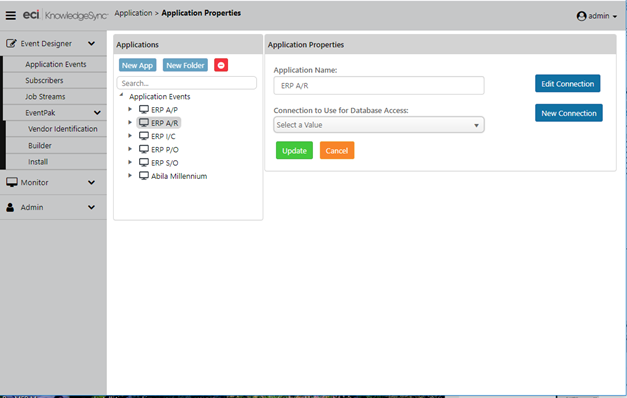
Click on either 'Edit Connection' (if a connection has been specified) or 'New Connection' (if no connection has yet been specified) and the following window will appear:
An Applications Connection Definition
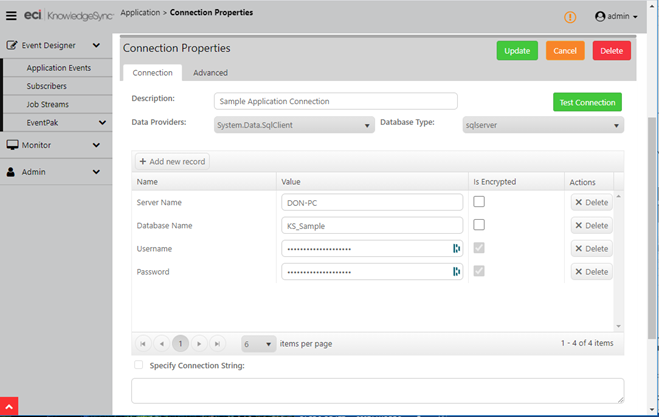
- Select the type of Data Provider and database type and then fill in the appropriate connection information based on whether you are connecting via .NET Database Provider, ODBC or OLE/DB, and then click on “Test Connection”. Once your test has been successful, save the record.
- The options in the 'Advanced' tab should be used only on recommendation of the KPI Monitoring support staff; these options are typically used when KS needs to accommodate special database tables, columns, or identifiers.
Useful Information! Any visual basic script can retrieve the script API values that are configured in the advanced sub-tab, using the method 'KSGetEvent' in a VB script.
- Calling KSGetEvent('apiname') from a script retrieves the name of the API as configured in this option associated with the application that contains the script; the other values retrieve the API user name and password.
Note: the following information regarding .NET Database Provider, ODBC and OLE/DB connections:
.NET Database Provider (preferred & most efficient connection method):
All currently installed database providers will appear from the drop-down list.
ODBC:
Only 'system' DSNs (sources) may be used.
Do not reference mapped drives in any sources (use UNC format instead)
Leave the date separation, long table name, link/join prefix and suffix, and column alias fields with their default values.
OLE/DB:
All currently installed OLE/DB sources will appear from the drop-down list.
If you need to create a New Application
To use KPI Monitoring with an application for which there is not a pre-defined EventPak, you’ll need to create an application. Follow these steps:
Under 'Event Designer', click on 'Application Events' and then on the 'New App' button. You’ll see the following window:
Add New Application
Notes:
You can add 'folders' as well as apps – folders let you group similar applications together. For example, you could have an “ERP Solution” folder, containing multiple applications, all of which are a part of your ERP application.
The sections in the Application Events module can be resized to allow for maximum available screen space when designing or editing. Use the splitter to resize the layouts for Queries, Events, Reports and Web APIs.
- Specify the name of the application you are creating (e.g., 'HR Application'). Then, click on the 'New Connection' button to specify the means of connecting KS to this underlying data – .NET Database Provider, ODBC or OLE/DB and enter the corresponding credentials.
Create the new application and you’ll see it listed under 'Application Events'.
Learn KPI Monitoring Using the 'Sample' Application
KPI Monitoring provides a small, sample ERP database, eventpak and instructions that you can use to learn how KPI Monitoring works. This 'Tutorial and Certification' kit is downloadable from: https://www.KPI Monitoring.com/downloads/downloadable-assets
Creating Multiple Branches from the Same Application
If you’re monitoring multiple 'parts' of an application – such as an ERP application, in which you have accounts receivable, accounts payable, and the like, you may find it easiest to organize your events into multiple applications – a separate branch for each application “module” you wish to monitor.
Do not create a new 'connection' for each application module; instead create a single connection record and use it in all the branches that all point to the same database.
When adding successive application branches in KPI Monitoring, the 'connection' window contains a field called “Connection to Use for Database Access” and there is a list button next to it. Click on that button and select the same connection that was used previously for the database you wish to monitor.
Test your Connection
If you’re monitoring multiple 'parts' of an application –
When you are in the 'Connection Properties' window, the 'Test Connection' button will confirm whether your input connection details (for .NET Database Provider, ODBC or OLE/DB access) are successfully configured.
Step 2: Set up an Email 'Sending' Account
Please see section 2.7.1 for 'quick configuration' options for the email sending account.
KPI Monitoring requires you to configure at least one email account from which it sends alert notifications.
Although most organizations configure only a single email sending account, the ability to define multiple sending accounts allows KS to send out messages from different origins (e.g., some alerts from the sales department, others from the service department) depending on the type of alert being sent.
We recommend using the 'default configuration' buttons at the bottom of the email account configuration window.
To configure an email sending account, follow these steps:
From the KS main window, expand the 'Admin' branch at the far-left, expand the 'Services' sub-branch, and then select 'Email Accounts'. The window like the following will appear:
Email Sending Accounts

- If there are no sending accounts configured, click on the 'Add' button; if you wish to review the configuration of an existing email sending account, click on the blue 'Edit' icon to the left of the record you wish to edit.
- The following window will appear:
Email Sending Account- Configuration
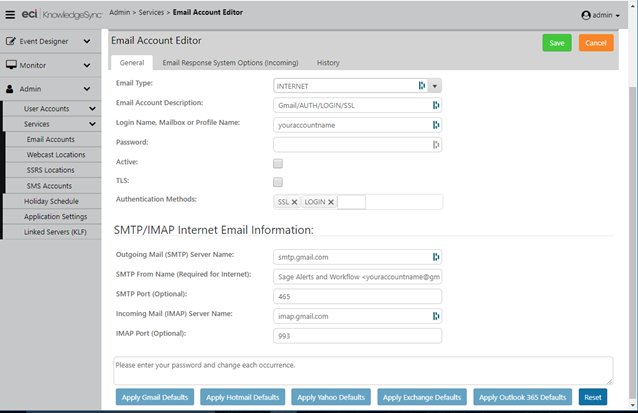
Email Account Configuration Buttons
There are five buttons at the bottom of this window to help you with the configuration of your email sending accounts in KS. These options auto-fill most of the settings needed to work with various email systems, and all that is needed is the login (username), password, and a few additional details (such as the SMTP send from name).
Click on the button that corresponds to (or is most similar to) the email system you wish KS to use and fill in the details that are required.
Email Account Settings
Here is a brief explanation of the email sending account components:
- Email Type: Choices are Internet, Exchange, MAPI, VIM, and Unknown. We suggest using the type of “Internet” for easiest configuration and most flexible usage.
- Account Description: A description of this account, this field also specifies the authentication type which is auto filled by the buttons at the bottom of this window.
- Login Name: The login username / email address.
- Password: The user’s email address password.
- Active: Whether this account is available for sending email.
- TLS: Transport Layer Security. Please see your email administrator for details. Auto filled by the buttons at the bottom of the window.
- Authentication Methods: Please see your email administrator for details. Auto filled by the buttons at the bottom of the window.
- Outgoing SMTP Server Name: The name of the server that will send e-mail.
- SMTP From Name: The name that appears as the 'sender' of the e-mail. This is required for type INTERNET and it must be a valid address with a valid domain name. E.g., john.smith@KPI Monitoring.com.
- SMTP Port: Leave this field with its default value unless otherwise instructed.
- Incoming mail (IMAP) Server Name: The POP Server if monitoring inbound email (see Email Response System).
- IMAP Port: Leave this field with its default value unless otherwise instructed.
Email Account Notes
- We recommend using type 'Internet' with Exchange if the exchange server is configured for SMTP and POP3.
- HTML-formatted email alerts are supported only with an email type of Internet.
-
You may find that you can send email within your domain, but not outside of it. This is due to your SMTP Server not having 'Relay' turned on. Once you set the server to allow 'Relay', verify that no servers other than the servers within your domain can use that SMTP server for relay purposes.
Authentication Types Supported
Authentication is enabled for Internet-based email systems. You have six options:
- SSL: choose Port 465
- LOGIN:
- NTLM: choose Port 25
- MSN:
- CRAM-MD5:
- AUTO:
Please refer to your email administrator regarding the type of authentication required by your email system.
Test your Email Sending Account
Once you have created an email sending account, follow these steps to test it:
- Make sure the KPI Monitoring Windows service is running.
- From the Email Accounts window, click on the account you wish to test.
- Click on the 'Perform Email Test' button. Key in your own mail address as the recipient of this test message and click on 'OK'.
- Check the KPI Monitoring Monitor branch called 'Email Delivery.' You should see your test email go from 'Pending' to 'Sent Today'. If the e-mail appears in 'Errors Today' (or never leaves 'Pending'), there is an error in the configuration.
- If the email fails, stop the KPI Monitoring Windows service and review the email account set-up. Once you have re-configured the email account, you do not need to re-submit the email test as the previous test is still “pending.” Simply re-start the service and see if the pending message gets sent.
Step 3: Define yourself as an Alert 'Subscriber'
The next step is to define yourself as a subscriber – a person who is eligible to receive alert messages. To do so, expand the 'Event Designer' option and click on the 'Subscribers' sub-branch. You’ll see a window like the following:
KPI Monitoring 'Subscribers'
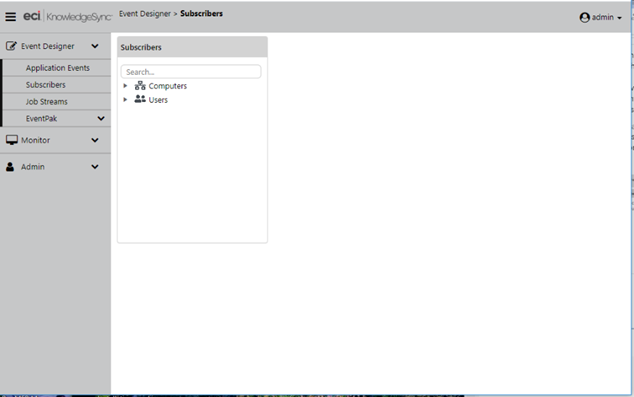
Expand the 'Users' branch and you’ll see subscriber groups, as in the following window.
Subscriber Groups

There are some default groups that come with KPI Monitoring; you can use them, change their names, delete them, and add in groups of your own. (More details on subscribers are located in the 'Subscribers' chapter of this manual.)
For now, let’s add yourself as a subscriber to one of the groups and set yourself up to be able to receive email alerts. Single-click on your selected group and you’ll see a window like the following:
Users in a Group
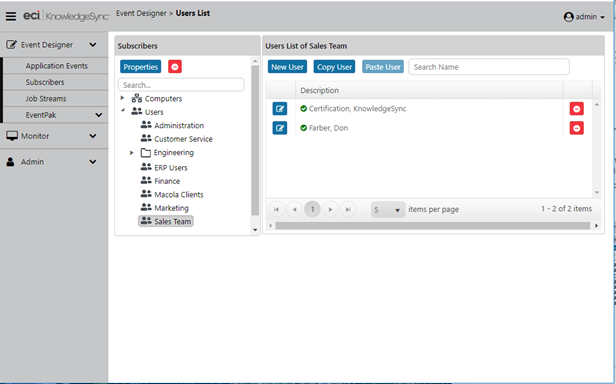
Click on 'New User' and you’ll see the following window:
New User ( Subscriber) : General Info
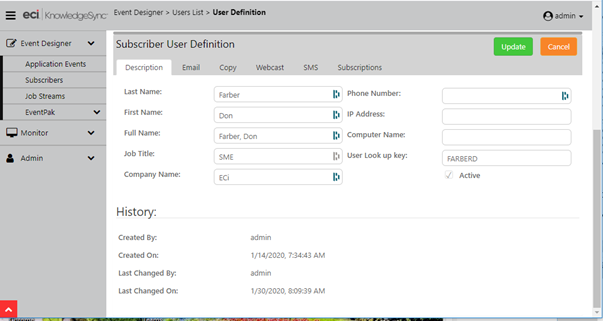
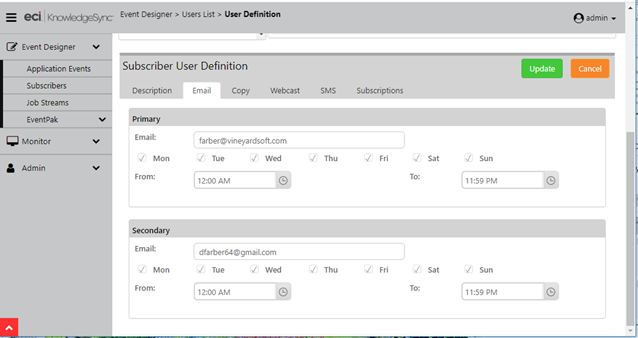
Fill in the five fields on the left of the 'Description' tab, make sure the 'Active' box is checked, and click on the 'Email' tab. Enter your most-often used email address into the 'Primary' address field, click on the weekdays, and leave the daily time range with their defaults to indicate 24 hours a day. Optionally, fill in either the same email address or a different address in the 'Secondary' part of this window. Click on 'Save'.
User Email Address Definition