Schedule Backup

Create Scheduled Backup
- To create a backup to run at regular intervals, on the main menu, click File > Scheduled Backups.
If the Scheduled Backups option is greyed out in the menu you will need to set up the service before you can proceed. For details, see Service Setup.
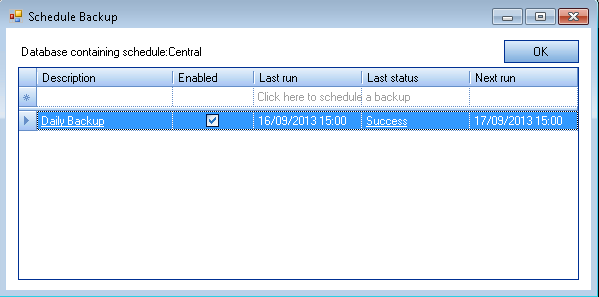
The Schedule Backup window appears.

The database that contains the scheduled information appears at the top of the window. In the example above the description is called Daily Backup.
The Schedule Backup window has the following fields:
- Description – Specify a unique description for the scheduled backup to identify it. This field accepts a maximum of 64 characters.
- Enabled – When the check box is selected the schedule backup will run at the set interval. To stop the scheduler, clear the check box.
- Last run – The date and time the scheduled backup was run.
- Status – The status for the last run backup.
- Next run – The date and time that the next run is scheduled for.
- To create a new schedule click in the Description field. The Schedule Backup window appears.

The Backup tab has the following fields:
- Description – Specify a unique description for the scheduled backup.
- SQL Instance – Select the relevant SQL instance. (Where PCs are running more than one SQL instance).
- Database – Choose the database that you would like to backup from the drop-down list provided.
- Test Connection – Use this button to test the connection to the database specified. If the connection is successful you will be presented with the following message:

- Time – Select the time the database backup will run at.
- Enabled – When the check box is selected the schedule backup will run at the set interval. To stop the scheduler clear the check box.
- Backup Path – Specify the path where the backup file will be stored, where the backup file will be stored i.e. C:\SQLDATA\Backups\
- Click the Advanced tab to specify additional information for the backup schedule.

- Type - Sets the database backup type
- Complete - This option takes a full backup of the database.
- Differential - This is a cumulative backup of all changes made since the last full backup.
- Copy Only - This will schedule a copy (that will not affect the LSN point) and allow a regular backup that can be used for creation of test databases.
- Days – Select the check boxes for the days you want the database backup to run.
- Frequency – Sets up the frequency that the backup will run.
- Once daily – The backup will run once a day at the specified time (specified on the Backup tab).
- Occur every – Use this option if you want the backup to run multiple times every day. Use the first input box to specify the frequency and the second box to specify if that frequency should be applied in minutes or hours. Use the Until field to specify when the last backup in the frequency should run.
- Backups to keep – If this is left as zero all the backups will be kept. Change this number to only keep the specified amount of backups. For instance, changing the Backups to keep field to 2 will result in two backups that will be saved in the folder specified on the Backup tab. When the third backup is done the oldest of the backups will be deleted to ensure that only the 2 most recent backups are kept.
- Performance – Select the Reorganise database and Update statistics check boxes to defragment the database when each backup is done. CCH does not recommend selecting the Shrink Database option, (unless, under guidance from CCH) as shrinking a database introduces page fragmentation.
- Reliability – Select the Verify backup when finished if you want to verify the backup after completion. The backup file integrity will be tested (it restores the file using RestoreHeaderOnly, to check the .bak file can be read) when the backup is finished to ensure that the backup has been completed successfully. If the verification fails, the backup will be marked as unsuccessful.
- Once you are satisfied with the information provided click OK to save the scheduled backup or click Cancel if you don’t want to save the scheduled backup.
When you click OK you will be taken back to the Schedule Backup window where you will see the newly created backup schedule.
Edit Schedule Details and View Backup History
1. Click the Description hyper-link to open the schedule details for editing. In this case 'Daily Backup'. The Backup and Advanced tabs are available for edit (see the above Create Scheduled Backup for further explanation of these two tabs.
2. Click the Last Status hyperlink field to open the history for the backup schedule.

The following fields appear:
- Database – This is the database name that is being backed up with this backup schedule.
- Server – This is the server name the database is located on.
- Backup Path – The backup path specified when the backup schedule was created.
- Backup Name – The unique name given to identify the backup schedule.
- Backup Date – The date and time the last backup was attempted.
- Success – A tick indicates a successful database backup.
- Message – The reason for the failure, in case of one, of the database backup appears here.
Manage Service Setup
How to successfully setup the Service to enable Scheduled backups and visibility of backup history from the homepage control.
The first time you use the Backup and Restore Utility, you need to set up the database where the information for the scheduled backups will be stored.
1. To open the Service Setup window go to the Tools > Service Setup menu option.
- In the Service Setup window:
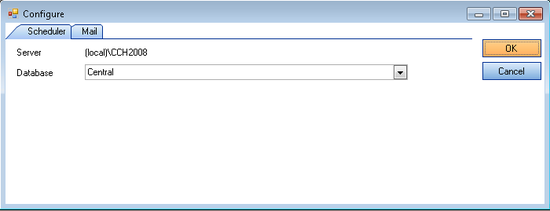
- Server - This field displays the server that was chosen at login. If this is not the server you expected please log out and log back in making sure that you choose the correct server instance.
- Database - Select the database you would like to use, to save the schedule backup information from the drop-down list. Please note that if you intend to use the homepage control to track the status of your backups; this should be the CCH Central database.
- When you are satisfied with the server and database information click OK to create the services.

- Click Yes to proceed.
As soon as the services are created the window closes.
If you are not planning to use the CCH Central homepage control to track the status of scheduled backups, you may want to setup email alerts on the status of the backups. An email is sent only if the backup fails.
Sending Mail Alerts
- Access the Service Setup window from Tools > Service Setup menu option and select the Mail tab.
2. Select the Send mail alerts check box to enable the entry fields.

- SMTP Server – SMTP (Simple Mail Transfer Protocol) address of the mail server
- User Name - Domain name and user name used to log in to the mail system
- Password - Password used to log into the mail system
- Port – Port used by the mailing system
- Use SSL – Select if your mail system uses SSL (Secure Socket Layer)
- Email sent from – Enter a description to show in the From field in your email inbox.
- Send email alerts to – The email address of the person that should receive the alerts
3. When you are happy that all information has been entered correctly, click OK to save and close the screen.
If you want to use the homepage control to track the status of your backups it is recommended that you specify the CCH Central database.