Adding a new Client

Enter Main details for the client
To launch the Add New Client Wizard, on the menu bar, click File > New > Client. The Add New Client Wizard - Step 1 window appears. The information you enter in the Client Personal Details and Responsibility window will appear on the Main tab of the Client page.
Step 1 - Enter Main details for the client. The information you enter in the Client Personal Details and Responsibility window will appear on the Main tab of the Client page.
-
Select whether the new client is a Person or an Organisation. The fields in the window update to reflect this selection.
-
Enter the name details for the client. If the client is a person, the Last Name is mandatory. If the client is an organisation, the Main Name is mandatory. Mandatory fields display a small red triangle like this

. This icon
 appears if you try to skip the field. You cannot move forward until the mandatory field is completed.
- Title: Mr, Mrs, Miss, Lord, etc.
- First, Middle and Last names: These fields are available only if the client is a person.
- Suffix: This field is displayed only for persons. Suffixes such as knighthoods and orders (KBE, MBE, etc.) can be entered here.
- Pre Name and Main Name: These fields are displayed for organisations only. Use the Pre-Name field if the organisation's name starts with 'A' or 'The'. Enter the main part of the name in the Main Name field. As searches are based on the main name, when results are displayed you will see suppliers listed in alphabetical order instead of seeing them all listed under 'T'. The Main Name is mandatory for clients who are organisations.
- Salutation: Any other name that the person is normally known by or prefers.
- Mailing Name: Name used for mailing purposes, alternative to the full name or salutation. If you do not enter a mailing name, the contact's full name will be used.
- Initials: Enter the contact's initials if required.
- Aliases : Select an alias Type from the drop-down list, then click in the Name field and enter the alias. Press [Enter] to save the alias.
3. Enter a unique Code for the client. This is a mandatory field for all clients. Alternatively, to generate a code automatically, click Auto. (The format of the automatically generated client code depends on the settings in Maintenance > Client/Supplier > Client Creation Settings.)
4. If the contact is a person, specify the gender and enter the date of birth.
5. Select the Centre and Category from the drop down lists.
6. Select the partner, department, office and company who will service the client.
7. Enter the Salutation, Mailing Name, Initials and Aliases.
8. To continue using the Wizard, click Next. The Step 2 window opens. This is where you enter Extra details for the client.
Note:
Salutation is any other name that the person is normally known by or prefers. This is different from an alias in that it can be used as the primary way of addressing a contact in a mail merge for example.
Mailing Name is that used for mailing purposes. It may be an alternative to the full name or salutation. If you do not enter a mailing name, it defaults to the contact or client's full name.
Aliases are alternate names that your contacts or clients are known by, for example, a name they want to be known as rather than their actual name. For example, 'Elizabeth Carter' might want to be know as 'Liz Carter', or a company might be called 'General Software Solutions' but be known as 'G.S.S.'
Useful Information! You can choose to continue with the Wizard to enter further details before adding the client to the database or you can click Finish and complete the details on the Client page later.
Step 2 - The Client Extra Details you enter in the Add New Client Wizard - Step 2 window will appear on the Extra tab of the Client page.
Enter Extra details for the client
-
Where relevant, type or select a value for the Extra fields and Extra field groups. Mandatory fields, which are flagged by a red triangle
 , must be completed before you can click Next or Finish.
The Custom Category icon indicates a list that becomes available when you click the Value field. Select a value from the list.
The Custom Field icon indicates that you can type text or select a date in the Value field.
-
When you have entered all the mandatory information, you can either click Finish and add the client to the system or click Next and continue adding details for the client. Clicking Finish creates the client using the information entered thus far. The wizard closes and the Client page is displayed for the new client. Click through the tabs to check, add or edit information. You can add to these details directly on the Client page at any time.
or
To continue entering details for the client on the wizard, click Next. The Step 3 window is displayed. This is where you enter address details.
Note: Entering information in the remaining windows (Steps 3 to 6) of the Add New Client Wizard is optional at this stage. Once the client is created, further details can be entered on the Client page.
Step 3 - The Client Address Details you enter in the Add New Client Wizard - Step 3 window will appear on the Addresses tab of the Client page.
Enter addresses for the client
- Select the Address Type that you want to add details for and then click the ellipsis in the Address field.
- On the Address Search and Maintenance window enter the address details into Address Lines 1, 2 and 3. These may be the house name, street number and street name.
- Enter the name of the Town, State, Post Code and Country and then click Link.
- Click OK on the Link New Address prompt.
- On the Success message click Yes.
- The Client Address Details window opens displaying the details for the Address Type just entered. The new address is added to the database and you can link it to other contacts, clients, suppliers and employees.
- Repeat Steps 1 to 5 for each Address Type needed.
- Enter the Phone, Fax and Mobile numbers.
- Right-click Enter EMail Address Here and over-type the email address. (If you left click on the link, you will open a new email message.)
Note: You can choose to continue with the Wizard to add the client to the database or click Finish and complete the details on the Client page later.
To continue using the Wizard, click Next. The Step 4 window appears for you to enter any notes you need about the client.
Link the client to an existing address
- Select the Address Type that you want to link to in the database and then click the ellipsis in the Address field.
- On the Address Search and Maintenance window, in the Find a drop-down list, select the part of the address you want to search on.
- In the which starts with field, enter the search text you want to find and then click Search.
- On the search results list click the address you want to link the client to and then click Link.
- To see who else is linked to the address click Show.
- Click OK on the Success message. The Client Address Details window opens showing the details for the Address Type just located.
- Repeat Steps 1 to 6 for each Address Type you want to enter for the client.
- Enter the Phone, Fax and Mobile numbers.
- Right-click Enter EMail Address Here and over-type the email address. (If you click the link, you will open a new email message.)
Note: You can choose to continue with the Wizard to add the client to the database or click Finish and complete the details on the Client page later.
To continue using the Wizard, click Next. The Step 4 window appears for you to enter any notes you need about the client.
Copy from
The Copy from option is available on the Address tab within Add New Client/Contact/Supplier Wizard, allowing users the ability to copy an address from one type to another address e.g. if the client has the same home and business address. The Copy from option contains a list with all address types:
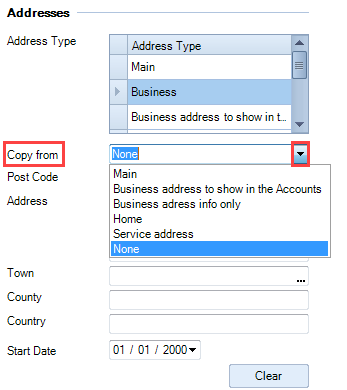
To copy an address set on a type to another address type:
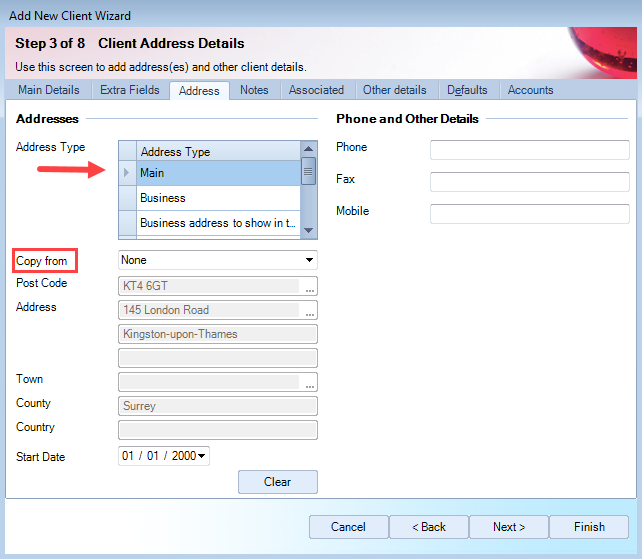
- On the Address tab from the Add New Client/Contact/Supplier Wizard highlight an Address Type: e.g. Main
- On the Copy from field leave the None option to add the new address.
- Enter the details of the address that will be used for other address types: Post Code, Address, Town, County, Country, Start Date.
- Highlight another Address Type: e.g. Registered Office
- From the Copy from drop down list select the address type that already has an address set. (Main in this example)
- The Registered Office is populated with the details from the Main address.
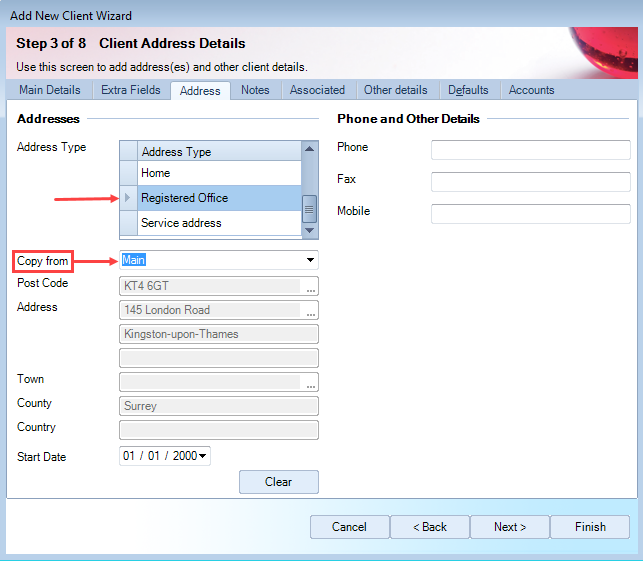
- Click Finish. The newly created client has both addresses - Main and Registered Address - with the same details:
Note: An address type that copies the details of an address will be excluded from the Copy from list for another address type. In the example above, if the Home Address is selected in the Address Type section, the Registered Office will not be displayed in the Copy from list because it uses the details from the Main address.
Step 4 - The Client Note details you enter in the Add New Client Wizard - Step 4 window appear on the Main tab of the Client page.
Enter a note for the client
- Enter the Title for the note. The current date is the default and is displayed in the Date field. You can select a different date.
- Type your notes into the block. Use the formatting icons to apply rich text styles such as bold and italic to the text in the Notes box, or to change fonts, etc.
- Click the
 icon to launch the spellchecker to check for typing and spelling errors.
 - 4. To continue using the Wizard, click Next. The Step 5 window appears. This is where you enter details of contacts associated with the new client.
Note: You can choose to continue with the Wizard to add the client to the database or click Finish and complete the details on the Client page later.