Assignment Details Page

Home tab
The Home tab displays key performance indicators (KPIs) for a client's assignment, e.g. Compliance. It is a graphical display showing the:
- Assignment Aged WIP
- Assignment Billing – Actual v. Budget
- Recent Activity listing the last WIP added, bill raised and receipt entered against the assignment
- Tasks listing any outstanding tasks planned for the assignment.
Main tab
Overview: The Main tab is the first tab you see when you open a Client's Assignment Details Page. It gives an overview of the selected assignment.
Options: From the Assignment Details Page > Main tab you can view and amend the following information:
- An Assignment Team comprises employees who are assigned to the team automatically when their Primary Station Record matches that of the centre, company, office or department of the client's assignment.
- the Assignment Type (view field only)
- the Company, Office, Department, and Centre that the assignment belongs to
- the Date Created being the date the assignment was created (view field only)
- the status of the assignment (open, held or closed)
- the Maximum Fee and Maximum Rate
- the Recovery Rate
- any Fixed Fee Type that has been agreed with the client (this is a memo field to remind you when to raise a fee)
- the Assignment Billing Timetable used to enter budgets and amounts used in the assignment.
- the Assignment Team and the responsibility of each team member for the assignment
- notes for your own or a colleague's information. For more information about adding or editing a note, click here.
Job/Schedule tab
The Schedule tab is used to manage, edit and add schedules, stages and tasks involved with a client's assignment. These actions are completed using the options available under Schedules on the Task Bar.
Task Heading Example: Choose a Client
The first step is to add a Job/Schedule to the Assignment and then define the work to be carried out by adding stages. You can choose to add pre-defined stages from a template or add custom stages appropriate to the schedule.
Once these steps are completed, you assign the work to employees and define the dates and budgets and tasks to be done. Employees can also view Job information within the assignment by click on the Job/Schedule tab:

Note: Only the Target date is available for editing from within the Job/Schedule tab
Task Related checkbox
By selecting the Task Related checkbox shown beside the Job/Schedule description box, you can limit the tasks available for selection in Timesheets to that client's assignment. When selected, only those task in the client's schedule are displayed to the employee when the Assignment and Schedule are selected in their Timesheet.
- If you want all tasks available for selection, leave the Task Related check box blank.
- If you do not want to allocate tasks to specific employees you can still monitor and control the tasks entered against an assignment by allocating the tasks to the -UNSPECIFIED- category. This allows any employee to enter time against the task.
Extra tab
The Extra tab creates and maintains custom category and field information. The custom category is used to store information that cannot be logically stored elsewhere in the contact, client, assignment or supplier areas.
Rates tab
Each assignment defaults to the employee's standard charge out rate. You can change that rate under Rates tab as well as assign an expiry date to it. You can also use this tab to assign a rate type (e.g. contract rate) to a particular assignment so that time spent is charged to the contract rate rather than the standard rate when the employee completes their Timesheet. You can use the - UNSPEC- employee to assign the special rate to any employee working on the assignment.
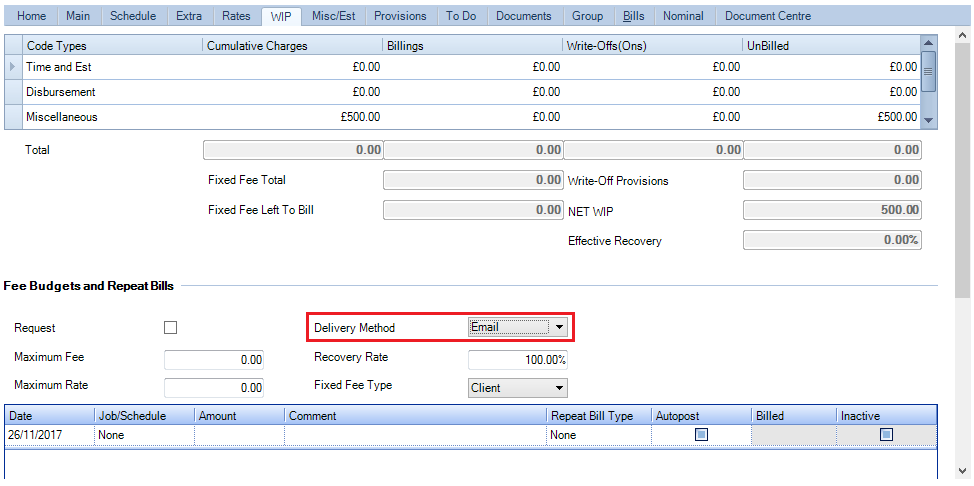
WIP tab
The WIP tab displays the transaction history of a work done for a client. It shows the transaction totals broken up over the categories of Time and Est, Disbursement and Miscellaneous. Clicking the WIP enquiry button on the Task Bar will provide detailed information about any one of categories.
Assignments – Delivery Method
Practices have the ability to set a delivery method at assignment level, which is used within the Billing Wizard.
Note: Once a bill is created and filed into CCH Document Management a workflow can be trigged to automate the process. Within this workflow, practices can choose whether to automate or manually send out invoices, whether by email, CCH OneClick or post.
Delivery Method availablity
The Delivery Method field is available within the following windows:
- Client > Bills Tab
- Billing > Draft Bills
- Billing > Bills Ready to Print
- Billing > VAT Invoices to Print
- Billing > VAT Invoice History
- Billing > Billing History
- Billing > Billing History by Partner
Assignments – Delivery Method Bulk Update
An option is available in the Bulk Update Wizard for Assignments called Delivery Method, giving users the ability to update the Delivery Method field from the Assignment screen > WIP tab > Fee Budgets and Repeat Bills section.
To bulk update the value of the Delivery Method field, select the assignments from the Find Assignments screen then click on Bulk Update option from the ribbon.
- In Step 1 of Bulk Update Wizard, select Delivery Method from the Field Name drop down list and click Next.

- In Step 2, set the value for the Delivery Method field and click Next.

- Step 3, the Confirmation tab of Bulk Update Wizard, displays the number of records that will be updated. Click Finish to update the Delivery Method field for the selected assignments. If the Delivery Method field is successfully updated for all the selected assignments, the following dialog will be displayed:

Note: Delivery Method is a field included in assignments. The value set on this field at assignment level is used in Billing Wizard. After the bill is created and filed into CCH Document Management a Document workflow that contains the Check Delivery Method activity can be started. This activity checks the value of the Delivery Method set on the bill and depending on this value, the bill is then emailed to clients or published to CCH OneClick.
Ability to lock down delivery method
A Task Permission is available to enable practices the ability to lock down who can add a Delivery Method. The new task permission applies to the following areas:
- Client > Assignments > WIP Tab
- Assignment Templates > Billing Tab
- Billing > Draft Bills > Open Draft No > Master Paragraphs
- Find Assignments > Bulk update
The Task Permission is located within File> Maintenance > Security > Task Permissions.

Note: If a user does not have the permission set, they are unable to set Delivery Methods.
Emailing Bills using Delivery Method
A workflow step Check Delivery Method combines with saving bills into CCH Document Management to allow firms to automate the generation and delivery of fee notes via email or CCH OneClick This is particularly useful for repetitive fixed fee services such as VAT and Payroll and can result in significantly reduced administrative overhead and faster cash collection.
Users can email to clients or publish to CCH OneClick the bills from CCH Practice Management by using the Check Delivery Method activity in a Document workflow. The Check Delivery Method activity checks the Delivery Method value set on the Billing Wizard and allows users to assign three outcomes corresponding to the values of the Delivery Method field: Post, Publish to OneClick or Email.
The value set on this field at assignment level is used in Billing Wizard. After the bill is created and filed into CCH Document Management, a Document workflow that contains the Check Delivery Method activity can be started. This activity checks the value of the Delivery Method set on the bill and depending on this value, the bill is then emailed to clients or published to CCH OneClick.
Misc/Est tab
The Misc/Est tab holds information to review or create miscellaneous charges and estimates for a client's assignment. A miscellaneous charge is a cost that you want to pass on to the client that cannot be entered onto a Timesheet or recorded as a disbursement. It is often a fixed amount charge that you have been billed for on a client’s behalf. They can also be used for entering opening WIP balances into the ledger.
Applying a Miscellaneous Charge
There are two ways of applying a miscellaneous charge:
- Use this tab if you want to use a miscellaneous charge to increase the amount of WIP held against the client's assignment. The miscellaneous charges shows on reports but does not increase the amount recorded for time or disbursements. You bill the charge as you would any other WIP amount.
- Use the Bill tab if you only want to increase the billable amount for a client without affecting their WIP total.
An estimate is added at the time of billing from the Bill tab and reviewed via this Misc/Est tab. The estimate is used to raise an invoice for client work that has not yet been entered as WIP and puts a credit against the total WIP amount. There is no write-off/on required. Like a miscellaneous charge, you can apply an estimate against any client assignment, regardless of whether it has any billable WIP against it.
Provisions tab
Provisions are made against an assignment if there is a doubt as to how recoverable the WIP and debtors might be on an assignment. The information you enter is recorded as memo information and cannot be deleted. When you create a new provision you need to select which provision type you are creating by selecting from the two options in the Ledger drop-down list (i.e. WIP or Debtors). You also select the date, enter the expected write–off amount in the Amount field and any comments in the Comments field.
WIP Provision setup
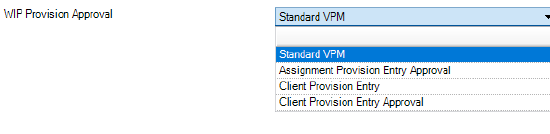
WIP Provision Approval
This functionality allows firms to select which mode of WIP Provision is entered at a practice level. The four modes are as follows:
- Standard VPM
- Assignment Provision Entry Approval
- Client Provision Entry
- Client Provision Entry Approval
The default setting is 'Standard VPM'. There is no functionality change to how existing WIP Provisions are applied i.e. WIP Provisions are applied at Assignment level only within the Provisions tab. Any WIP Provision added using Standard VPM does not require Approval.
To alter the default setting, navigate to File - Maintenance - Miscellaneoous - Miscellaneoous and select the required mode from the 'WIP Provision Approval' drop down list
Note: Access to the Miscellaneous menu option is controlled by the existing security permission key.
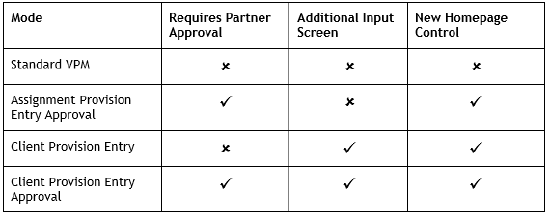
The table below provides a top level summary of the mode features:
Note: Entry of WIP Provisions via any of the above modes is controlled by the existing Task Permission #Assignment @Provisions task
WIP Provision Entry
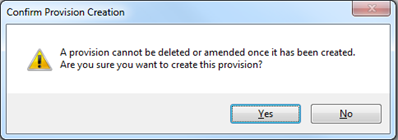
Entry of Standard WIP provisions is accessed from the Provisions Tab within a client assignment. Enter the provision on the blank line and select WIP from the Ledger drop down menu. After adding the entry the following message appears:

Yes - Commits the Entry. The provision is unable to be edited or deleted.
No - The date, value and reason on the provision are able to be amended until committed.
Assignment Provision Entry Approval
This new mode ‘Assignment Provision Entry Approval’ enables sites to apply partner approval for all WIP Provisions entered. The initial entry of WIP Provisions remains the same i.e. entry at assignment level, within the Provisions Tab. The partner (set within the Client responsibility tab) is required to approve their WIP Provision. Approval of the WIP provision is achieved two ways:
- Homepage Control
- Provisions Tab
Cross Partner Approval
There may be times where a client partner is required to approve another client partner WIP Provision. This is achieved by the Task Permission:
- #Homepage #Provision Approval #Allow Cross Partner Approval
Additional options are available within the Homepage Control when the ‘Allow Cross Partner Approval’ Permission is set. These options are accessed through right clicking the homepage control:
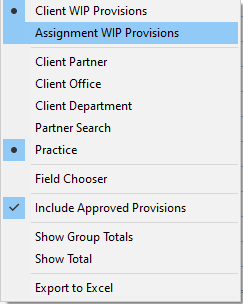
The options shown without Cross Partner Approval enabled, are the same with the exception of ability to swtich the view between Partners (inc. Partner Search), Offices, Departments and Practice view.
Note: This is related to Partner responsibility and NOT to security groups. A Superuser who is not a partner is not able to carry out this function.
Homepage Control
Approval: A list of all ‘Unapproved’ WIP Provisions for which the partner is responsible is displayed. Approval is achieved by selecting the applicable provision entries and clicking the  Approval icon at the bottom of the homepage control. This can also be done on the Provisions tab within a client assignment
Deletion: Partners are able to delete ‘Unapproved’ WIP Provisions by selecting the relevant provision entries and clicking the  deletion icon at the bottom of the homepage control. This can also be done on the Provisions tab within a client assignment.
Note: Client partners are only able to approve or delete unapproved WIP Provisions belonging to clients where they are the set as the partner responsible. Sites are required to grant the ‘Cross Partner Approval’ permission to enable Partners to approve Assignment WIP Provisions belonging to other client partners.
Client Provision Entry/Client Provision Entry Approval
Either of these modes are selected from the WIP Provision maintenance area (File - Maintenance - Miscellaneous - Miscellaneous) and enables sites to quickly add WIP Provisions at Client level. The WIP provision is apportioned evenly against all open assignments for the client(s). Any WIP provision added using this mode does not require approval. With this mode enabled, users can still apply provisions at assignment level if required.
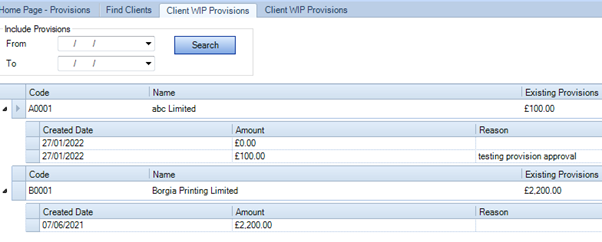
The Client Provision Entry can be accessed from the Ribbon on the Find Clients screen. Select your client(s) and naviagte to the WIP Provisions button:

Entering a Client WIP Provision
Having selected your client(s) and entered the WIP Provisions screen using the above method, you can proceed to enter the following columns for each client:
- Amount
- Date
- Reason
After adding the required information, you will receive the following message:
Yes - Commits the Entry. The provision is unable to be edited or deleted.
No - The date, value and reason on the provision are able to be amended until committed.
Clicking on the  option next to each client, lists all historic provisions entered. Users can refine the list of past provisions, by entering From/To Dates and searching. (This returns provisions within the specified date range)
Note: If the entry option is greyed out on the Client WIP Provisions screen, the client is either closed, or there are no open assignments attached to the client.
Smart Reports
Within the WIP group heading two additional reports have been created to enable users to report on any approved and unapproved WIP Provisions with their relevant reasons:
- WIP Provisions By Assignment
- WIP Provisions By Client
- Control by Client WIP and Debtors with Provisions and Cash
- Provisions; to return values within the Provisions column, ensure the ProvisionsOn configuration key is set to 1. Any provisions added within adjustment mode (which match the report date range) is then displayed.
Two task permission keys have also been created under the Product of VPM, within File > Maintenance > Security > Task Permissions:
- Smart Reports : WIP - WIP Provisions By Assignment
- Smart Reports : WIP - WIP Provisions by Client
Note: All unapproved WIP Provision values are excluded from any report using the WIP Provision field.
Activities tab
The Activities tab allows you to view and amend the tasks that are outstanding or completed for an assignment. Two additional drop-down lists allow you to sort schedules by status or by date. Overdue schedules are shown in red.
Documents tab
The Documents tab provides you with the facility to set up links to documents created outside the system.
Document Types: When you click a Document link, the document will automatically open the application the document was created in. You can link to documents such as:
- Microsoft Word documents
- Microsoft Excel spreadsheets
- Internet web pages (HTML)
- PDFs
- Microsoft Access database files
- Bitmaps
- Microsoft PowerPoint presentations
- Movies and sound clips.
You can also link to a folder holding documents relating to an assignment. When you click the link to a folder, Windows Explorer opens showing the contents of the folder for selection. The Documents tab gives you the facility to set up a document management system where links to documents are saved so that everyone can find information relating to an assignment. However, there is also the same facility to manage documents using the Documents tab in the Contacts, Clients or Suppliers function. The practice will decide which function will be used so that everyone uses the document management system consistently.
Note: The documents must be backed-up using the practice's normal backup procedures because the documents are not stored within this system. The system administrator sets up the path where the documents are saved and located.
Group tab
The Group tab displays the relationship that one assignment has with another. It is also the tab where you view and create billing groups.
Using the Group tab: Generally, a client will want one invoice billed to them. However, there are times that a client will want an invoice billed to one or more of their subsidiary or associated entities. You can accommodate the client's need by using the Group tab to set up a Parent Assignment with one or more Child Assignments belonging to that client. Creating groups of assignments allows the WIP from other assignments to be billed to the parent assignment on the same invoice. You can also report on these billing groups.
Bills tab
The Bills tab provides details of draft bills together with a full billing history of bills created at assignment level only for the selected assignment.
Note: All bills for the client, whether they have been created at assignment level or client level, will display in the Bills tab on the Client page.
Using the Bills tab: Any draft bills created for the assignment can be accessed from here. Double-click a draft bill in the list to open the Billing Main page for the bill from where you can complete the billing process. Once a bill has been posted it will appear in the Full Billing History area. The Full Billing History area shows the assignment's previous invoices. From here you can view the previous bills and use them as a template for standing orders to be raised at the assignment level.
There are three buttons at the foot of the Bills tab window:
- Click Report to produce a Draft Internal Bill Report of the selected bill displayed in a Print Preview window.
- Click S/O (Standing Order) to display the Create New Standing Orders Template window where you can use an existing bill to generate repeat bill entries. For example, you could stipulate that a particular bill was required on a specific frequency (that is, daily, weekly, fortnightly and monthly). If you want to create a standing order based on a bill created at the assignment level, you will need to create the standing order from the Bills tab in the Assignment page.
- Click Reverse to reverse or partially reverse a bill. You will need to be authorised to do this.
- Click the Preview button
 to preview the bill in MS Word.
Nominal tab
The Nominal tab assigns, maintains or deletes company's nominal account for the open assignment. This information is used when raising bills against the assignment for general ledger integration. All the companies that have been set up in your system will be listed in this tab.
Using the Nominal tab
If you want to add a new nominal account for the selected assignment, click in the Nominal Accounts column next to the company you want to assign an account to for this assignment to display the accounts available, then select the required one. The entries in the Nominal tab can be edited by changing the selection in the Nominal Accounts area for a company, or deleted by selecting the line and pressing the [Delete] key. The nominal account will be removed from the field.
Bulk Update/Add
Practices have the ability to update/add nominal codes to assignments in bulk via the Bulk Update tool within the Find Assignments area:
Note: Users may wish to utilise the Advanced Search functionality to identify a list of specific Assignments
Note: The list of nominals returned depends on the Company selected
- Select the assignments you wish to either add or update the nominals for.
- Select Bulk Update button from the ribbon bar
- From the Field Name option, select Nominal Code
- Select the Company
- Select the Nominal
- Overwrite existing nominal values for selected company – Tick this to overwrite nominals already present.
Note: If the overwrite option is selected where no nominal already exists, the nominal will not be updated.
Exceptions
Where assignments have been selected that already have a nominal present and the Overwrite existing nominal values for selected company option was not selected, then the following is returned:
Where a Job is ticked with no corresponding assignment from the Find Assignments window, then the following is returned: