CCH KPI Monitoring: Email Response System (ERS)

The Email Response System (ERS)
The Email Response System enables KPI Monitoring to monitor (and respond to) the content of incoming email messages in much the same way that you can monitor the contents of application databases. If an email message meets certain criteria, you can:
- Re-route the message to specific recipients
- Notify people about the message
- Auto-reply to the sender
- Trigger the generation and delivery of specific reports and/or forms
- Match the sender of the email with a record in an underlying database
- Use the contents of the message to add or update information in an underlying database
- ERS refers specifically to the ability to monitor incoming messages and respond to them; if your interest is only in sending outgoing alert messages via email, you do not need to use the ERS.
- Authentication and secure sockets (SSL) are supported in ERS.
ERS and Web Forms
ERS can monitor email messages coming from any source; this includes messages generated from data entered on a web form, as web forms typically create email messages containing data from the completed form. Thus with the ERS, you can take the contents of email messages created from a web form and then use KPI Monitoring’s standard capabilities to trigger application updates, send alerts, auto-respond to the person who filled out the form, and so on.
Supported Email Systems
ERS supports all of email systems listed in the KPI Monitoring Email Account Setup option documented earlier in this manual (under KPI Monitoring Administration).
How ERS Works
Here is an overview of how ERS works:
- You identify what email accounts KPI Monitoring will monitor for incoming messages.
- When a new message arrives, KPI Monitoring loads its data into an internal table called “Inbox”.
- Queries check the content of the incoming email message to see if the message meets certain criteria.
- Events that use these queries send out alerts, auto-respond to the sender, and (if appropriate), and update application databases with the message data.
- The key to this process is that KPI Monitoring takes each incoming message and creates a database record (in the “inbox” table) out of it. As a result, standard trigger (query) and event design functions are used to process and respond to each message.
What This Chapter Covers
This chapter covers the steps to configure KPI Monitoring to monitor incoming email and load those messages as records into the table called “Inbox”.
Once those email records are loaded into the “inbox”, you may refer to the chapters on “Query Designing” and “Event Designing” for details on how to identify and respond to those email message records.
Create Connection for ERS Database
KPI Monitoring processes incoming email messages by loading them into a table called “Inbox” which is located in the SQL Server database called “KS_Inbox”. Connecting KPI Monitoring to this underlying SQL Server database may be done via any of the methods detailed in the Query Designing chapter of this guide (.NET database provider, OLE/DB, or ODBC).
Optimum system performance is obtained by using the SQL .NET data provider.
Identify Email Accounts to Monitor
To identify the email accounts that will be monitored for incoming messages, follow these steps:
Expand the Administrator option, select “Services” and then “Email Accounts”.
If the account you wish to monitor for incoming message is listed, click on the blue Edit button; if not, click on the “Add” button.
Email Account Properties
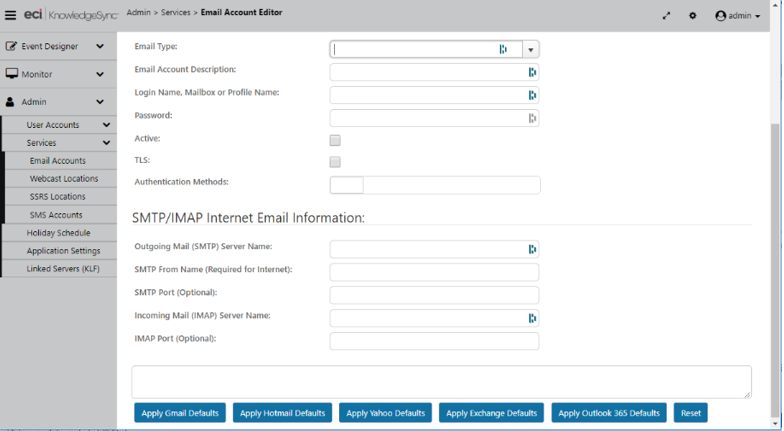
KNOWLEDGESYNC EMAIL ACCOUNT SETUP WINDOW
There are five options for Automatic Email Setup:
- Gmail
- Hotmail
- Yahoo mail
- Exchange (non-hosted)
- Outlook 365 (hosted Exchange)
If you will be using one of these methods, click on the corresponding button at the bottom of the email setup window. Doing so will auto-fill the settings for these email systems. All that is needed is the login (username), password, and the SMTP Send from Name. Please do not change any other values.
Please refer to the following Microsoft Article for further information on Outlook 365 account settings:
http://office.microsoft.com/en-ca/ou...102908389.aspx
In the following example the Outlook 365 option was chosen. You can see the fields that require information input as they contain the word “your”, (i.e. youraccountname, yourserver.outlook.com).
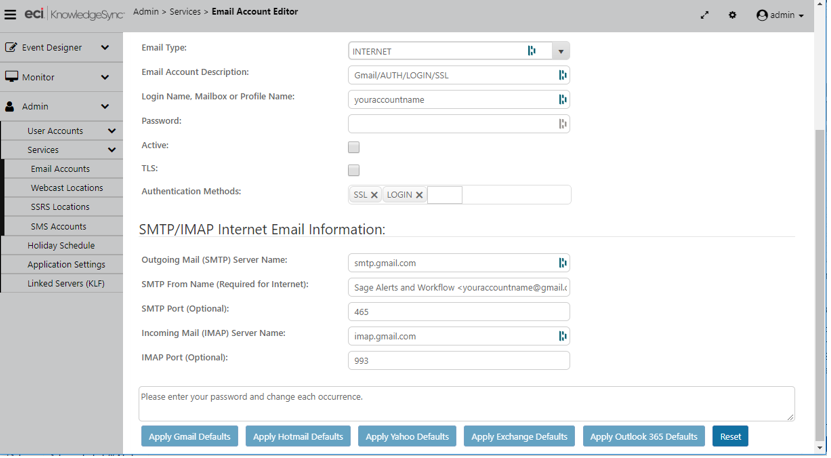
OUTLOOK 365 EMAIL ACCOUNT SETUP
The following describes the email account configuration fields:
Email Type: Select from Internet, MAPI, Exchange, or VIM. We recommend INTERNET.
Account Description: This value defaults based on which button at the bottom of the email setup window was selected. Do not modify this value unless instructed by KPI Monitoring Support personnel.
Login Name: Fill in this value based on the default format that appears.
Password: The email password for this user.
Active: Whether this account is currently available for sending email (you can configure an account without enabling it for immediate use).
TLS: Whether TLS authentication and encryption is enabled for this account.
Authentication Method: Select from SSL, LOGIN, NTLM, MSN, CRAM-MD5 and AUTO.
Outgoing mail SMTP Server Name: The server that will be used when sending email notifications via the INTERNET method.
SMTP From Name: The name that will appear as the "sender" of the email alert message. It is required when using type INTERNET and it MUST be a valid email address with a valid domain name. For example, a valid from name will look like the following: KPI Monitoring <youraccountname@gmail.com>
SMTP Port: The port that will be used to accommodate firewall security software. Leave this field blank unless a default value appears.
Incoming Mail Server Name: The name of the server that monitors the inbound email.
IMAP Port: The port that will be used to accommodate firewall security software. Leave this field blank unless a default value appears.
Email Response System Options
When you click on the “Email Response System Options (Incoming)” tab, you’ll be presented with the following window:
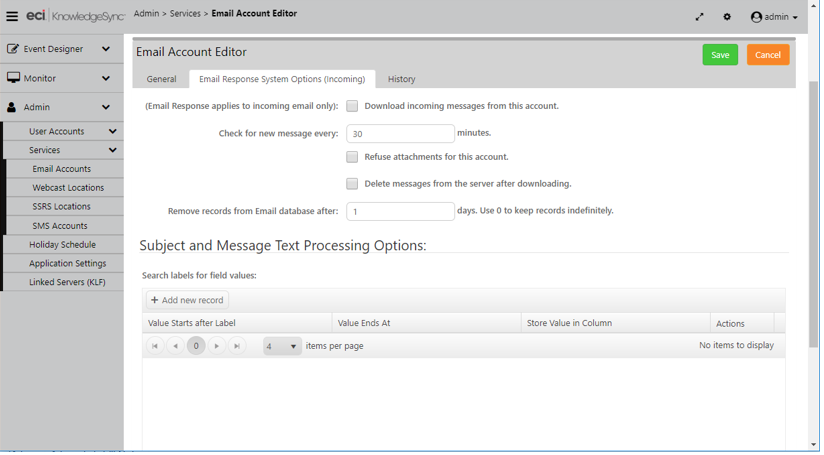
EMAIL RESPONSE SYSTEM OPTIONS (INCOMING)
The following is a brief description of the ERS configuration options:
- Download incoming messages. Check this box if KPI Monitoring should download messages sent to this account.
- Check for new messages every n minutes: Specify how often (in minutes) KPI Monitoring will check for new messages sent to this account.
- Refuse attachments for this account: Check this box if you do not want to download email attachments. (ERS cannot scan the contents of attached files but can scan the names of attachments.)
- Delete messages after downloading: Check this box to delete downloaded messages from the email server after they are stored in the ERS database. Check this option only if there are no other applications or email clients that need these messages.
- Remove records from database after n days.: Specify the number of days that email records will be kept in the ERS database. KPI Monitoring recommends 120 days; specify a value of ‘0’ to keep email records indefinitely.
ERS & Attached Files
Although the ERS cannot scan the contents of attached files, it can identify whether a message has attachments, and the names of them. Additionally, attachments are automatically stored in the KPI Monitoring “Attachments” folder, and an ERS event may copy or move the attached files to a location of your choice.
Attachment files are always created with unique names.
Message Text Parsing
KPI Monitoring can parse through the contents of incoming messages and can load individual elements of message data into specific fields in the ERS inbox table.
For example, consider mail message text like the following:
- Company Name: Acme Corporation
- Address: 1 Main Street
- Contact Name: Robert Smith
- Phone: 800-555-1212
- Request: Please send me information you have regarding your product.
You can tell KPI Monitoring to take the value after “Company Name:” and store it in the inbox field called “account”. Likewise, the value after “Address:” could be stored in an Inbox field called “address”, and so on. This is referred to as “parsing” the data in an incoming message and mapping to a corresponding field in the inbox table. The inbox table comes pre-configured with a number of fields that can have data parsed into them from an incoming message; you may also modify the inbox table to include additional fields that you’d like to map data to.
The Inbox Table
You can modify the Inbox table to add columns or modify the names of existing columns. You must stop the KPI Monitoring service before making changes and re-start the Service when done.
Pre-Defined Loadable Inbox Fields
The following fields in the inbox table may be loaded with data from incoming messages.
| Inbox Field Name | Default Purpose |
| Account Account_no Address Application Case_no City Country Fax First_Name Full_Name Incident_No Last_Name License_No Mobile Notes Order_No Pager Phone_Home Phone_Work Postal Problem Product Question Request Serial_No Service Service_No Solution State Ticket_No Title Tracking_No Udf_date1-Udf_date3 Udf_Flag Udf_Memo Udf_num1-Udf_num3 Udf1 – Ufld5 User_Name Version Web_Site |
The sender’s account name The sender’s account number The sender’s address The application the sender is writing about The case number referenced in the message The sender’s city The sender’s country The sender’s preferred reply-to email address The sender’s fax number The sender’s first name The sender’s full name The incident number referenced in the message The sender’s last name The license number referenced in the message The sender’s cell phone number Message notes The order number referenced in the message The sender’s pager number The sender’s home phone number The sender’s work phone number The sender’s postal (zip) code The description of the problem/issue The product that the sender is writing about The question text The request details The serial number The description of the service required The service number referenced in the message The solution text for a problem or question The sender’s state The ticket number referenced in the message The sender’s title The tracking number referenced in the message Date and time-based user-definable fields. Integer-based user-definable field. Memo-based (long text) user-definable field. Real number-based user-definable fields. Five user-definable ERS data fields The sender’s username. The version of the product referenced in the message The sender’s web site address |
How To Specify Inbox Parsing
The order in which you specify the parsing fields is very important; the order that you designate in KPI Monitoring must be the same as the order that the fields appear within incoming email messages. To configure mail message parsing, go to the bottom of the Email Response System (Incoming)” tab – where it says “Subject and Message Text Processing Options” and follow these steps:
- Click on the “+ Add New Record” button.
- Key in the text that will precede the value (e.g., “Account:”).
- Click in “Value Ends at” and choose from:
o Carriage return
o Line feed
o Blank space
o End of message subject
o End of message body
o End of subject or message - Click in “Store Value in Column” and select (from the drop-down list) the KS Inbox table’s column to load this value into (e.g., “account_no”).
- Repeat for each field you wish to map.
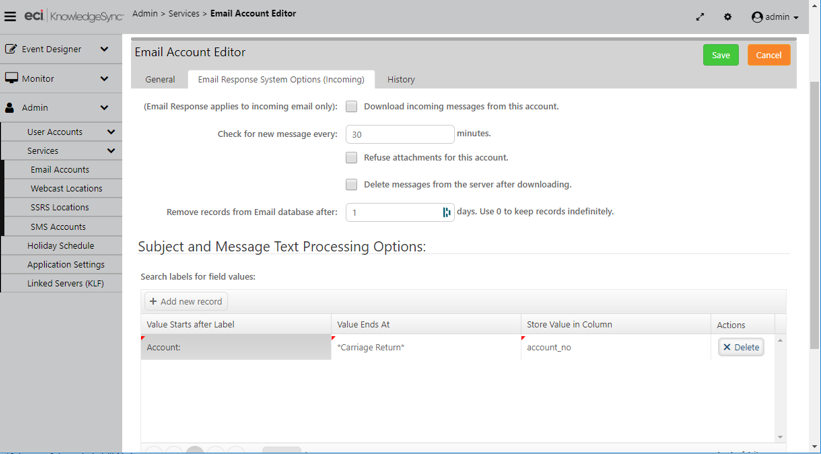
INBOX MESSAGE TEXT PARSING
Message Posting Options
At the bottom of the Email Response System tab, you have the option to specify whether you would like to post (store) downloaded mail messages in another database for historical retention. To use this function, follow these steps:
Check the option to “Post incoming messages to an alternate database”.
Choose the database connection (e.g., provider or ODBC source) that points to this database.
Enter the name of the table (within the destination database) to which the inbox records will be posted.
The destination database table must be configured to exactly mirror the column names that exist within the inbox table, and the alternate database table must have a unique primary key.
Create ERS Connection (Outside of KPI Monitoring)
ERS data is stored in a SQL Server database called “KS_Inbox”. As detailed earlier in this chapter you’ll need to create a connection to that database using either a .NET data provider (preferred connection method), ODBC, or OLE/DB in order to allow KS to monitor and respond to incoming emails.
Create ERS Application (Inside KPI Monitoring)
ERS queries and events must be stored within their own application in KPI Monitoring. To configure this, follow these steps:
- Log into KPI Monitoring and expand your list of application events. If a branch for the Email Response System exists, click on it and view its “Properties”. If an ERS branch does not exist, click on the “New App” button and create an application called “Email Response System” or simply “ERS”.
- Select the connection that points at the inbox database and be sure to supply the required credentials.
- Save and close your work.
Inbox Queries
ERS queries retrieve data from the inbox table. This table contains both “loadable” fields (detailed earlier in this chapter) as well as pre-loaded fields that KPI Monitoring populates with details from incoming messages.
The following list describes all the inbox pre-loaded fields. A query may retrieve and use data from any combination of loadable and pre-loaded data fields. Please do not modify or remove any of the following fields from the Inbox database.
| Inbox Field Name | Purpose |
| Attachment_Count Attachment_Files Attachment_Names Attachment_Start CC_Names Certified Created_dt Email_Account Email_Account_Id From_Name From_Path From_Root ID ERS-assigned unique column Inet_Alt_Count Inet_Mail_Program Inet_Message_Length Inet_Priority Inet_Raw_Header Inet_UIDL Inet_Webform Inet_Webform_Fields Inet_Webform_Values Login_Name Message Message_Id Received Received_dt Sent_dt Subject To_Names |
Number of attachments including alternate HTML text Comma separated list of attachment file specifications. Attachments are stored in the attachments folder. Comma separated names of the attachments (0, 1, or 2) ‘0’ = no attachments, ‘1’ indicates one or more attachments, ‘2’ indicates attachments beyond alternate HTML text. The “cc” names from an incoming message Whether the message was sent Certified. The date/time the mail message was created in the inbox The name of the email account the message came in to. The ID email account this message came in to. The email “from name”, such as ‘John Smith’ The full path of the sender’s name, such as ’John Smith <smith@mycompany.com>' The email address of the sender, such as ’smith@mycompany.com’ ERS-assigned unique column The number of “alternate” attachments (for Internet type mail systems only.) The name of the email client used to send the email (for Internet type mail systems only) The length of the message (in bytes) (for Internet type mail systems only) The priority of the message (for Internet type mail systems only) The header of the email message (for Internet type mail systems only) Internal Internet mail identifier (for Internet type mail systems only) ‘0’ (not from web form) or ‘-1-‘ (from web form) (for Internet type mail systems only) The names of the web form’s fields (for Internet type mail systems only) Inet_Webform_Values The values of the web form’s fields.(for Internet type mail systems only) The login name of the account for this message The mail message text The unique message id (for Internet type mail systems only) The date the message was received The date and time the message was received The date and time the message was sent The subject of the message Whom the email was sent to. |
Inbox Query Filters
Creating filters for inbox queries is done in the same manner as creating filters for application events. (See chapter on Query Designing)
Specific to querying incoming email records, however, is the need to test for messages that are sent from specific email addresses or to specific email addresses.
This filter identifies any messages sent from a person at KPI Monitoring: Inbox.from_path like %KPI Monitoring.com%
This next filter identifies any messages sent to KPI Monitoring’s support mailbox: Inbox.to_names like %support@KPI Monitoring.com%
You should also limit query results to only those messages received today: Inbox.received is equal to {%Current Date%}
Inbox Events
Inbox events are created just like standard application events. However, you might decide that you’d like to link an incoming email message to a corresponding contact record within a customer database. This would let you:
- Identify the corresponding account manager and alert them
- Update the customer’s record with the details of the incoming message
- Create a record (such as a support ticket) and link that ticket to the customer
- Identify if the sender is not already in your customer database
Linking Mail Messages to Client Records
You can link an incoming email message to a customer record in two ways:
- Using two queries in one event
- Using a Visual Basic script or a web service call
Although VB scripts and web service calls give you complete control and flexibility in terms of creating database records based on receipt of an incoming email, both methods require programming expertise. The use of two queries requires no programming knowledge.
When you use two queries in an inbox event, the first query retrieves the email records, and the second query links those records to your customer database.
This requires identifying a field in the inbox record that matches with a piece of data from the customer record. This might be the sender’s email address (stored in the “from_root” column in the Inbox table), but could also be any other field in the incoming message that corresponds to a matching field in your customer database (such as a customer’s “account number”).
Using a field such as the sender’s email address to match to a customer’s record in an application database, your two queries would work as follows:
- Query #1 (retrieving inbox records) would include the linking field (i.e., the sender’s address, “from_root”) as one of the fields in the query.
- Query #2 (retrieving customer info) would have a filter that compares the email address in the customer application (e.g., “customer.mail”) to the customized name of the inbox sender address field (e.g., “{from_root}”).
This is illustrated in the following:
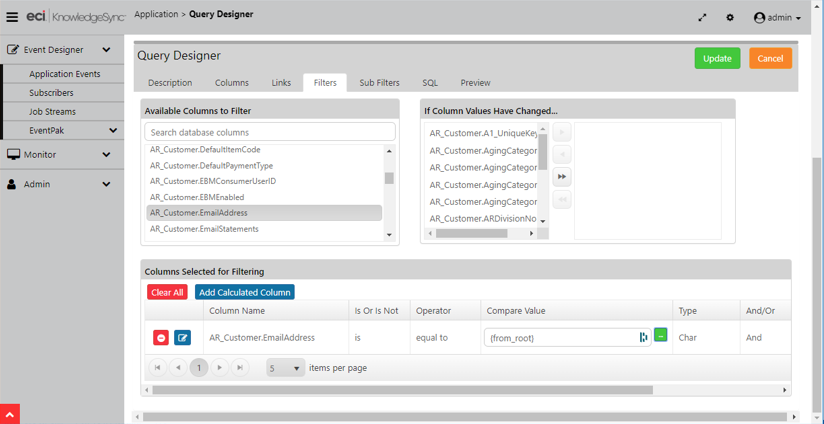
MATCHING EMAIL ADDRESS TO DATABASE RECORD
An event that uses two queries in this manner will trigger only if the sender’s address is also found in the customer database. Once a match is found, all of the fields of data from both queries may be used in alert messages and in workflow actions.
(And, although the above scenario identifies message senders who exist in a customer database, you could construct a similar event where your second query looks for no matches to your customer database. This would identify a new client or prospect.)
Alerts & Actions
In response to an inbox event, KPI Monitoring can send messages to:
- The salesperson and/or support person associated with an account
- The sender of the incoming mail message
- Other people related to the incoming message (such as “cc” names)
These messages can include all standard content associated with a database event. Here is an example of a message that could send back to a person who logged a support question via email:
Hello {from_name},
This is to confirm our receipt of your email sent on {sent_dt} to {to_names}.
We will contact you shortly when we have an answer for you.
Thank You,
Support Team
KPI Monitoring can also execute workflow actions because of a triggered inbox event. One common use of an inbox action is to have an event take information from an incoming email and pass that into a VB script or web service call to create or update records within an underlying application database.
Using Email for Report Requests
You can use ERS to allow users, partners, or clients to request and receive forms, documents, or reports. Consider the scenario where an organization has staff who need to need to run reports, but currently must ask their IT department to run the reports for them.
Using the ERS module, an organization could configure a mailbox called “report_requests” and whenever a staff member needs a report, they could send a message to that account. The message could include the name of the report to run and even the selection criteria for that report.
When such a message is emailed, KPI Monitoring receives it, uses a query to determine which report is being requested, and then runs the report and emails it back to the requester. All done automatically, without human intervention.
Inbox Event Schedule
Since you want KPI Monitoring to respond to incoming mail messages as soon as they are received, all inbox events should use a frequency of “When Email Arrives.”
Inbox Events in the Monitor
To monitor the status of inbox events, use the Monitor options. Although inbox events turn into standard application events, there is an additional branch called Email Response.
The Email Response branch lets you check to see what mail messages have been received (and logged) into the inbox database.
Once an incoming message has been received and loaded into the inbox database, you may use the standard application event and delivery branches of the Monitor to check to see if the inbox event was triggered, who was notified, what applications were updated, and so on.