CCH KPI Monitoring: Generating and Delivering Reports, Forms and Documents

Generating & Delivering Reports, Forms & Documents
KPI Monitoring includes the ability to trigger, generate and deliver reports (which includes standard forms and documents designed using report templates) for both Crystal Reports and Microsoft SQL Server Reports (SSRS).
KPI Monitoring can generate and deliver reports:
- On a scheduled basis, such as daily at 9 AM or every Friday at 5 PM.
- When an event’s conditions are met (referred to as a triggered report), such as generating an A/R aging report for a client when that client gets to within 10% of their credit limit or generating an invoice when a new order is placed.
You do not need to install either Crystal or SSRS on the KPI Monitoring server but do check to see if the KPI Monitoring server already contains a version of Crystal Reports on it. You can have only a single version of Crystal Reports on a server and the most recent installation of Crystal will overwrite any previous installations.
Supported Report Types
Please note the following about KPI Monitoring’s Support of reports:
- All reports must be connected to the underlying database via .NET data provider, OLE/DB, or ODBC.
- Crystal reports must be based off of the permanent data tables in a database. I.e., reports cannot make use of “temp” or “work” tables. (If your reports do use temp or worktables, you’ll need to make a copy of them and then modify those copies to point at an application’s permanent data tables & views.)
- Crystal reports cannot make use of *.ttx files or “print parameters,”and cannot make use of programmatically defined parameters. All Crystal report parameters must show up in the “Reports” tab of a KPI Monitoring event under the heading of “Report Parameters”.
- KPI Monitoring can use an event’s “actions” to generate and deliver other (non-Crystal, non-SSRS) reports, such as Sage Intelligence reports. Contact KPI Monitoring Support for details.
Reports vs Forms & Documents
KPI Monitoring is frequently used to create and deliver forms and documents, such as order confirmations, invoices, statements, dunning notices, picking lists, quotes, purchase orders and other similar materials.
KPI Monitoring can generate and deliver such documents using a report as the template for each form.
Supported Versions of Crystal & SSRS Reports
Please refer to the KPI Monitoring Installation Guide for details regarding Crystal Reports compatibility.
KPI Monitoring supports SSRS versions for MS SQL 2012 and onwards (e.g., SQL 2012, 2014, 2016 and 2017).
SSRS Location Definition
For SSRS reports, you need to specify the location of your SSRS installation. Expand the KPI Monitoring “Admin” branch and under “Services”, click on “SSRS Locations.” When you add or update an SSRS location, the following window will appear:

SQL SERVER REPORTING SERVICES (SSRS) SETUP
Fill in the fields as follows:
Description: The name of the SSRS server (e.g., “SSRS on QA-SVR123”)
Report Server URL: This is the URL of the SSRS Report Execution 2005 Service on the report server (e.g., “http://qa-svr123/ReportServer”). Copy this URL from SQL Server Reporting Services Configuration Manager.
Make sure the URL is accessible from the machine where KPI Monitoring (the web application and Windows Service) are running. Use a “localhost” URL only if KPI Monitoring and SSRS are installed and running on the same machine.
Report Server 2010 URL: This is the URL of the Report Service 2010 Service on the report server.
Notes: Use this field to contain comments about the corresponding SSRS location.
Username/Password/Domain: This is where you specify the credentials used to run the Report Execution service of SSRS. The values in these fields must match the settings in the SQL Server Reporting Services Configuration Manager.
The domain can be entered separately (in the “Domain” field) or it may be included in the username, as in “mgmt\svcQASQL”.
Report Definition
Once you have defined your SSRS “location” (see previous section), the next step in enabling reports is to tell KPI Monitoring which Crystal and/or SSRS reports you wish to generate. Reports are organized according to the application they work with, and the reports must already have been created in Crystal or SSRS in order to define them within KPI Monitoring.
Note: If you are using Crystal reports, the option to “Save Data With Report” must not selected from within Crystal and the reports defined in KPI Monitoring must (in Crystal) be configured to use the same connection (data provider) as the corresponding application in KPI Monitoring.
To define your reports, log into KPI Monitoring open the Application Events branch, expand the application in which you wish to define reports, and click on the “Reports” branch. Click on the New Report button to define a report; the following window opens:
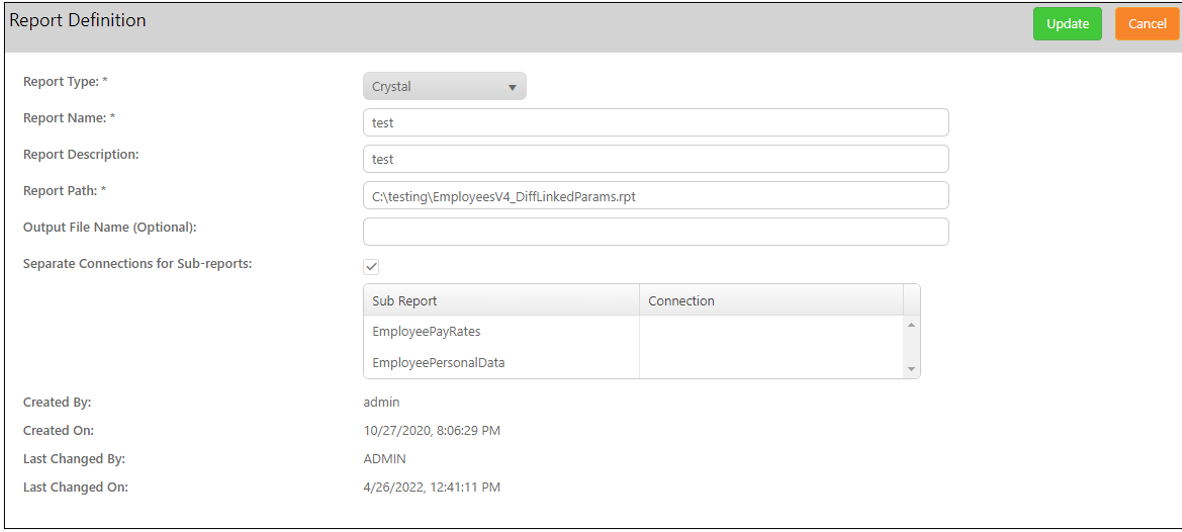
NEW REPORT DEFINITION
Fill in the fields as follows:
- Report Type: Select either Crystal or SSRS. Select if the type is On Prem or Hosted.
- Report Name. A short description of the report.
- Report Description. Use this field to contain a detailed description of the report.
- Report Path. This is where you specify the location of the source file that corresponds to the report you are adding. If the report is a Crystal one, the selected file will end with *.rpt - if the report is an SSRS one, you will need to specify the path of the report as deployed on your SSRS report server
Do not reference mapped drives; use UNC format instead. If you refer to a destination on another computer, make sure the user account running the KPI Monitoring service has read rights on the other computer.
- Report Output Filename. The name that will be given to the output of this report. Do not specify a disk or directory; the file will be created in the KPI Monitoring “Reports” directory.
If blank, the name will be generated by KPI Monitoring. If you are hard-coding the output file name, the name must not contain any non-standard characters, such as @, #, $, %, ^, &, *, (, ), _, and +.
Do not specify the file suffix (e.g., .pdf, .html, etc.). KPI Monitoring will append that automatically, based on the selected output format of the report.
If the report is generated multiple times by the same event, do not hardcode the output name as this will cause each generation to overwrite the last.
- Separate Connections for Sub-reports. Reports and sub-reports can connect to more than one data source and different databases. Check this box if the reports are sent to multiple connections. Select a connection for each Sub-report.
Dynamically Naming the Report Output File
You can have KPI Monitoring dynamically name the report output file, based on data from the triggered records. For example, an event that triggers an invoice (using a report as the invoice template) could name each generated invoice using a combination of the client’s name and order number.
To do this, select from the names of the trigger fields (e.g., a query’s columns) you wish to use in your report output files, Thus – using the preceding scenario – as long as you had selected the client name and order number in the trigger that is used by the event generating the invoices, you could specify an output file name of:
{cus_name}_{ord_no)
Note that you will need to refer to an associated trigger (and/or to KPI Monitoring’s list of date substitution variables) to get the names of any variable fields you wish to use in the report output file specification.
Repeat this process for each report you wish KPI Monitoring to generate.
Scheduled vs. Triggered Reports
There are two kinds of report events you can create in KPI Monitoring:
Scheduled. A scheduled report event is an event that runs on a recurring schedule; such an event has one or more associated reports, and no triggers. Examples of scheduled reports are:
o Daily Sales report
o Weekly shipping summary
o Monthly trend analysis
Triggered. A triggered report event is an event that uses one or more triggers to see if certain data conditions exist; if the specified conditions do exist, the event is triggered and it generates its associated report(s). Examples of triggered reports are:
o If a client’s balance exceeds $10,000, generate an A/R Aging report for that client.
o When a new order is placed, deliver an order confirmation (report) to the client.
o If an inventory item falls below its re-order point, generate a stock status report.
A single scheduled report event may generate and distribute multiple Crystal and/or SSRS reports. Both scheduled and triggered reports are configured as events in the KPI Monitoring system.
Preparation for a Report Event
If you’re creating a scheduled report event and you’ve already defined the reports you wish KPI Monitoring to generate, you can proceed directly to the option to create a new event. (See “Scheduled Reports”.)
If, however, you wish to create an event that checks for certain data conditions and then (if those conditions are met) triggers an associated report, then you’ll need to begin by designing the trigger for your report event.
The trigger in a report event performs three functions:
- It determines whether the event’s conditions are met and thus whether the report associated with such an event gets generated and delivered.
- It provides access to the data fields that can be passed into the report as selection criteria. (E.g., using the example of a report triggered by clients whose balance exceeds $10,000, the trigger would pass the ID of each matching client into the report.)
- It supplies the “delivery address” of the person(s) to receive the generated reports. (E.g., in the previous example, the trigger could retrieve the email address of the salesperson assigned to any client whose balance is greater than $10,000 and thus deliver each report to the corresponding salesperson.
Scheduled Reports
To create a scheduled report event – that is, an event with no trigger and with one or more associated reports, follow these steps:
Expand the application you are working with, click on the “Events” branch and click on “New Event”. Fill in the fields much as you would a standard KPI Monitoring event (see the Event Designing chapter for details).
Be sure to check the “active”, “include reports”, and “keep only last checked record” boxes. Your window will look like the following:
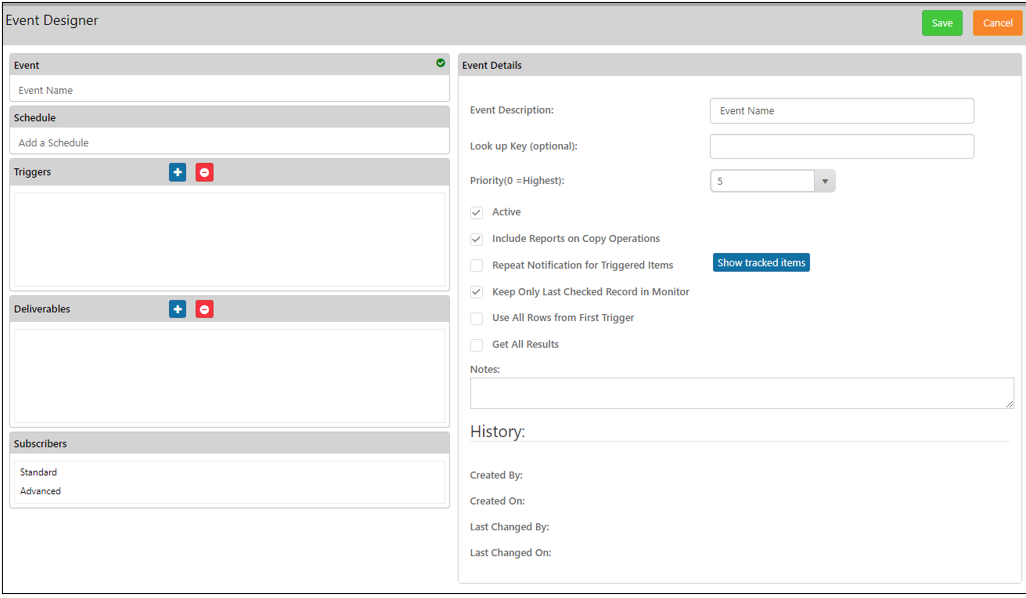
SCHEDULED REPORT EVENT
The Report’s Schedule
A scheduled report (as opposed to a triggered report) runs on a recurring schedule, such as daily, weekly, or monthly. Click on the description beneath the Schedule heading and select the schedule that controls how often this event is generated and delivered.
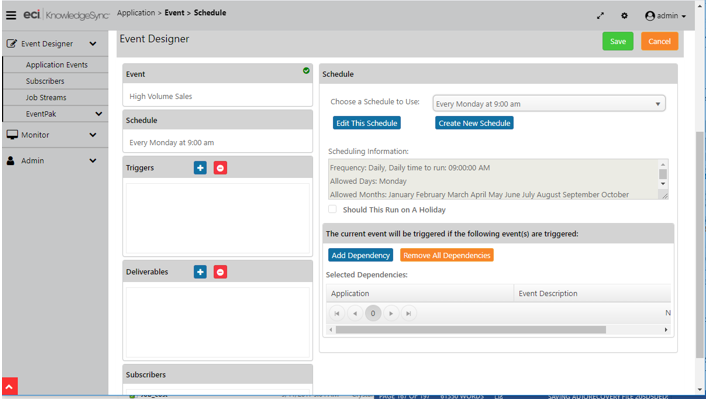
THE REPORT’S SCHEDULE
Do Not Specify Any Triggers
Since a scheduled report runs on a recurring basis (and is not triggered by data conditions), be sure to have no triggers defined for a scheduled report event.
The Event’s Report(s)
A single scheduled report event may produce one report (e.g., “Weekly Sales Report”), or it may produce multiple reports (e.g., “Month-End Performance Reports”); you can have up to 999 reports associated with a single event. To add a report to an event, follow these steps:
- Click on the blue Plus sign next to “Deliverables”.
- Under “Alert Content”, click on the “Report” button. The following window opens:
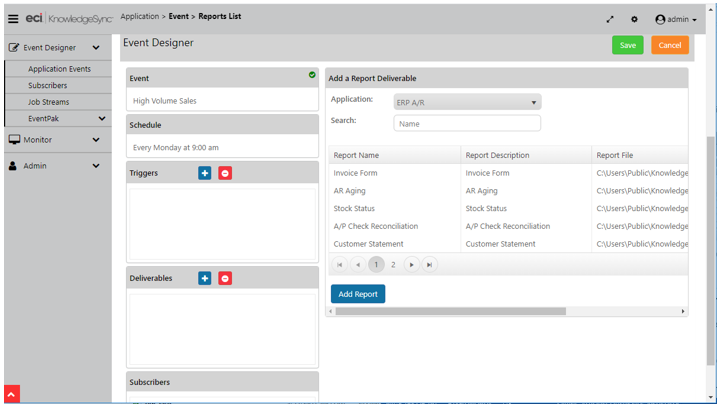
AVAILABLE REPORTS FOR AN EVENT
By default, you will be shown a list of the reports that are defined for the current application; select a different application if your desired report was defined for an application other than the one you’re currently in. (You may also use the “Search” window to locate a report by its name.)
Once you have located the desired report, single-click on it then click on “Add Report”.
The Report’s Output Type (Style)
(If you do not see the “Report Properties” window on the right-side of your display, click on the report you just added to the event – beneath the “Deliverables” heading.)
On the Reports Properties window, click in the Report Type column to choose the report output format
- MS Word
- MS Excel (.xlsx)
- MS Excel legacy format (.xls)
- HTML
- Comma Delimited
- Tab Delimited
- XML
- Image
- Ascii
- Rich Text
- Crystal
Note: SAP Crystal Reports runtime only allows data-only exports to .xlsx files (formatting is not exported).
The output option of Crystal creates a .rpt file that may be viewed only by users who have the Crystal client installed on their desktop.
The Report’s Properties
If you do not see the Report Properties window on the right-side of the Event Designer display, click on the report you just added to the event – beneath the Deliverables heading.
The Report Properties module looks like the following:
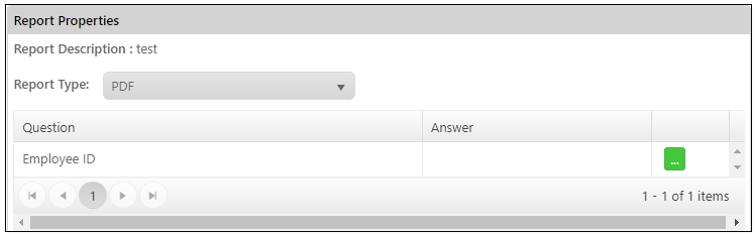
A REPORT’S PARAMETERS (SELECTION CRITERIA)
Report parameters let a report restrict the records that it retrieves to only those records that meet specific criteria. When a report includes parameters, they appear in the Report Properties window shown previously.
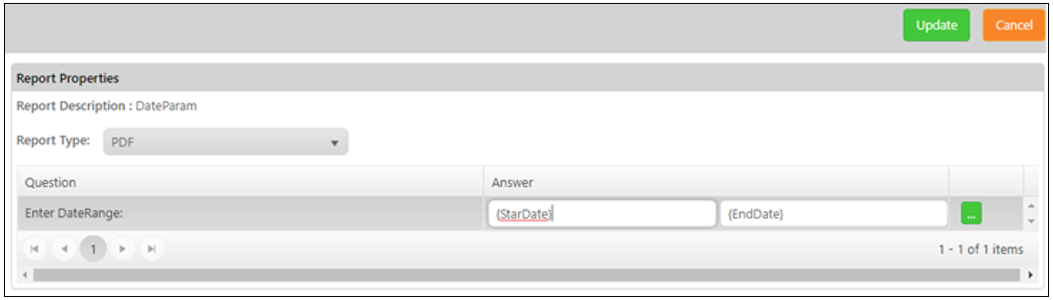
For each parameter you can supply a corresponding value that will be used whenever the report is generated. You may answer each parameter in two ways:
• By manually filling in its value in the Answer field, i.e., enter the start/end values for a range.
• By selecting a date substitution variable, such as “today”, “tomorrow”, or “last Monday.”
• Click on the green List button that appears next to the parameter you are working with and select the predefined variable you wish to use:
Report Delivery Methods
Reports can be emailed, FTP’d or linked to a webcast (dashboard) page. (See Report Delivery Methods for details.)
The Report’s Subscribers
Reports can be delivered to any combination of individual subscribers and subscriber groups.
Triggered Reports
Unlike a scheduled report, a triggered report gets generated and delivered only if the event’s triggering conditions are met. For example, you might want KPI Monitoring to generate an A/R Aging report for customers who are over their credit limit. This would require a triggered report, because only if there are any customers over their credit limit would you want the report to be generated.
An additional aspect of a triggered report is that the contents of the report(s) can be driven by the records that meet the event’s criteria. Using the preceding example, an event’s trigger would determine which customers are over their credit limit and then the event would take those results and feed them into the report to be generated.
Thus, you could have an event that generates individual A/R Aging reports only for those customers that are over their credit limit.
Triggering a Report on True/False Results
Many organizations need to generate a report if a situation proves true or false. Consider the following two examples:
Run a report if there were any sales of over $10,000 last week
Run a report if there were no sales of over $5,000 last week.
To configure either of these conditions, you would design a trigger that uses the “count” function to count the number of records that meet the query’s criteria. In the first scenario, the report would trigger if the count of sales is greater than zero; in the second scenario, the report would trigger if the count of sales was equal to zero.
Linking a Report to a Triggered Event
To have an event generate reports that are based on the records that meet the event’s criteria, you must have some way to take the results from an event’s trigger and feed those results into the event’s report. This is accomplished through a report’s parameters. Consider the previous example – you have customers who are on hold and you want to generate an A/R Aging report for each on-hold customer. You would do the following:
- Create a KPI Monitoring trigger (such as a query) that retrieves a list of on-hold customers.
- Create an A/R Aging report so that is has a parameter on the customer ID.
- Create a KPI Monitoring event that uses the trigger and report mentioned previously.
When you add the report to the event, the parameter (e.g., “please select customer ID”) will appear. In the “answer” field to this parameter, you’ll select the “customer ID” field from the event’s trigger.
When the event runs, it will:
- Use its trigger to generate a list of on-hold customers – e.g., Client A, Client B, and Client C.
- Take the first matching record – Client A – and pass that client’s ID into the A/R Aging report.
- The Aging report for Client A will be generated and delivered.
- Repeat steps #2 and #3 for clients ‘b’ and ‘c’.
Delivering a Triggered Report to the Record “Owner”
Consider the previous scenario – generating a separate report for each client who is on hold. In addition to generating a separate report per customer, you might want to deliver that report to a “related party” – such as to the customer who’s on hold, or even to the salesperson who’s responsible for that client’s account. A triggered-event enables this kind of intelligent delivery.
In the design of the “On Hold Customers” trigger, as long as you include the field(s) that contain the delivery addresses of the “related parties”, you’ll be able to tell KPI Monitoring to deliver the report to them. Using the above example, let’s say that you want to email the A/R Aging report to both the customer and their account manager.
All you would need to do is to go into the event’s trigger and make sure that it retrieved:
The field that contains the email address of the customer
and;
The field that contains the email address of the customer’s account manager
By including those two fields in the event’s trigger, you’ll be able to select them as “advanced subscribers” for the KPI Monitoring triggered report event.
Trigger Design for Triggered Reports
It’s important to keep in mind that KPI Monitoring will (by default) generate one report per record that meets an event’s criteria. So – build your trigger so that it retrieves only one record per report that the event will generate. Consider the following example:
- Your staff gets assigned activities; sometimes those activities become overdue. You want KPI Monitoring to see if a staffer has overdue activities and (if so) generate and deliver a “Past Due Activity Report” to them.
- Your trigger should not generate a list of past due activities, because if a staffer has 10 past due activities, KPI Monitoring will generate 10 reports for that person. Instead, configure your trigger to count the number of overdue activities per staffer and retrieve only those staffers whose “past due count” is greater than zero. That way, regardless of the number of past due activities, each staffer with past due activities will appear only once in the trigger’s result set – and only one report will be generated and delivered to each of them.
Using Triggered Reports to Generate & Deliver Forms & Documents
A very common use of triggered reports is in events that generate and deliver forms and documents such as invoices, statements, order confirmations, shipment confirmations, purchase orders, and the like.
In these scenarios, your report is actually a form (such as the ones mentioned previously), and it has a parameter that prompts for the “record ID” – such as a sales order number, customer number, or purchase order number. The event’s trigger retrieves a list of matching records (new orders, new shipments, new POs, etc). When you link the report to the event you will pass the record ID (e.g., the sales order number from the trigger) into the report as a parameter.
Begin & End Repeat in Triggered Reports
In most cases, an event-triggered report will not make use of {BEGIN*REPEAT} and {END*REPEAT} in its alert message. In such cases, the event will generate one report for each record that meets the event’s criteria.
However, if an event uses {BEGIN*REPEAT} and {END*REPEAT} to group multiple records within separate messages, KPI Monitoring will generate one report per delivered message. (Thus, an event that puts all matching records in a single alert message would, if it had an associated report, generate and deliver only one report, regardless of the number of records that meet the event’s criteria.
Trigger Design for Triggered Reports
Keep in mind the following 3 concepts when designing a trigger:
Use filters to control your result set – remember that KPI Monitoring will generate one report for each matching record, so it may be more effective to use the “count” aggregate function so that you do not generate the same report multiple times.
Be sure to include the columns/fields whose values need to be passed into the event’s associated reports as parameter values. Also include the columns/fields that contain the addresses of potential report recipients – such as the email addresses of the related customer, prospect, vendor, salesperson, or manager.
Report Selection
To link a triggered report to an event, follow these steps:
Open the event you wish to associate the report to.
Go to the event’s “Deliverables”, click on the blue plus sign, and add the desired report to the event.
Review the report’s “properties” and select the type of output format from the following:
o ASCII
o HTML
o Rich Text
o Microsoft Excel
o Comma Delimited
o Tab Delimited
o PDF
o Microsoft Word
o Crystal
o XML
(The output choice of “Crystal” is usable only by users who have the Crystal Reports “viewer” installed on their client workstation.)
Fill in the answers of any report parameters that appear. For each parameter you can choose to manually fill in the answer or click on the List button to choose either a date substitution variable or a field value from the event’s query. You may add additional reports to a single event.
The Triggered Report’s Schedule
Like any standard KPI Monitoring event, a triggered report event runs on a periodic schedule (e.g., hourly or daily) to see if the conditions specified in the event’s trigger(s) have been met. If they are met, the event is triggered and the corresponding reports are generated and delivered.
Click on the description beneath the “Schedule” heading and select the schedule that controls how often this event is submitted.
Report Delivery Methods
Reports can be emailed, FTP’d or linked to a webcast (dashboard) page. In some instances, it may be most efficient to use email (or SMS) to notify recipients about the availability of reports while using FTP or webcast to deliver those reports.
At the bottom of the Email Deliverable window are two checkboxes that allow you to specify whether to attach the selected reports to the outgoing email message.
- If you “include reports as email attachments”, KPI Monitoring will wait until the reports are successfully completed before sending the mail message. If a report fails to complete successfully, the email message will not be sent.
- If you choose to not attach the reports, you can specify whether the email message should wait until all the associated reports are successfully generated. (Place a checkmark in “Email notifications should wait until reports are completed.”)
Embedding the Report Within the Email
If you are sending mail in HTML format, an event may be configured to send the report’s contents within the body of the email message (as opposed to sending the report as an attachment).
This function is available only if you have KPI Monitoring configured to send out mail via SMTP or any other INTERNET-based mail system.
To configure this, follow these steps:
- Choose the report whose content you wish to appear within the body of the email message. (You can specify only a single report.)
- Choose a report output type format of “HTML”.
- Go to the “Email” tab and leave the “Message Text” field blank (empty).
When the event is triggered, KPI Monitoring will generate the corresponding report in HTML and will embed this HTML within the body of the email message that is sent to the event’s subscribers. If a subscriber of such an event is using an email system that does not support HTML, the report will appear as an attachment. Note also that such an event cannot have any other attachments (i.e., no other reports and no attached files).
FTP/SFTP (Copy)
To deliver a report via this method, go to the event details window and select the option to “include reports on copy operations”. Note that the copy/ftp destination is determined within each subscriber’s profile in KPI Monitoring. Specify this location in UNC format and do not reference mapped drives.
Webcast (Dashboard)
When a report is configured for delivery, KPI Monitoring enables you to specify whether the report will appear as a URL link in a webcast (dashboard) alert message. (Please see the chapter on “Webcasting / Dashboard Alerts” for more details.)
At the bottom of the Webcast Deliverable window are two checkboxes that allow you to specify whether to link the selected reports to the generated webcast page.
- If you “include reports as URL links”, KPI Monitoring will wait until the reports are successfully completed before generating the webcast page. If a report fails to complete successfully, the webcast will not be generated.
- If you choose to not link the reports, you can specify whether the generation of the webcast page should wait until all the associated reports are successfully generated. (Place a checkmark in “Webcast notifications should wait until reports are completed.”)
Report Subscribers
Reports can be delivered to any combination of standard and advanced subscribers; both individuals and groups. Because a triggered report has associated triggers, all the trigger data fields may be used to contain recipient alert delivery addresses.
How Reports Appear in the Monitor
Scheduled reports start out in the tab called “Report Generation” (they go from “pending” to “generated”) and then move to the tab that represents how the reports are to be delivered to their intended recipients (e.g., “Email Delivery”).
Triggered reports begin in “Application Events”, from where you can track the event’s status as “checked” and (if appropriate), “triggered.” Only if an event is triggered will its associated report(s) be generated.
Once an event with associated reports has been triggered, it will proceed to the “Report Generation” tab. From this branch, you may track the progress of the event’s associated reports as they go from a “pending” to a “generated” state.
(If a report fails to generate successfully, it will appear under “Errors” in the “Report Generation” tab.)
Once a report generates successfully, you may click on the corresponding “Delivery” tabs within the Monitor and check to see that the message (and report) was successfully delivered.
Within the Application Events Triggered tab, you may also click on the “Details” (blue plus sign) next to an event to see whether the notifications included the corresponding reports.