Edit - Check Out Documents

Check Out Documents
- Click either Global Documents or open a client or contact document centre and locate the document that you want to check out.
- Do one of the following to check out the document:
- Right-click the document and select Check Out.
- Click Check Out under Version Control on the Task Bar, then double click the document to open it
- Click Edit in the ribbon, in the Open & Check Out group

Note: Check Out does not automatically open the document in the corresponding application as with Edit.
Identifying Checked Out Documents
When you check out a document, it is locked so that no other user can edit it until it is checked in. For further details on checking in documents see: Check In Documents. This  indicates checked out documents and Check out by shows the user who has the document checked
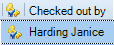
or hover over the checked out symbol to see who has it checked out. 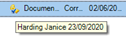
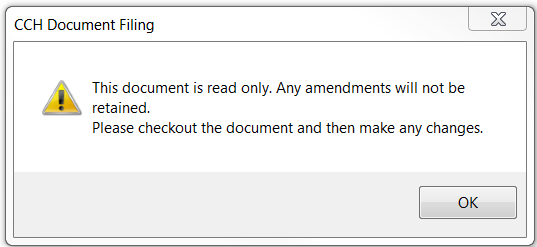
Note: Other users can open a read only version of the same document by double-clicking it.

If a document is opened in read only mode, the Check-Out button is enabled, so the document can be checked out for editing, without having to close it first.
If the user starts to edit a read only document, a warning message appears advising the user to check out the document prior to making any edits.
Logoff button
The logoff button has also been added to the ribbon and is used to log out of the plug-in when the user is not online.
Save on close
When closing a document in word or excel, using the top right hand red cross, the user is prompted to check in a document..
The following screen will appear:

The options are
- Check-In - Saves, checks-in and closes the document
- Save – Saves and closes the document but leaves it checked-out for further editing later.
- Discard – Abandons any changes and closes the document but leaves it checked-out for future editing.
- Cancel – Returns to editing mode without having saved or checked in the document changes.
Note: The window only appears on closing the document or exiting word, not each time a document is saved
OneDrive Integration
Useful Information!
CCH Document Management provides the ability to check out single or multiple documents to their local install of OneDrive (which automatically syncs with their OneDrive account in the cloud) allowing employees to perform group collaboration on the checked-out document(s).
When ready, the employee who initially checked out the document, can check the final document(s) back into CCH Document Management.
To work collaboratively on documents with your colleagues, CCH Document Management can be integrated with your organisations OneDrive to manage Checked Out documents to a shared location. See CCH Document Management release notes to review the steps for integration in your organisation.
Once OneDrive integration is enabled and setup for an employee to utilise, users can accesses the option via, Contact’s, Client’s, Employee’s Document Centre tab or the main Documents window, or via the client, contact, employee find windows. A ribbon bar option called Check Out to OneDrive is available within the Open & Check Out group:

Right mouse option
When the user selects either single or multiple documents within the Contact’s, Client’s, Employee’s Document Centre tab or the main Documents window and right mouse clicks an option is available Check Out to OneDrive.

Field chooser
To help identify documents which have been checked out to OneDrive rather than the standard checked out path a field can be added via the field chooser and is available for Contact’s, Client’s, Employee’s Document Centre tabs the main Documents window and the homepage view.
Right-mouse click on the document centre or home page control and choose Field Chooser, then drag and drop or double click on ![]() to add the checked out to OneDrive field heading.
to add the checked out to OneDrive field heading.