Create for Non-contact Filing

Documents can be created for non-contact filing libraries from the Global Document Centre. Click Create Document in the CCH Document section of the Task Bar to open the Create Document window.
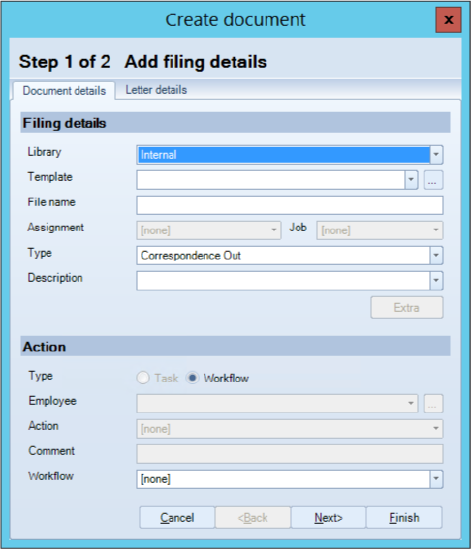
Step 1 of 2 Add filing details
|
Field |
Note |
|
Filing Details |
|
|
Library |
The library that the document will be filed to. Defaults to the last selected non-contact library. Only non-contact libraries will be included in the dropdown selector. |
|
Template |
The template that will be used to create the document. Defaults to last selected template. Click on |
|
File name |
Defaults to the file name from the selected template, but can be changed. |
|
Assignment |
Disabled. Not applicable for non-contact filing. |
|
Job |
Disabled. Not applicable for non-contact filing. |
|
Type |
This will be automatically populated based on the selected template. Use the dropdown selector if you want to change this type. |
|
Description |
A free format text box. The description can help you identify the document. The dropdown list recalls the last 10 descriptions used. |
| Extra | Will be enabled if the Type selected has extra fields associated to hold additional document tagging information. |
|
Action |
|
|
Type |
Will default to Task or Workflow based on whether you have CCH Workflow activated or not. |
|
Employee |
Only applicable where the Type is Task. Select the employee that the task is being assigned to. Click on |
|
Action |
Only applicable where the Type is Task. Select the appropriate task action. |
|
Comment |
Only applicable where the Type is Task. An optional text field. |
|
Workflow |
Only applicable where the Type is Workflow. Entries are based on any preset defaults and your permissions as a user. |
 to list the most recently used, or
  to open the
 Step 2 of 2 Add mailing details

|
Field |
Note |
|
Addressing information |
|
|
To |
Defaults to blank. You can select a contact using the |
|
FAO |
Only enabled if there is an entry in To that is not an individual. Use to select the contact within an associated company that the letter is directed at. |
|
Use related contact's address |
Only enabled if To is changed and will default to checked. Uncheck the box to use the original contact's address. |
|
Address |
Use to select which address to use where there is more than one associated with the contact in the To field. |
|
From |
Defaults to the logged in user. To change this use the |
|
Preview/edit letter information (these fields are all editable) |
|
|
FAO Mailing Name |
Only applicable if there is an entry in the FAO field. Will default to the mailing name of that contact. |
|
Mailing Name |
Defaults to the mailing name of the contact in the To field. |
|
Document Date |
Defaults to today. Can be edited if for example you are preparing a letter that will be sent at a later date. |
|
Salutation |
Defaults to the salutation for the contact in the To field, unless there is an entry in the FAO field. |
|
Heading 1 |
Blank by default. |
| Heading 2 | Always defaults to blank. Allows the entry of additional heading/reference information. |
| Signatory |
Select the employee in whose name the letter is being sent. This is for templates where the employee in the From field would not be the actual signatory. Click on |
| Leave document checked out after creation | Defaults to selected. This will leave the document open for editing (and checked out) after creation. Untick this box if you want the document to be created, closed and checked in. |
 to open the