Milestone Maintenance Creation

Milestones
A milestone is a scheduled event signifying the completion of a major deliverable or a set of related deliverables. A milestone can have a date applied which indicates when it should be reached or completed by, but it is possible to apply four different statuses to a milestone. See Milestone Status section for further information.
Milestones are created and tagged to a Job to indicate whether certain targets have been reached. Milestones are created from File > Maintenance > Assignments > Milestones.
This window will offer the users the chance to enter in milestones which are then applied to Jobs if required. It will be possible to define the name; whether it is shown on the planner and the position it takes in the planner.

- Assignment Type: Milestones are linked to an Assignment Type. Using the screen shot above as an example, you can see Milestones such as Information Requested, Information Recevied, Draft Accounts Produced etc will be displayed as milestones in the Job Sheet Homepage Control when Assignment Type of Accounts is filtered on.
- Short Description: This will be shorter description for the milestone. This is the name that will be displayed as the column label on the homepage control for the milestone.
- Description: This will be the longer description for the Milestone and may be used in reporting.
- Position: This will indicate the position of the milestone on the homepage control in order from left to right. Position 1 will be the left most milestone column with the proceeding columns going up in numerical order.
- Start Milestone: This flag is applied if the milestone is to be used as a Starting milestone. When a milestone which is tagged as a Start Milestone has been completed, the completion date on the Start Milestone is taken as the actual start date.
- End Milestone: This flag is applied if the milestone is to be used as an final milestone. When a milestone which is tagged as an End Milestone has been completed, the completion date on the End Milestone is taken as the actual end date.
- Show on Planner: This check box indicates whether the milestone is shown on the Homepage planner or not. If this is not selected the milestone will not appear on the homepage planner. Users can clear the Planner check box for a selected milestone that is no longer applicable to a job so that it is not visible in the homepage control.
Note: In order to make use of reporting on milestones, a start milestone and an end milestone must be flagged.
A job is deemed started when the status of the start milestone is set to Complete. A job is deemed to have ended when the status of the end milestone is set to Complete.
Adding Calculated Columns
In addition the using a default due date, there is an option to enter a date field using a calculated column. To do this,:
- Right-click on any milestone and select "Add Calculated Column"
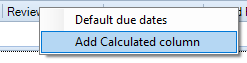
- You will be then presented with the following window:

- Selected the required milestones that you wish to compare the number of days between. In the following example, a field is needed to display the number of days left from the "Info Req" milestone until the "Target Date" is reached:

- The calculated column will be added to the homepage after the final milestone column. The header of the column will be displayed as per the parameters of the entered criteria:

Note: The calculated column will use the due date or the completed date in the calculation.
If there is no due date or completed date then the calculated column will be blank. The total for the calculated column will display the average number of dates rather than the total number of days.
Bulk Assign/Reassign
Using the Job Management homepage control, there is the option to assign/reassign a Job to an employee in bulk. To do this:
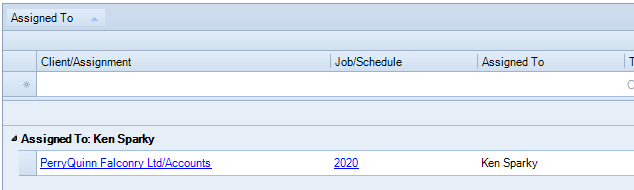
Right click the "Assigned To" column heading. You will be presented with the following options:

Warning: Using this bulk update will Reassign/Remove ALL records displayed. Therefore, it is recommended to filter the Job list to ensure that the "Assigned To" records displayed on screen are only the records that you want to update.
Job Management Creation
The homepage control can be used to monitor, track, and filter job stages that are carried out in the practice.

The default display is: client/assignment, job/schedule, Assigned to, Target Date, Days Left and the milestones created.
Note: It is important to note that jobs will be displayed filtered by assignment types.
You can change the filter by clicking on the drop down in the upper right hand corner and choosing the assignment type to view jobs. The reason for the filter is that the system allows you to create different milestones for each assignment type.
You can also use the group-by feature to group the jobs by one of the column fields:
The homepage control incorporates intelligent grouping. Some fields such as the 'Target Date' and 'Year End' are not grouped on the values. The 'Year End' field for instance is grouped by the month. The following window displays the homepage control when it is grouped by Target Date.

Right-click menus also provide the ability to change the status of a milestone for a job, change the date, filter the jobs shown, add comments or switch from using icons to dates. When you complete the end milestone on a job it will disappear from the homepage control. The right click menu also allows you to include completed jobs.
