Area Risk Assessment

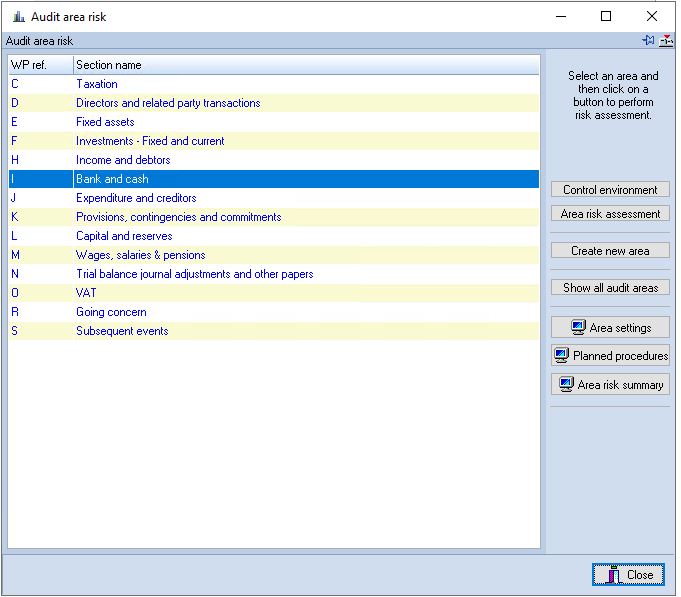
After entering all known risks in the Identified Risks screen, you need to review the risks for each audit area. To do this, open the Audit area risk dialog, eg by selecting Planning> Risk assessment and audit approach> risk assessmentand audit programme review.
Note: this is based on MERCIA 18 Master Pack. If you are using IPCAS or an IFULL master pack, some of the headings above will be different.
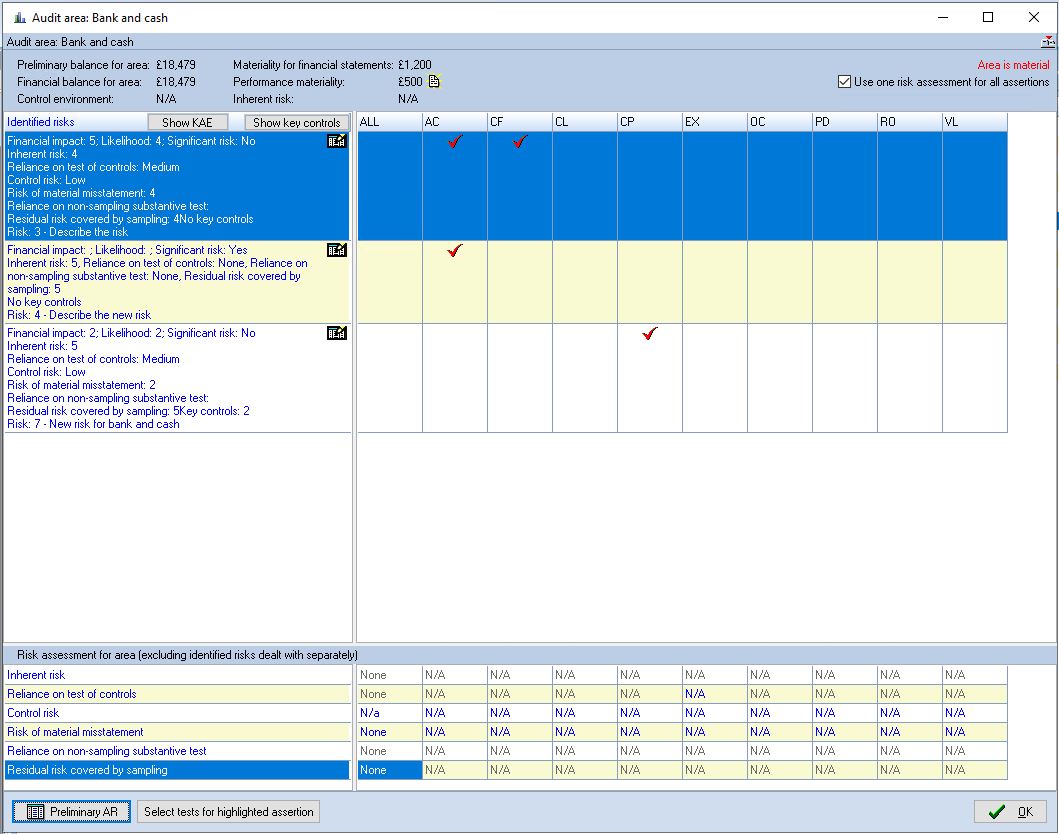
To access the risk assessment procedures for each area, either double click on the area, or select it and click on [Area risk assessment]. The Audit area dialog will be displayed.
Note: this is based on MERCIA 18 Master Pack. If you are using IPCAS or an IFULL master pack, some of the headings above will be different.
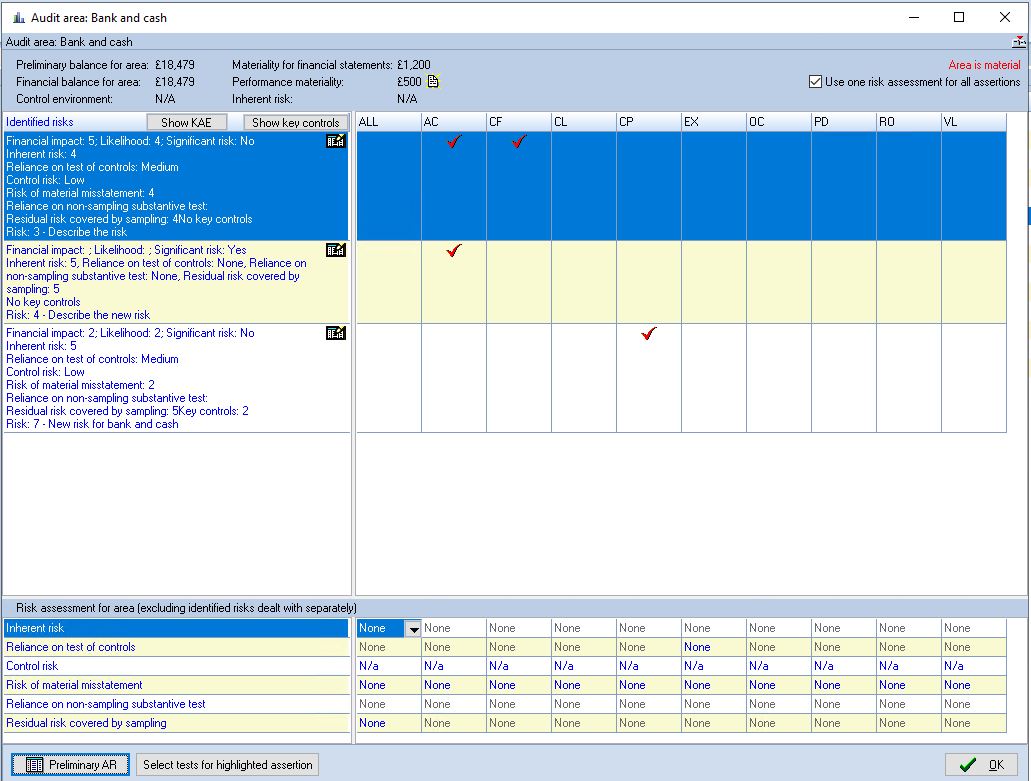
This dialog will contain columns for each assertion that is relevant to the area selected, together with an All assertions column. The column headings contain the code that is used to identify each assertion. To see the full description of the assertions, move the mouse pointer to the column heading.

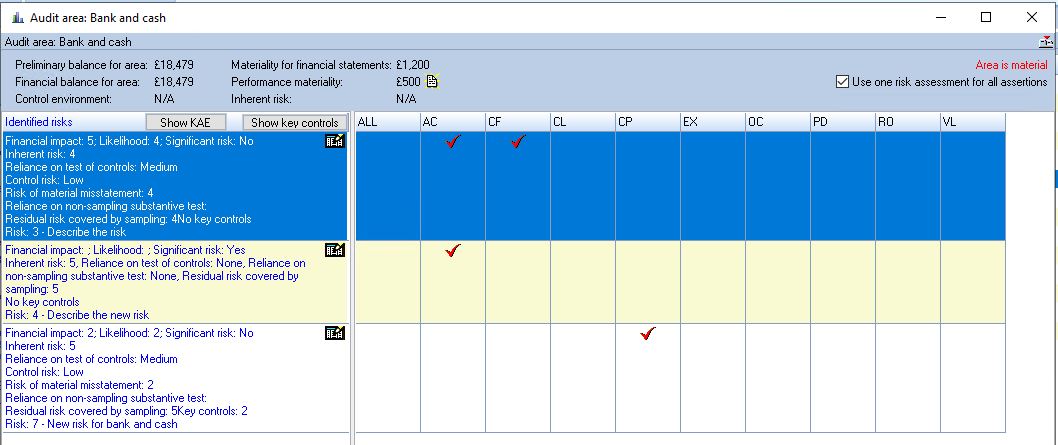
The system lists in the top section all risks that have been identified for the area and places a tick in the columns of any assertion that the risk relates to. In the bottom section, the system lists a matrix showing the overall risk for the area/assertion combination and the level of reliance/risk for each of:
• Reliance on test of controls
• Reliance on non-sampling substantive tests
• Residual risk covered by sampling
When the area is first accessed, the system will set all fields to the lowest level in each section, which will normally be called “None”. The identified risks shown above the line do not affect the risk assessment as it is assumed you will design tests where required to cover the identified risk.
The system can be set up to assess risk on an assertion by assertion basis, or to use one risk assessment for all assertions (see below). If it has been set up to assess on an assertion by assertion basis, “N/A” appears in the ALL column.
An information banner is shown at the top of the dialog which contains key information relating to the area, control environment and inherent risk.
Review of audit coverage
The process for assessing risks of material misstatement involves:
- Documenting and reviewing our understanding of the client's business, information systems and systems of internal control.
- Reviewing the draft financial information.
- Identifying from the above any risks of material misstatements and documenting those risks in the Identified Risks screen.
In theory therefore, there is no need to assess further risks or to plan additional audit work; all this should have been documented already. However, ISA 315 requires stand-back procedures, which involves the following reviews:
- (ISA 315.35) Evaluate whether the audit evidence obtained from the risk assessment procedures provides an appropriate basis for the identification and assessment of the risks of material misstatement. If not, perform additional risk assessment procedures until audit evidence has been obtained to provide such a basis. Take into account all audit evidence obtained from the risk assessment procedures, whether corroborative or contradictory to assertions made by management. (Ref: Para. A230-A232)
- (ISA 315.36) Review any material classes of transactions, account balances or disclosures that have not been determined to be significant classes of transactions, account balances or disclosures, and evaluate whether the auditor's determination remains appropriate. (Ref: Para. A233-A235)
- (ISA 315.37) If, during the course of the audit, we become aware of new information which is inconsistent with the audit evidence on which we originally based the identification or assessments of the risks of material misstatement, revise the identification or assessment, modify the further planned audit procedures accordingly and document them.
This can be done using the Area risk assessment screen. The user can open the identified risks displayed by double-clicking on them, review and if necessary amend them. The user should add further identified risks where appropriate.
Where there is a material assertion for which no risks of material misstatement have been assessed, the user will see this and is required to evaluate whether our determination remains appropriate. The preferred way of doing this is through the Identified risks screen, ticking the box ‘Material classes not otherwise tested’. Alternatively, the user can choose the dropdown for Inherent risk of that assertion and confirm that the ‘none’ is appropriate by entering a comment in the ‘Edit justification’ box, eg 'The residual risk of material misstatement is assessed as trivial'.
There remains the option to assess the remaining risks for the area after excluding the identified risks. This should normally be unnecessary. If after the review of the audit area, the user concludes that there are other risks, these should be entered as identified risks.
Where however a residual risk is identified here, you may indicate your assessment of the overall risk in respect of each assertion, the level of reliance, if any, that you are going to place on controls and non-sampling methods.
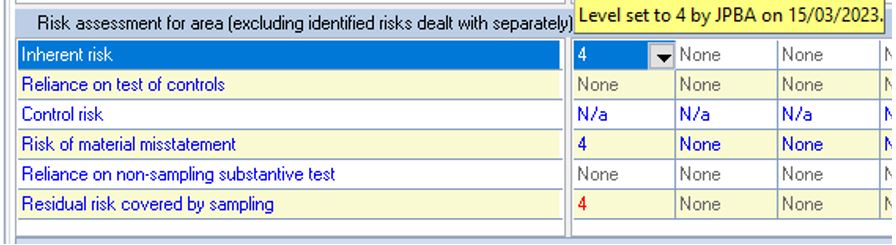
To do this, select the cell containing the current setting and click on the drop-down button. Select the level, and the system will update the cell and recalculate residual risk for the assertion. On making the change, the system will record the level you have selected and display the Justification dialog for completion:

This records the change you have made and waits for you to enter your reasons for the selection. Enter the details and click on [OK].
As you make your selections, you will see that any level of reliance or risk that is other than the lowest will be shown in red and this is an indication that audit procedures need to be defined in respect of the item but none currently exists.
As you move the mouse pointer over the levels selected, the system displays the justification data at the head of the column:
Note: this is based on MERCIA 18 Master Pack. If you are using IPCAS or an IFULL master pack, some of the headings above will be different.
If you close the risk assessment dialog without defining procedures in all areas required, the system will display a message indicating that this is the case. You may, however, still exit from the routine and come back later to finish the planning.
For smaller clients, you may not wish to design procedures on an assertion by assertion basis. You can choose to use a single risk assessment for all assertions when an area is first accessed. You can choose this option for a particular area when it is first accessed by placing a tick in the Use one risk assessment for all assertions checkbox.
Note: this is based on MERCIA 18 Master Pack. If you are using IPCAS or an IFULL master pack, some of the headings above will be different.
After confirming that you wish to do this, the system will place “N/A” in the individual assertion cells and “None” in the All column. You can use the “All” column to select the level of risk and reliance and design one set of procedures to cover all assertions. Once the risk has been assessed on the selected area, the settings for the area are persistent and this setting will have no effect.
Note: this is based on MERCIA 18 Master Pack. If you are using IPCAS or an IFULL master pack, some of the headings above will be different.
The One Assessment by Default system setting allows you to make this the default option, if required. In addition, the Use one assessment for all assertions checkbox can also be disabled, if required.
Reviewing the preliminary analytical review
Clicking on the [Preliminary AR] button will result in the display of the Preliminary analytical review dialog with the current area highlighted.
Designing work programmes
To define the audit procedures in respect of each element on which reliance is being taken or a residual risk exists, either double click on the cell, or select it and click on [Select tests for highlighted assertion] and the following dialog will appear:
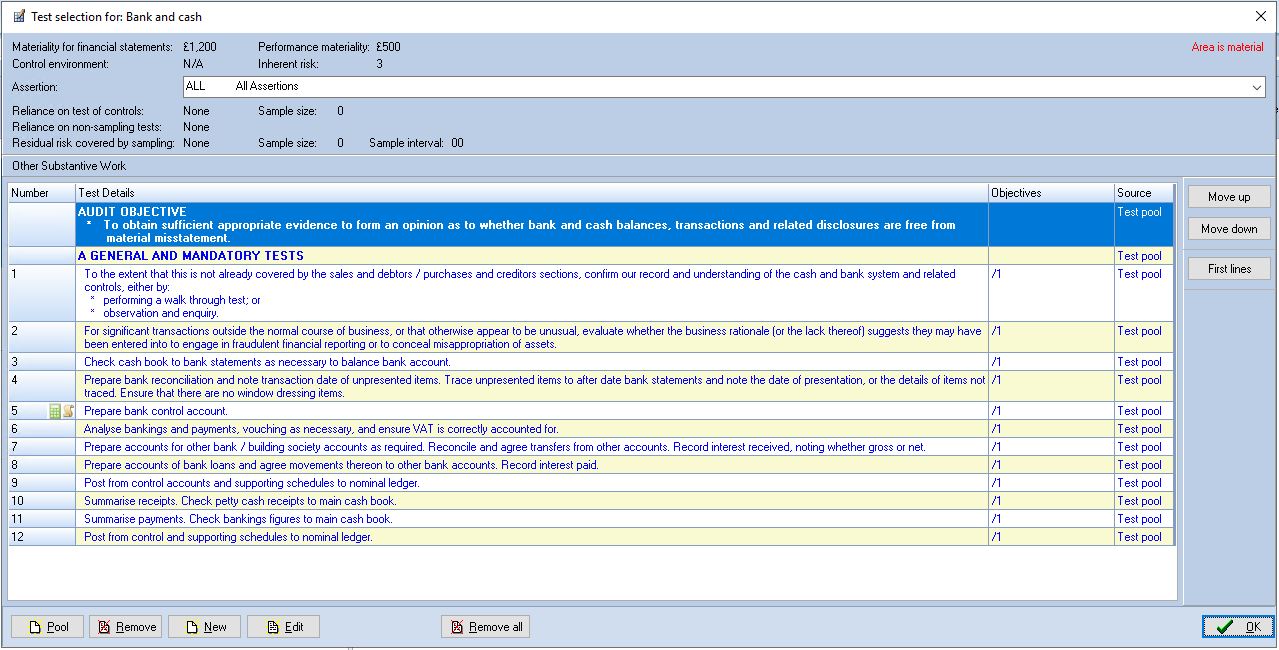
The information banner at the top of the dialog shows key data in respect of the area/assertion for which the procedures are being designed. Any tests that have already been selected or entered will be displayed.
In some master packs, standard tests are included within each audit section containing the substantive and completion work that will always be carried out irrespective of the risk associated with the client. To ensure that these tests are taken into account when you are designing your procedures and that you do not accidentally duplicate any work covered by them, the system automatically links any tests in an area when you first access an assertion to design the work to cover residual risk.
You can select further tests to support the reliance or provide comfort on the risk. These can be taken from the pool of tests or the standard audit programmes. You can also add your own tests where appropriate tests are not present.
Note that once the Test selection dialog is open, you can switch to another assertion using the drop-down list.
Headings
You can select headings from the pool of audit tests, in the same way that you select tests. This allows you to show headings in the audit programmes during completion. As you can add any number of headings, and include them in test selection, you can use this to, for example, include details of a key control in the Test of Control program, which can then be followed by the test to be performed in respect thereof.
When you have made all the changes you require, click on [OK] to close the dialog and return to the Audit area dialog. The cell text will turn blue to indicate that procedures have been defined.
Adding tests from the pool of audit tests
Click on the [Pool] button to add tests from the pool of audit tests. The Pool of audit tests dialog will be opened listing all tests that match the criteria for the programme being designed.

Note that the tests are colour coded:
Black: Tests that have already been selected for inclusion either in this work programme or elsewhere. If the tests are included in the current programme the checkbox by the test will be ticked and greyed out.
Green: Tests that are not currently selected to be carried out for the client but which may be relevant.
Silver:Tests that would not appear to be relevant to the client.
When you access this dialog while planning your procedures, the majority of the buttons in the panel on the right will be disabled as the structure of the pool may only be changed when you are displaying tests for all assertions.
If the tests that you are interested in are linked to other assertions for the area, select the assertion from the Show drop down list. The following three buttons become active:
• [First lines] – Allowing you to reduce the list of tests to only display the first line of each.
• [Edit] – Allowing you to edit the text of the highlighted test.
• [Add ticked] – To add any newly selected tests to the planned procedures.
To select tests to include in the work programme, place a tick by each one required. Finally, click [Add ticked] and they will be added to the programme.
If you select All Assertions in the Show drop down list, all tests relating to the type of test being considered will be displayed and the other options will become available.
You may use these buttons to edit the pool of tests for the current client, as set out below.
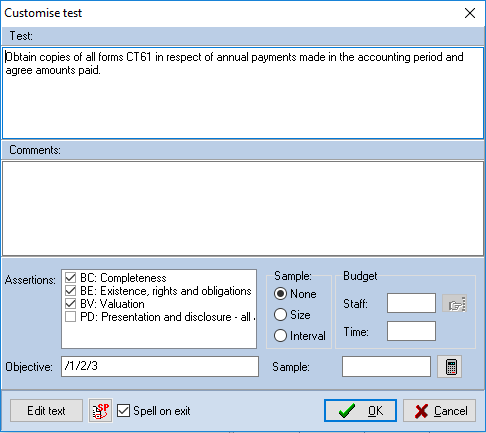
Insert a new heading or test in the list
You may insert a new heading or test at any point in the list. To do this, highlight the position where the new item is to appear and click on [Insert] and the Test pool edit dialog will appear:

This dialog will be populated with the Test type (this cannot be changed), the assertion that you are currently working with, and the level of item that will be inserted.
The level defaults to the same level as the item that was selected when you clicked on [Insert]. Complete the dialog as follows:
Condition
You will normally leave this blank, however, if the test would only be relevant if a certain condition were met, it can be entered here. In future years, if the condition is not met, the test will be shown in the inactive test colour. Please refer to the System Manager’s Manual for details of the conditions available and how they are entered.
Assertions
You may indicate the assertions that this test can provide evidence for by ticking the checkboxes by each.
Level
As indicated, the level will default to the same level as the selected item. You may change this to one of the other levels if required. Note that you can add headings as well as tests, sub tests and parts of sub tests.
Sample
If the test involves the selection of a sample, select the appropriate sample calculation to use, a sample size, or and interval.
Objective
Enter here any audit objectives to which the test relates, in the format “/1/2….”.
Default template
Enter a template code or use the [Pick] button to select a template to use by default when a new document is created for this test.
Template
New document created for this test
Test
Enter the text of the test.
After you have entered the details, click on [Store], the dialog will close and the item will appear in the list with a blue dot indicating that it is a user added, or edited test.
Adding a new test or heading at the end of the list
You may add a new heading or test at the end of the list. To do this click on the [Add] button and the Test pool edit dialog described above will appear. Complete the details as described and the new item will be appended to the end of the existing tests.
Editing an existing item
To edit the text of an existing heading or test, either one that you have added for the client or a master test, either double click on the item, or select it and click on [Edit].
The Test pool edit dialog will be displayed showing the details for the item to be amended. For items that you have added for the client, you are free to change any of the data shown, apart from the test type. Hence, if you add an item as a sub test and later wish to change it to a Main test, you are free to do this.
However, when editing master pack tests, you may not change the condition or the item level.
The system provides a visual indication of master test that have been edited in the client’s pack. This takes the form of a blue dot that is displayed to the left of the text.
Deleting tests
You may remove headings and tests that you have added in the client’s pack. To do this, select the item to be deleted and provided it is a user added item, the [Delete] button will be active. Click on this and the system will ask you to confirm your request. Note that the system will not allow you to remove tests that have been included as a planned procedure in the audit file. You will first need to remove the test from the programmes and then delete the test.
Restoring the master wording
If you have edited the wording of a master item and you decide that you wish to change back to use the original wording, you can do this using the [Restore] button. Simply select the item that has been edited and click on [Restore]. The system will ask you to confirm that your instruction before proceeding.
Changing the position of an item
You may change the position of an item in the list by selecting it and clicking on [Move up] or [Move down]. The item will be moved in the direction selected. Note that the numbering will be updated to reflect the new position of the item.
Editing an existing item
Highlight the test and click on the [Edit] button to edit the test. The text of the test will become enabled and editable.
Removing tests
To remove a test from the programme, select it and click on [Remove]. Note that this only removes the test from the current programme, it does not remove it from the pool or from other programmes if the test has been included in more than one place.
Adding new tests
You can add a new test using the [New] button. Click on it and a blank Customise test dialog will be displayed for you to enter the details. Note that you can only add new tests, not sub or part tests and that all new tests added will be appended to the bottom of the programme. However, they can then be repositioned as described below.
Changing the position of an item
To change the position of a test, select it and click on either the [Move up] or [Move down] button. As the position of the test moves, the tests, sub tests etc will be renumbered.
Identified risks work programmes
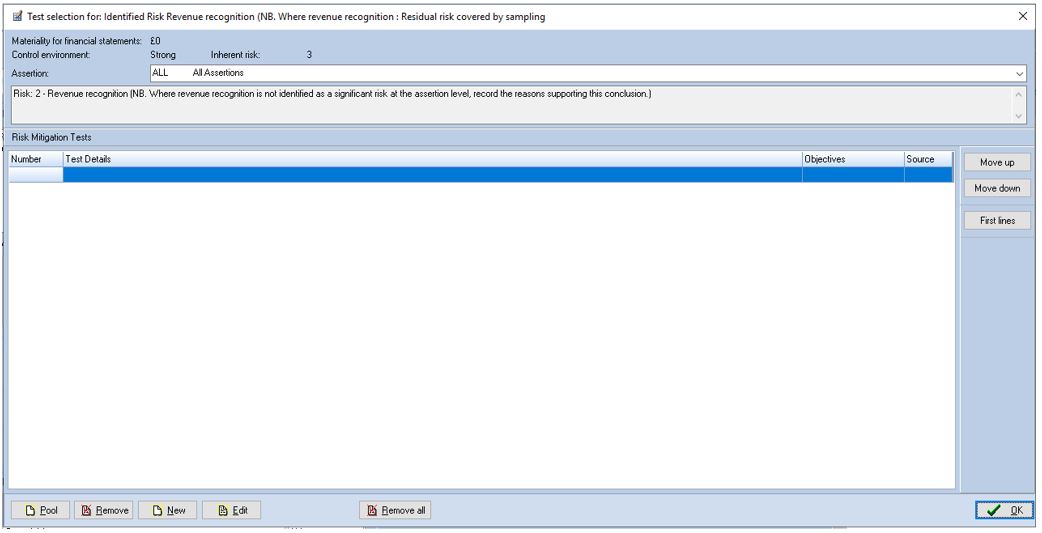
You can also create work programmes for identified audit risks from this dialog. To do this, double click in the assertion area on the risk line. The Risk mitigation tests dialog will appear:
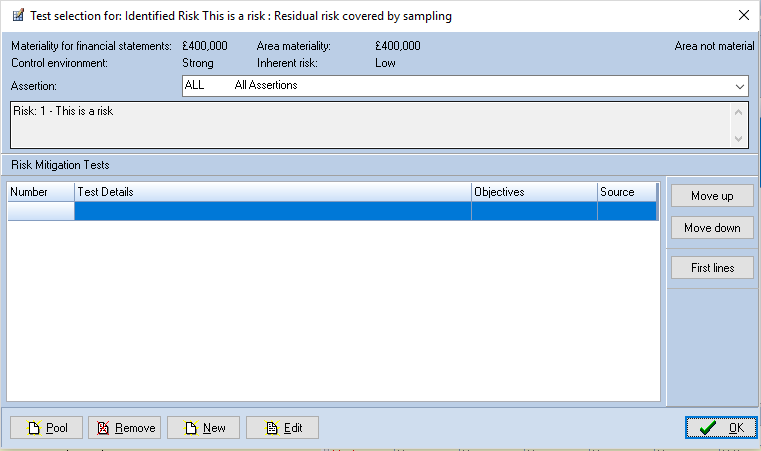
From this you can select and add tests as required. Note that you may need to design tests for each assertion affected by the risk, but the system will not insist on this.
Risk assessment for identified risks
You can assess the risk levels associated with identified risks and the assessed risk will affect the size of samples calculated for tests linked to the residual risk for the identified risk. The adoption of this new way of assessing risks is not mandatory and can be activated or suppressed by the System Manager.
When the option is active, a new section appears in the Identified Risk dialog:

The risks and reliance in this section will all default to None. Risk is assessed in this section in the same way as you would assess risk on an assertion in the Audit area risk dialog. Namely, select the level of risk associated with the identified risk, and indicate if any reliance is being placed on tests of control or non-sampling methods and the system will calculate the residual risk. Any levels of risk or reliance other than None will turn red if there are no procedures associated with them.
See below:

To associate procedures with a risk or reliance double click on the red number (or risk level), or select it and click on Work programme, and the Test selection dialog will be displayed.
From this you can select tests, edit them or enter new ones. If you calculate a sample on any test associated with Residual Risk then the risk level set here will be taken into consideration when assessing the highest risk level associated with the test.
As with Area risk assessment, if you try and exit from the Identified Risk dialog without planning procedures for a risk or reliance, the system will warn you. You will also not be able to sign off planning until at least one procedure has been designed for a risk or reliance.
No controls linked to identified risks
There is a checkbox on the Identified risk dialog to allow you to indicate that there are no key controls relevant to the risk (bottom on the 'Identified risk' window next to Risk conclusion button) .
When you tick this checkbox, the Key control button will become disabled. If controls have been linked to the risk then the checkbox will become disabled.
If this checkbox is ticked, the fact that there are no controls is shown in the Identified Risk dialog and in all other places where the risk is displayed or printed.
The system will not allow you to conclude on a risk if you have not ticked this checkbox when there are no controls linked to the risk.
Forcing the inclusion of an audit area
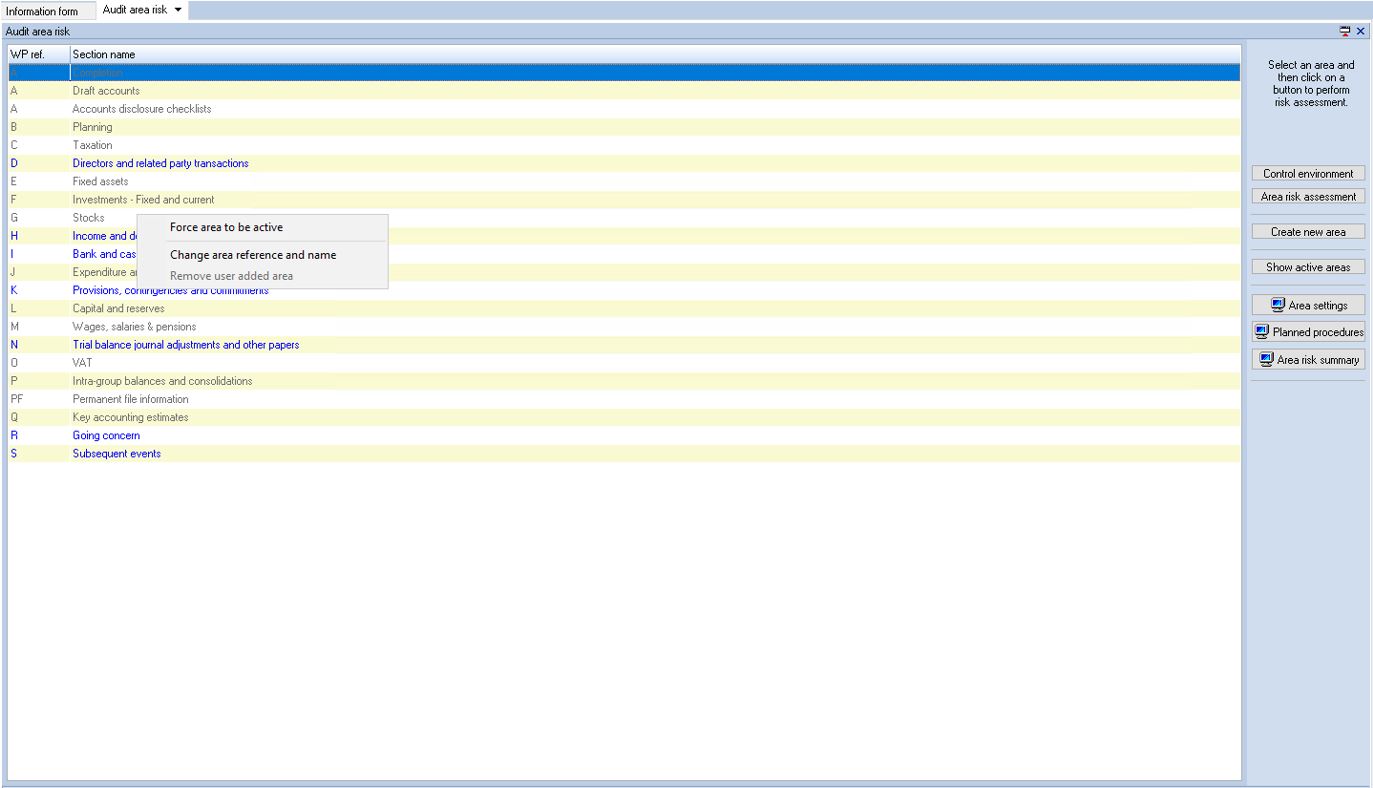
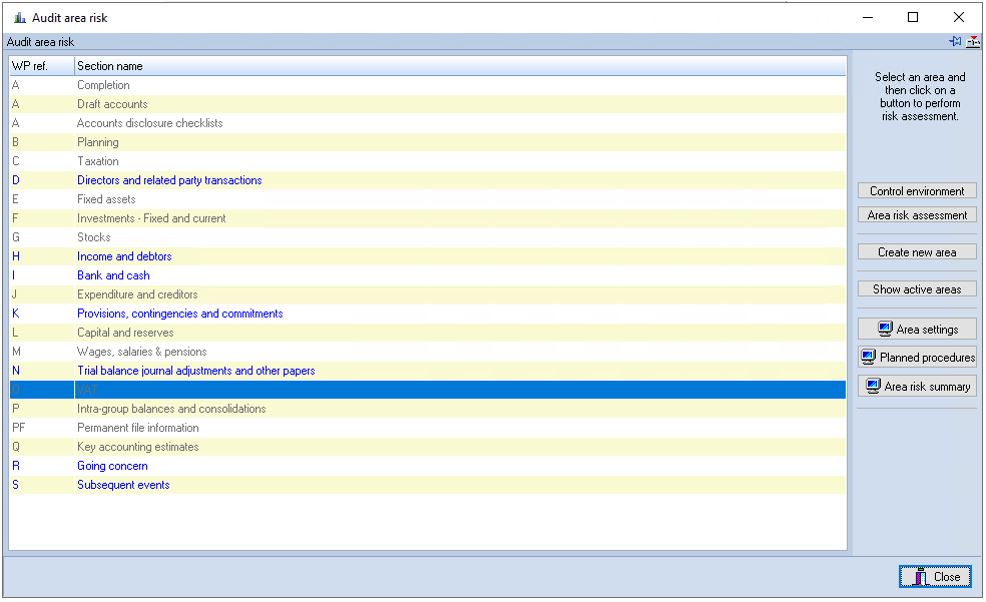
The system will show the audit areas that are relevant to the client as defined in the master pack. However, there may still be occasions where you wish to override this and force an area to be included. To do this click on [Show all audit areas] so that inactive areas are shown. Select the area to activate, right click to display the pop up menu and select "Force area to be active". This is a toggle, so you may select a forced area, pop up the menu (the option will be ticked to show that the override is active), and you may click on it to remove the tick and inactivate the area.
Creating a new audit area for a client - Multiple transaction streams
It is possible to add additional audit areas on a client by client basis to allow risk assessment and audit procedures to be designed for multiple transaction streams. To do this, display the Audit area risk dialog, highlight the area that is to be duplicated to form the new area and click on [Create new area]. The system will offer a dialog to allow you to enter the area reference and name, which will both default to that of the area being duplicated. Do this and click on [Save]. The new area will be created and entered in the list. You are now free to carry out separate risk assessment for the new area.
When you create a new area, the programmes and checklists that it contains, and the risk questions, will be based on the source area on which it was based. This routine therefore allows you to create programmes and checklists to reflect multiple transaction streams for an area. Note that the new section will not contain any lead schedules or perennial checklists as these would simply duplicate those in the source area.
Note also that on an update from one master pack to another, only the main audit area will be updated with additions to the programmes. Any tests edited or deleted from the master pack will, however, be reflected in all areas based on the section.
The number of audit areas that can be defined is 999. Of these, 500 are accessible in master pack definition. The remaining 499 are available for the user to create multiple copies of audit areas in the client pack.
Change reference and area name
If you wish to change the reference allocated to a user created area, or its name, select the area and press the right mouse button. An option is included in the pop up menu that allows you to do this.
Removing user added areas
If you have added an area and you subsequently wish to remove it, select the area and press the right mouse button. An option appears at the end of the list allowing you to delete the area.
Creating new working paper areas for packs where risk is not being assessed
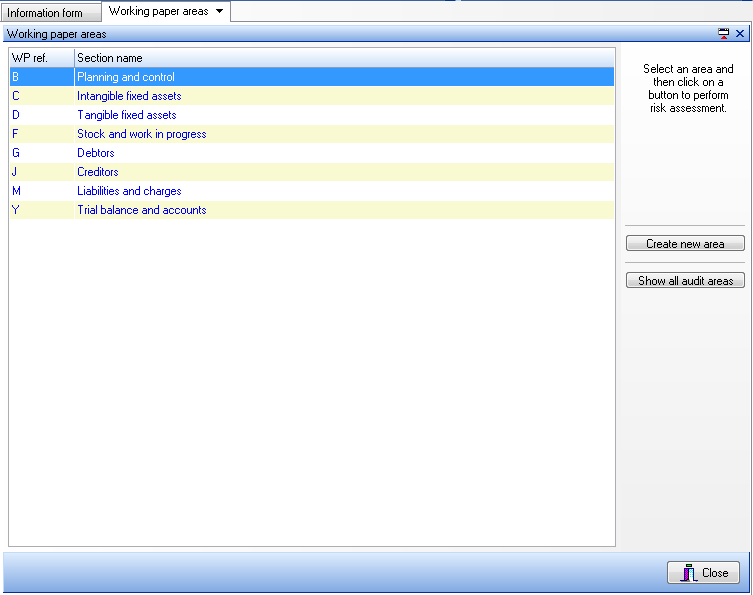
For clients attached to master packs where risk assessment is deactivated, the Risk analysis menu option in planning is replaced with an option called Working Paper Areas. On selecting this, a window will appear called Working paper areas giving access to the Create new area option.
Risk reports
Three reports are available in respect of risk analysis:
• Area Settings is a report containing a summary of all the settings for risk and reliance for each audit area and assertion combination. It shows who made each setting and any justifications entered. It also contains an indication of all instances where there is a risk or you are taking reliance and no procedures have been planned
• Planned Procedures contains the same information as the Area Settings report and includes the details of any planned audit procedures for each risk/reliance setting.
• Area Risk Summary is a report that provides a more condensed view of the risk settings for each area/assertion and shows the risk factor and sample sizes. This report provides partners with an overview of the risk profile of the client.