User Created Documents

As you will have discovered, Audit Automation allows you to create working papers and letters based on templates and you can do this from a number of different places in the program. When you create a working paper, the system automates the addition of the document to the index for the area to which it relates and also adds it to a central list of user created documents. You can view this list of user created documents by clicking on [User documents] on the Documents menu. When you select this option, the User created documents dialog will appear.

Client documents dialog
This dialog will contain a list of folders showing the audit areas in which user created working papers are stored. In addition, a General folder appears at the top of the list and this will contain any documents that you may wish to create but which do not relate to a particular area. This can contain such things as the letter of engagement, bank request letter and any minutes that the firm prepares. The documents that are contained in the General section are not deemed to be part of the audit file but allow you to make use of the template facilities and provide a convenient place to store documents that you wish to keep with the file and may wish to reuse next year.
A folder called Key business documents will only be shown when key business process documents have been added to the client. The documents can be marked as reviewed in the normal way, however additional documents cannot be added from this area as they should be generated from the Key Business processes area.
Double click on a folder to open it or click on the '+', and the system will list the documents that it contains.
Each document is identified by an icon showing the program that was user to create the document.
To add a subfolder to an area, select the folder and right click and select add subfolder.
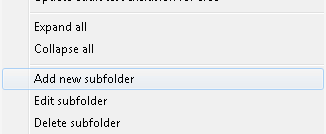
There are two additional options to edit the subfolder name and to delete a subfolder. A subfolder can only be removed when it no longer contains any documents.
The option to Change working paper folder and reference has also been updated to include a new option to allow the document to be moved into a subfolder if required:
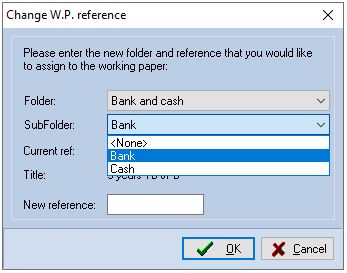
To move a document to the parent folder select the <None> option from the subfolder drop down.
A colour coding system is used for user created documents. Any document that was present on a balance forward and has not been accessed during the current year’s audit will be shown in the outstanding colour (default red). This is to alert you to the fact that this document still contains last year’s data. Once the document has been loaded, it is assumed you have made the changes required to reflect the current year end date, etc. and prepared the document for the current year. From that point on it will be shown in the standard list colour.
Tree view and List view
When the Use created documents dialog is first displayed, the data is presented in Tree view mode, with each audit area being represented by a folder.
You can switch to List view mode by clicking on [List view]. In this mode the working paper details are shown in a grid format, with the general papers first followed by those for each audit area in reference order. See below:

More information is available in this mode, and you can see this by scrolling the window to the right.
To switch back to Tree view mode, click on the [Tree view] button.
Restricting the content of the list
When the User created documents dialog is first displayed, the system includes all user generated working papers in the list. If you are only interested in the papers which have been generated using the word processor, or the spreadsheet program, you can click on the appropriate radio button and the list will be recompiled in accordance with your request. You can revert to a full list by clicking on the [All documents] radio button.
If you are looking for a particular schedule whose name is known but you are not sure where it is stored, you can restrict the list to only include documents where a specified string of characters appears in the title. To do this enter the title, or part thereof, in the Title entry box and click on the [Refresh ] button. The list will be recompiled to only include those schedules where the string appears somewhere in the title of the document.
Adding a new working paper
You may add a new working paper to any folder in the list. Simply, highlight the name of the folder and click on [Add]. The Client document dialog will be displayed completed with the audit area reference and you can proceed to create your new schedule.
Editing an existing document
The system stores the documents in a file store controlled through the SQL database. This means that documents must be checked out to be edited and checked in when editing is complete.
- Check Out - Checks the selected document out and stores and editable copy in a local document store on your hard drive.
- Undo Check Out - Remove the record of you having checked out the document but does not check in any local changes. Hence if you have made changes and then undo your checkout any changes made since you checked the document out will be lost. The system does make a backup of your document in the local document store so if you do this by accident it will be possible to retrieve your work provided the backup has not been deleted during housekeeping.
- Check In - This option copies your local copy of the document back to the SQL database thereby saving any local edits you have carried out.
Status icon
When a document is checked out, the system displays the following icon to the left of the name of the document:
 indicates document checked out
When a checked out document is highlighted, the system also indicates the local path where the document is stored together with the name of the document in the button bar:

In List view, the status icons are presented in the second column and the name of the user who has the document checked out is displayed in the last column.

You can only checkout 1 document at a time, however in this view you can check in multiple documents by ticking their checkboxes in the first column and selecting the check in, or undo check out, options.
If you open a document that has not been checked out, for example by double clicking on it, you will be asked if you wish to check it out for editing:

If you answer [Yes], the document will be checked out and opened for edit. If you answer [No] it will not be checked out and will be opened in read only mode. In read only mode the document will either not be editable, or in the case of Word will accept your edits but it will not allow you to save the changes.
To edit an existing document, either double click on the document's name, or highlight it and click on [Edit]. The Client document dialog will be displayed showing the header details for the document and you may proceed to edit the details and/or the document as described see link Working Papers and Client Documents .
Deleting a document
It is possible to delete a document from the list of user created working papers and delete the underlying file. This process is not reversible so you must be absolutely sure that you wish to remove a document before proceeding. To delete an item, select it and click on [Delete]. The system will ask you to confirm that you wish to delete the highlighted document and, if you click on [Yes] it will be removed from the list and the underlying document will be deleted from the system.
Keep on balance forward
In List view there is a column called ‘Keep next year’ containing checkboxes.
Selecting or deselecting these boxes as required will allow you to keep or delete user created documents after carrying out a balance forward without having to open the edit document screen.
