Dimensions

Dimensions and Dimension members
Dimensions are user definable and set up by selecting Dimensions from the Reference folder in the Task Bar list.

The Dimension is the concept that you would like to report on and the Dimensions members are the analysis of that concept. You can have any number of dimensions associated with an account.
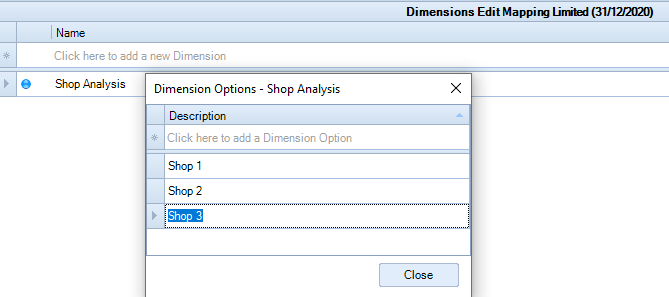
For example, if you have a client with three shops, you could set up a Dimension called Shop Analysis with 3 members:
- Shop 1
- Shop 2
- Shop 3
In the chart of accounts, you can indicate which accounts you wish to analyse by Shop, by adding the dimension to the nominal codes.
Creating Dimensions and dimension members
- Select Dimensions from the Reference folder to open the grid.
- Enter the description for the dimension in the first row (input row), press enter to drop the row into the grid.

A warning triangle will appear beside the Name, this is because no dimension members have yet been set up.
- Click on View
 from the ribbon (or right click and select View Dimensions) to enter the dimension member descriptions e.g. Shop 1, then Shop 2, then Shop 3.

The warning triangle will change to a blue dot to indicate there are dimension members.
Assigning Dimensions to Nominal codes using Single Selection
- Select Chart of Accounts from the Reference folder, the Chart of Accounts grid appears.

- Select the the nominal code, within the grid that you want to link a dimension to, right click and then select View Dimensions (or click on View Dimensions on the ribbon).

The Dimension dialog box appears, and it contains the dimension that you created earlier.
- Select the dimension that you want to assign from the drop-down and press enter.

- With the Dimensions dialog box open you can select additional nominals (repeat step 3 to link).
- Click Close when done. An icon appears next to nominals which have a dimension linked.

Assigning Dimensions using Multiple Selection
- Alternatively, to select a range of nominals use Shift-Click to highlight the range, or if selecting nominals not in a range hold the CTRL key while at the same time left click each nominal that you wish to add, release the CTRL when you have completed your selections.
- Right-click and select View Dimensions or select View Dimensions on the ribbon to display the "Dimensions Multiple Selection" dialog box.
- Select the dimension that you want to assign from the drop-down and press enter.
- Click Close.
The dimension is assigned to the selected nominals and the dimension icon (showin in 5 above) appears in the Dimension column on the grid.
