Getting Started with CCH iFirm Personal Tax
Prerequisites
- Must have the Latest version of CCH Central installed
- Your practice has subscribed to CCH iFirm Personal Tax
- In CCH Central, a new task permission #Client#LaunchiFirmPT has been created to allow firms to select which employees can access CCH iFirm Personal Tax.
Note: Without this permission you won't be able to launch CCH iFirm Personal Tax - .Net 8.0 runtime installed (This is available via our CSI installer > Tools Install)
- Ensure that the 'CCH iFirm Console' Central service is running and signed in
- Ensure the user can access CCHiFirm
How to create a CCH iFirm Personal Tax Return in CCH Central
Please note:
Ensure that the 'CCH iFirm Console' service is running before creating tax return. The CCH iFirm console allows firms to authenticate and monitor the syncing of edited Contact and Client records from CCH Central to CCH iFirm.
Users must have Latest version of CCH Central installed and .Net runtime version 8.
These applications are essential for CCH iFirm and must be installed on the SQL Server and all Workstations wherever CCH Central is run from.
All empolyees require permission to access CCH iFirm Personal Tax in CCH Central > Task Permission and CCH iFirm.
The NINO and post code are mandatory fields for MTD for Income Tax, they must be present in the client record. Otherwise, an error will be shown and you won't be able to create that client in MTD for Income Tax, as these fields are used get the quarterly submission obligation from HMRC into CCH iFirm
Create a new tax return
Find and open the client you would like to create a tax return for in CCH Central.
- Click on the Tax Returns sub-tab within the clients record.

- Click Create in the ribbon or Click here to create a new tax return on the screen to create the return.
The Create a new tax return box will open.
3. The first screen allows you to select the tax year and click Next.
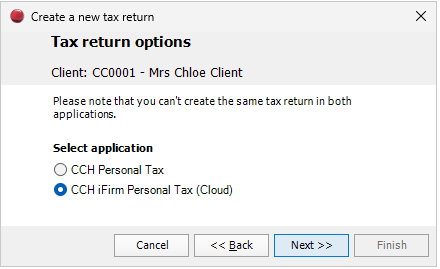
4. Select the CCH iFirm Personal Tax (Cloud) application and click Next.
Note: The starting tax year that CCH iFirm supports for CCH IFirm Personal Tax Cloud will be 2024/25. You will not be able to create the self assessment any previous years
5. If you wish to add a workflow select Central workflow and click Next then select the workflow name.
6. If you do not wish to add a workflow click None and click Next.
7. Confirm you would like to create a new tax return in CCH iFirm Personal Tax by clicking Finish.
8. You will be redirected to the CCH iFirm webpage. Log-in using your email address that is registered in CCH iFirm.
(Note: this email address here should match your employee email address in CCH Central)
9. Once logged in, you will see the CCH iFirm : Personal Tax screen for your client.

Appendix
Enable the CCH iFirm Personal Tax launch button
First you will have to login to CCH Central as a superuser.
Navigate to File > Maintenance > Security > Task permissions. Here, choose CCH Personal Tax as the product and then chose a group that you would like to have access to CCH iFirm Personal Tax. Search 'launchifirmpt' and tick 'For Clients' and click 'OK'.

Setting up CCH iFirm Personal Tax users in Organisation Management
All employees who require access to CCH iFirm Persoanal Tax must first be invited by your Organisation's CCH iFirm admin user via organisation managment using the same email address recorded against the employee record in CCH Central. If you require more information about how Organisation Management works in CCH iFirm, please click here above hyperlink.
Important Note: the employee email address must not contain a space between the first and last name.
Assuming you are already in the Home screen of CCH iFirm then Organisation Management can also be accessed from [Manage my Organisation] button below under My Services

The overview section in left hand panel should now be highlighted and either the existing members box or inviting new members can be selected.

If following screen displays click [Start Walkthrough]

Having selected a member you can choose the grant or revoke access to products

If a new member is being set up their details will need to be entered and you will need to decide whether their role is regular member or administrator.

Then select the [Product Access] button and mark which products they are being given access to.

The [Invite Message] shows the message the new member will receive by email

The products section will show the logged in user which products they are subscribed to.

Once a user is subscribed to CCH iFirm Personal Tax via Organisation Management, they also need to be given the correct access for CCH iFirm Personal Tax in CCH Central.