Help guide for Wolters Kluwer Account Admin users

|
You'll need to manage your employees' access to the Support Portal and other applications such as My Learning Portal and invite new employees as they join. We refer to this role as the Wolters Kluwer Account administrator. You need one nominated person to undertake this role, but we recommend at least two people to cover absences. Topics covered in this video:
|
|
What is Wolters Kluwer Account?
LOGIN TO WOLTERS KLUWER ACCOUNT SELF-SERVICE
Wolters Kluwer Account self-service is used by Wolters Kluwer Account Administrators to set up and manage new Support Portal administrators and users for the Support Portal, My Learning Portal and UserVoice.
Every organisation must have one or more Admin users who can add and remove regular users for these applications.
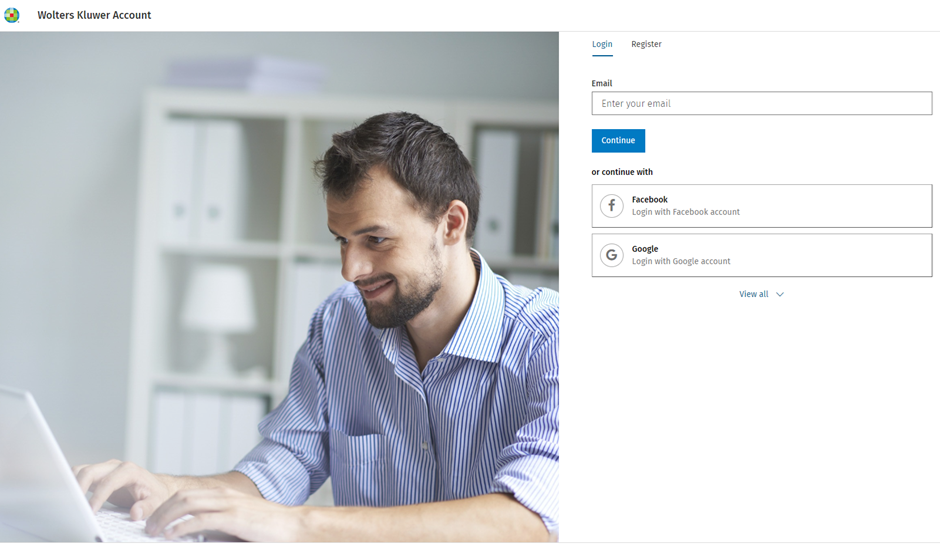
Login to Wolters Kluwer Account self-service
Use the login link above to access the Wolters Kluwer Account self-service portal. As an existing user of Wolters Kluwer Account, you will have an email login and password that you previously set up. Enter them in the form on your screen. If you have a different form showing on your screen, make sure you have selected Login at the top.
NOTE: The following documentation relates solely to 'Admin' user functionality.
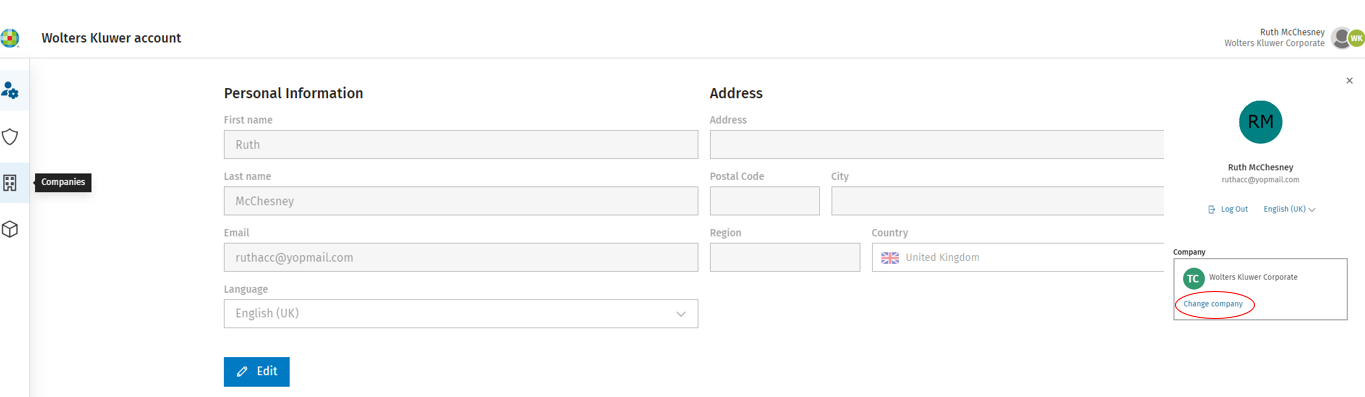
Selecting your company
If your Wolters Kluwer Account is registered for multiple organisations, you will have access to all companies. The name of the organisation/company you are currently accessing is displayed under your name in the upper right corner of the page. If you need to change the company, click on your name or the company name and select Change Company.
Select the Companies tab from the left menu on the self-service page and change company if applicable (see above Selecting your Company).
You will see the applications that your organisation is licensed for. If these don't show immediately, click on the fourth tab in the left menu (as above) Applications.


Assigning Admin rights to an existing user within your organisation
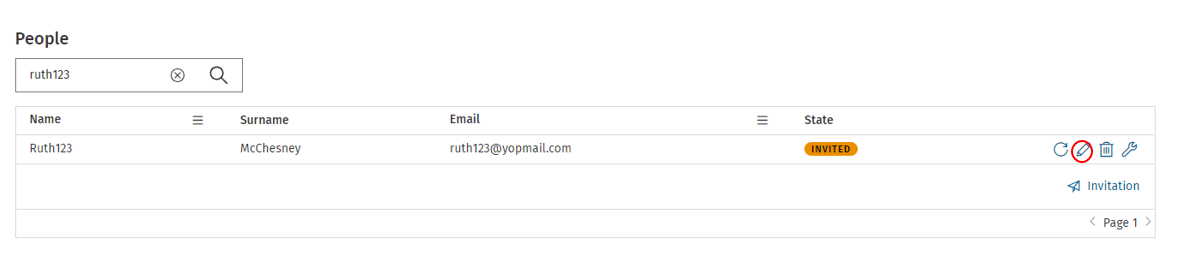
In the People section below, search for the existing Support Portal/My Learning Portal user you wish to give administrator access to and click the pencil (edit) icon beside the user's name.
IMPORTANT NOTE: Please carefully review access permissions when granting employees and external IT consultants access to the Support Portal. Specifically, external IT personnel should NOT be granted Admin user rights or permission to Edit the Company Profile in the Support Portal.
If you would like a staff member (user) to be a Wolters Kluwer Administrator, tick Can Manage Users. We don't recommend that you tick Can edit company profile. Changes made to the login configuration and behaviour will affect all users in your organisation.
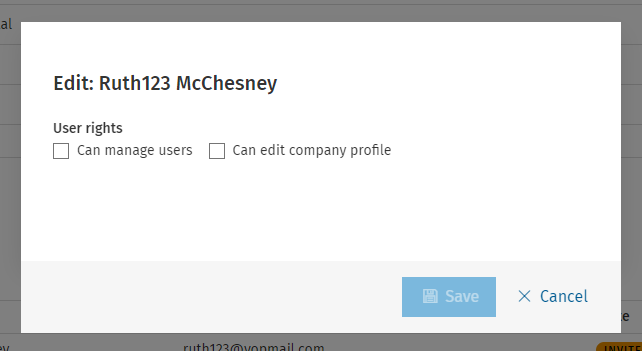
Click Save.
If you ever need to remove admin permissions, simply repeat the above process and untick the 'Can Manage Users' checkbox.
Inviting new users to join the Support Portal, (My Learning Portal and/or UserVoice)
To invite new users to the Support Portal, login using your Wolters Kluwer Account credentials at Wolters Kluwer Account self-service page
- If the user that you wish to join the Support Portal DOES NOT HAVE A WOLTERS KLUWER ACCOUNT already, you will need to send them an email invitation as step one of a two-step process.
- If the user that you wish to invite HAS A WOLTERS KLUWER ACCOUNT linked to your organisation (because they use another Wolters Kluwer cloud application that is licenced to your organisation, for example CCH OneClick, go straight to step two of the invitation process below.
Step 1: Sending the Invitation Email
If you have multiple companies, change company using the instructions from the Selecting your Company section above.
Scroll down to the People section and click Invitation.

Enter the user's name and email address, and if you would like to give the user administrator rights, tick the 'Can Manage Users' checkbox. This would give the new user the ability to invite others to join the Support Portal. Most customers provide administrator access to a few individuals within their organisation only.
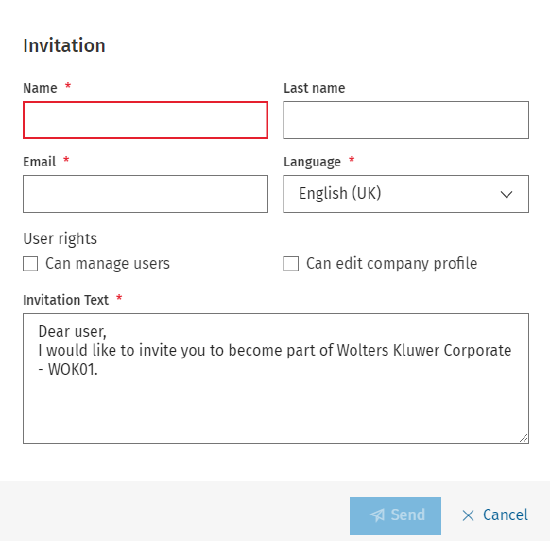
The invitation text is standard and it will contain a link for your new user to click when it arrives in their inbox. If you would like to customise the invitation text, click here to read the instructions.
You should notify the user in advance that you will be sending them an invitation to register for the Support Portal and that the invitation will be sent from noreply@wolterskluwercloud.com. They should also be asked to check their junk mail folder if the email does not arrive.
Step 2: Add the Support Portal application to the invited user
You will need to add the application (Support Portal or My Learning Portal/UserVoice) to the user.
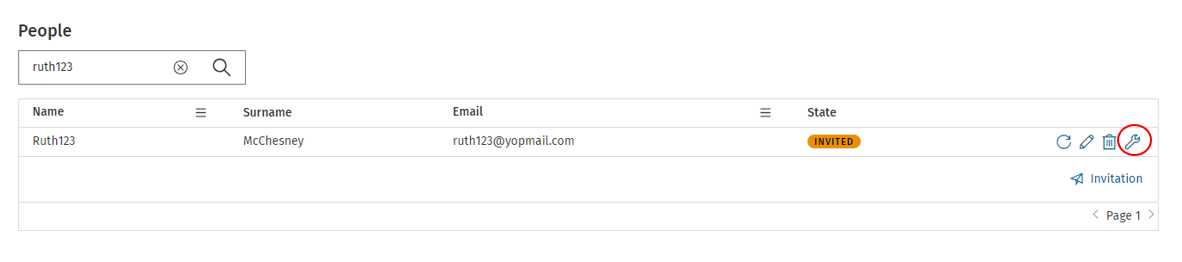
Making sure you have selected the correct company (as explained above), search for the user in the People section.
Once you have located the user:
Click on the spanner icon beside the user's name:
You will see any applications that the user already has access to. In the example below, there are none.
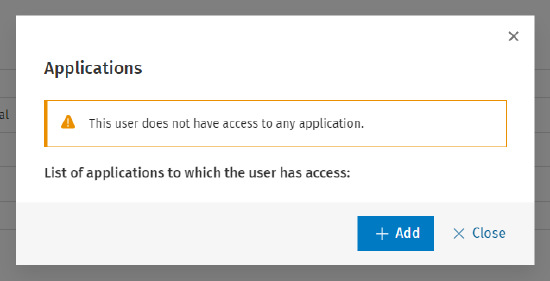
Click Add to view the applications that you can assign to the user.
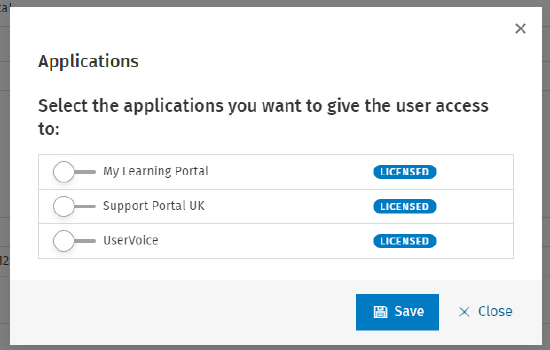
And click the slider to add the applicable application/s. The Support Portal will not appear as blue (active) until the new user has logged in for the first time.
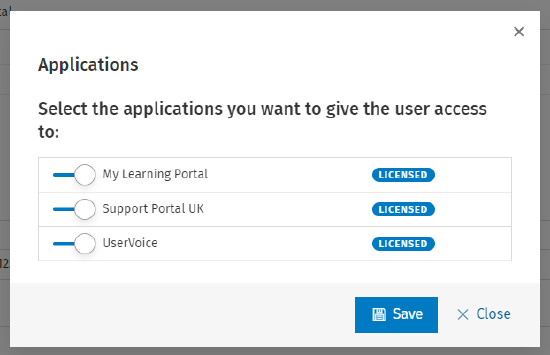
Click 'Save' when completed.
The user will not be sent an email from Wolters Kluwer Account informing them of their updated user status so we recommend you an email to update them.
An Admin user with Can Manage Users rights can invite other colleagues to join the Support Portal. We would encourage you to invite all colleagues who use Wolters Kluwer software to activate their Support Portal user accounts. If you wish your user/s to have access to eLearning courses for our CCH software, enable My Learning Portal and if you would like a user to be able to vote or suggest product enhancement ideas, enable UserVoice.
Need to re-send a new user invitation email?
Log into the self-service screen, select the company (as per above instructions) and search to find the respective user (their status will show as invited) and click the resend icon to the right of the Invited status label:

This completes the invitation/activation process for new users. Please make sure all of your software/support users can access the Support Portal.
Note: if you have added Support Portal, this will show as having been assigned to the user but in a disabled state until the user logs into the Support Portal. Other applications will show as enabled.
Customising your user email invitation text
Customising your email text is optional. Your user will be invited to join the Support Portal or other applications as required using the standard text provided above.
The text below can be used to overwrite the default text in the email 'invitation text' box.
It contains more detail that will prove helpful to new users. You may prefer to copy and paste the text below into a Word document and edit to meet your exact requirements – including adding your own contact details to the bottom – and then copying and pasting from that document in future.
When you are copying and pasting, we recommend that you highlight the text, press CTRL-C to copy, then click in the invitation field and press CTRL-A to highlight all existing text and CTRL-V to paste and overwrite the existing text.
Below is the bespoke text for your invitation email to new users. You will see the text contains HTML code. If you copy and paste this text including the HTML code into the Invitation Text box on your screen, it will generate the email below which is what your user will see.
Email text for you to copy and customise using the instructions below:
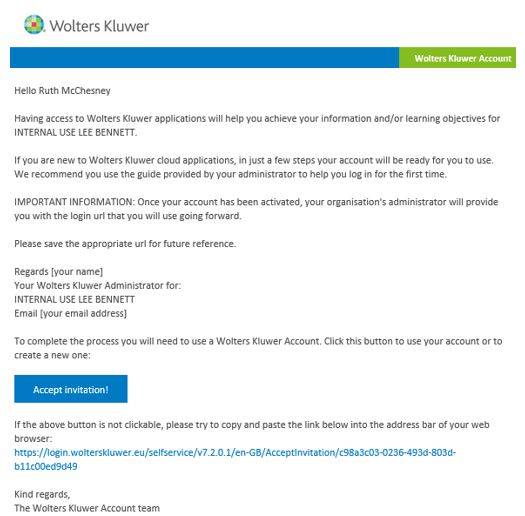
Hello {name} {surname}
Having access to Wolters Kluwer applications will help you achieve your information and/or learning objectives for {companyName}.
If you are new to Wolters Kluwer cloud applications, in just a few steps your account will be ready for you to use. We recommend you use the guide provided by your administrator to help you log in for the first time.
IMPORTANT INFORMATION: Once your account has been activated, your organisation's administrator will provide you with the login url that you will use going forward.
Please save the appropriate url for future reference.
Regards [your name]
Your Wolters Kluwer Administrator for:
{companyName}
Email [your email address]
This is what the email will look like for the user receiving it, using the above text:
Here we explain the email merge fields for you.
- {name} First name. This will automatically be shown in your email.
- {surname} Last name. This will automatically be shown in your email.
- {companyName} Your company 'display name' as shown at the top of the Companies tab will automatically be shown in your email. If this needs to be changed, please assign ‘Can Edit Company Profile’ rights to a user, but please be aware of the potential for this user to make other changes that you may not want.
- {email}. This will automatically be shown in your email.
Tips for formatting your email:
- We recommend that you copy the above text into a Word document first so you can use it to invite new users to join the Support Portal in the future.
- Edit the text to meet your specific requirements, ensuring the merge fields are used correctly
- When pasting your text into the Invitation Text box, use CTRL-A and CTRL-V as highlighting existing text may close the invitation window
Your Administrator is unavailable?
If you need new users invited to the Support Portal but your Administrator is not available, please log into the Support Portal and submit a support case.
Suspend/Delete access for user
As the Administrator for your organisation, you are able to suspend a user’s access to the Support Portal or other application by repeating step 2 above and disabling or deleting the application for them. You can:
- Suspend Access - Search the list of People to find the applicable user. Click the spanner icon beside their name and click the slider to the left of the application name to change to Disabled and click Save.
- Delete Access - Search the list of People to find the applicable user. Click the spanner icon beside their name and click the Delete icon to the right of the application name. Confirm your ‘delete’ request.
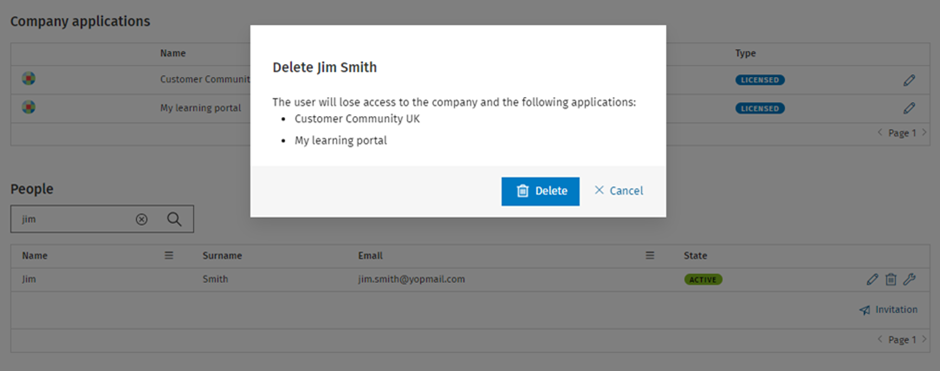
- Delete the user - Search the list of People to find the applicable user. Click the Delete icon to the right of the user's name.
The following will be displayed:
Note: Our recommendation is that you do not make any changes over and above those documented above. Specifically, you should leave MFA as mandatory for CCH OneClick and any other application that Wolters Kluwer UK has determined should have mandatory MFA.
We also recommend that you do not change the social login options from their defaults.