How do I raise, check on or close a support case?

How to create a Support Case
To create a support case with our Support team, please follow the instructions below:
- Log in to the Support Portal
- Click on Cases from the top menu
NOTE: if your support query is urgent, select the reason for urgency from the Case Reason field.

3. Click on the 'Create a Case' button

4. Step 1 of 2 requires you to complete all the mandatory fields in the form on your screen (those marked with a red asterisk)


Level 1 relates to the type of query that you have. Depending on the applications that your practice is licensed for, you will see up to four options to select from.
a. Select Cloud Product Support if your query relates to a cloud based product that your practice is licensed for, eg. CCH OneClick, Twinfield, finsit etc.
b. Select On Premise Product Support if your query relates to a locally installed product that your practice is licensed for, eg. CCH Central, CCH Accounts Production etc.
c. Select Billing, Licensing and Subscription if your query is for our Customer Services team, eg. you have a query regarding your invoice or you are requesting a new licence PIN etc.
d. Select Something Else if your query relates to an area of the Support Portal, eg. you are experiencing an issue activating an employee via Wolters Kluwer Account.
Level 2 is the product/topic that your query specifically relates to:
For example, CCH Personal Tax:

Level 3 is a further categorisation to assist the Support Consultant handling your case. Simply select Core Functionality if your case is related to the product as opposed to a specific category.

Select the most appropriate option from the Products field.

Enter your subject, a brief description of your issue. Then, in the description field, be more explanantory and include any error messages or other relevant information that you think would help our support agents to resolve your query.

New! Impact and Urgency Support Options
The "Reason for me to create this case" field will default to "General question about product or functionality," which indicates the lowest impact on your current situation.
You can select a different option from the drop-down menu—for example, "Functionality is not working correctly"—if you're experiencing issues such as:
- Unable to activate OC, request recovery code
- Unable to submit online filing or Tax return
- Query about edit format, statutory datbase in Accounts Production
- Query about running reports
- Query about timesheet, WIP in Practice Management
- Unable to file documents
- Unable to proceed AML checks
- Unable to proceed with audit work in Audit Automation
- Unable to run workflows etc.
Please select the option that best describes your current situation. Making the appropriate selection will help alert our Support team to the urgency of your case once it’s submitted.

Then, let us know whether there are any limitations to your work by selecting from the Can you continue to work?

Although the Product Version field is not mandatory it is always useful for the Support Consultant to know which version of the relevant product your query relates to.
The External Reference' field is also not mandatory but it can be used by you or an external IT company to make a note of the equivalent Case Number within their own case logging system for tracking purposes.

Locating an answer from our knowledge base
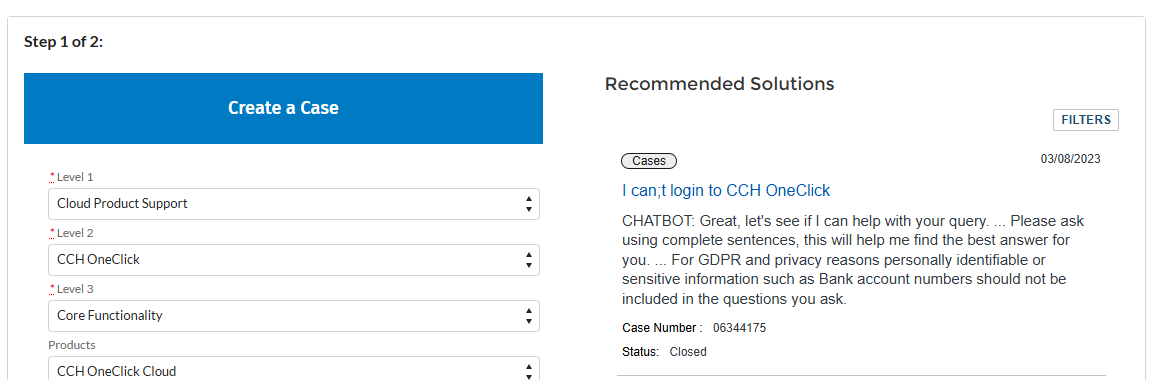
Use the filters to further refine your search.

Hover over the date on each article of interest and click on the Quickview icon to view the article in a pop up window.

Click Next to progress to Step 2 of the case creation process once you have reviewed the suggested articles that may answer your question.
Step 2 will offer you more articles to review. If you're not able to find a solution to your query, scroll to the bottom of the screen and select Create Case. At this point your case will be created and will be automatically assigned to the available agent skilled in the related product.

How to check on an existing support case
To update or reopen a case from within the Support Portal, click on Cases from the top menu bar

Select the case you are interested in from the Open Cases tab.


Scroll to the case comment section and enter any relevant information into the Comment field. Click Add Comment and your support agent will be notified and will respond as soon as possible.

How to re-open a case
If your case has been closed and you would like to continue working on the query, if it's within 48 hours of it being marked resolved, you can click on the case number under the Closed cases tab and scroll to the case comment section and enter a comment. This will re-open the case and a support agent will be in touch. If you are outside of the the 48 hours, you will need to create a new case but please mention the previous case number in the description field to assist our support team in matching the two cases.

If a support agent adds a new comment, you will receive an automated notification containing a link that will take you straight to the case within the Support Portal.
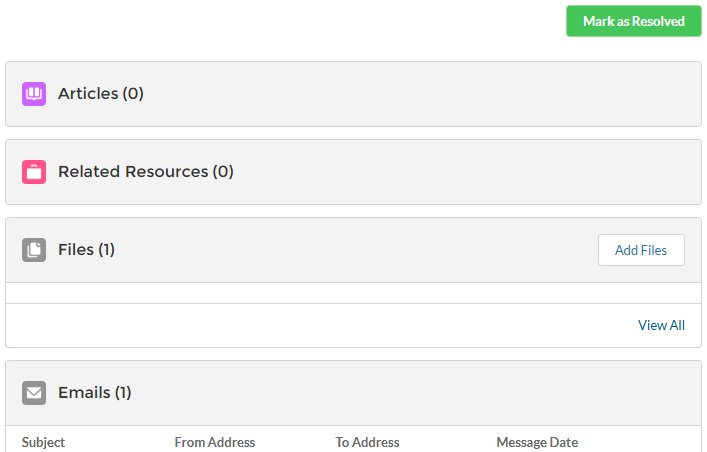
How to close (resolve) a case
Click on the Cases tab from the top menu.
Click on the case number on the left that you would like to resolve from the Open Cases tab.

Click Mark as Resolved from the top right of your screen. You will be asked to confirm that you wish to resolve the case. Read the on-screen message and click Save if you still wish to resolve the case. A success message will appear at the top of your screen. If you need to re-open the case for any reason within 48 hours, please follow the instructions above.