CCH iFirm AML Functionality in CCH Central

Setting up users in Organisation Management
All employees who require access to CCH iFirm AML must first be invited by your Organisation’s CCH iFirm admin user via Organisation Management using the same email address recorded against the employee record in CCH Central. Please see our CCH iFirm Organisation Management documentation for further information.
Once this is completed the employee also needs to be given the correct access for AML in Central (please see Setting up user section below)
The CCH iFirm AML process

Setting up users to access AML in Central
Users must have Central 2024.120 service pack or later, as well as the .Net6 upgrades (available from the CSI)
In order to run an AML check, first you will have to login to CCH Central as a superuser, in order to give permission for the users in your firm to see the “CCH iFirm AML” options for both contacts and clients within CCH Central.
Navigate to File > Maintenance > Security> Task permissions. Here choose CCH Central as the product and then chose a group that you would like to have access to CCH iFirm AML. Search 'AML' and tick both boxes for contacts and clients and click 'OK'

Users under that group and Superusers in the firm will be able to see the option to run CCH iFirm AML under tasks when viewing a client or contact.
Running the AML Check
Find the client or contact that you would like to run an AML check on, open them and navigate to tasks. Here you will be able to see CCH iFirm AML. Please click on that button.

After clicking “CCH iFirm AML” your browser will open up a new tab, asking you to log into CCH iFirm with your Wolters Kluwer account. Note, that the email address you use to login with your Wolters Kluwer account, must match the email address under the “Personal” tab in the employee record in CCH Central email.
If the email address for the Wolters Kluwer account and the email address on the employee record do not match, you can edit the email by going to Central.
>Employees> Personal and then entering or editing the email address displayed.

Once you log in, you will see a success message (as per the below image) - please note do not close this window just minimise as instructed if it does not minimise automatically and a new tab will open on your browser for you to continue the AML check.


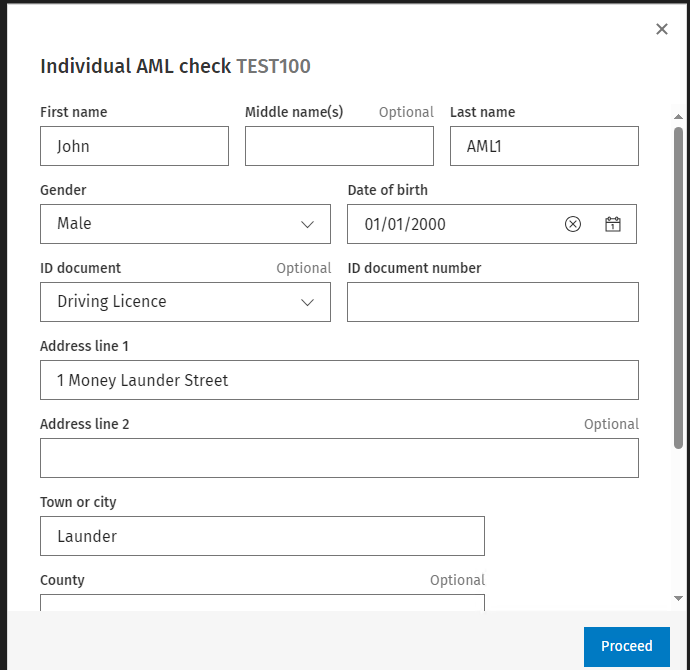
You will see all the information from CCH Central has now been populated in the browser window ready for you to run the check on. Whilst you can retype information in this window, we always recommend ensuring your data is correct in CCH Central, as CCH Central will be your main database and your single source of truth. From here you can hit proceed.
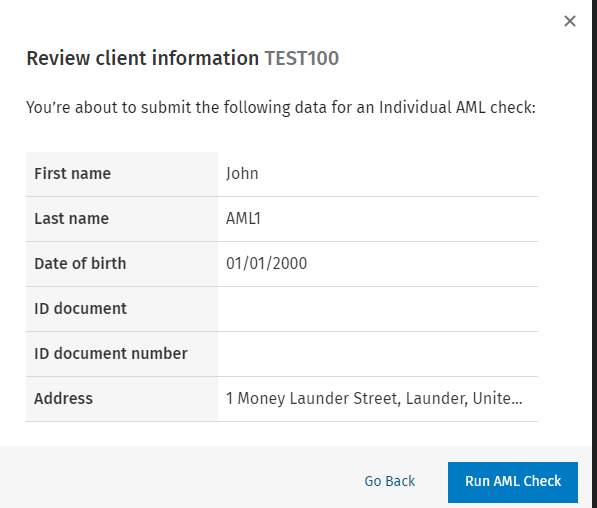
The screen will ask you to confirm the details, from here you can click “Run AML Check”

After running the check, you will get a pass or fail with the option to download the accompanying PDF. It will also automatically sync with CCH Document Centre against the relevant client or contact. If you chose not to download the PDF or you don’t have CCH Document Centre, you can view it at will within CCH iFirm AML.


Click here to check that CCH Central has been set up to enable users access to the Document Centre Viewing PDFs of AML Checks in CCH Central Document Centre
Click here to go to an AML check that has passed with a detailed explanation of the report AML Example Report Detailed Explanation
After closing the report you will be in CCH iFirm AML and be able to view all AML checks that have been run for all clients and contacts. In the example below you can see under the status column that AML checks displayed either a fail or pass for this particular customer depending on which day they were run.

To run another check, simply head back to CCH Central and find a new contact or client and repeat the steps. You won't have to log in again with your Wolters Kluwer account, unless your session expires.