Client management

What are 'Clients' in CCH Trust Accounts?
CCH Trust Accounts produces accounts for 'clients'. A client in Trust Accounts usually corresponds to your concept of a client. For CCH Trust Accounts it is normally the trust; for estate accounts, the estate; for Charity accounts the charity and so on. However, there are exceptions to this approach. For instance, if each beneficiary receives a set of accounts showing their assets, liabilities and details of their income, it is usually easier to set the beneficiary up as a client in their own right.
For high net worth individuals it is often not necessary to produce a set of accounts. In this case the individual would also be set up as a client. This type of client would be set up to have an investment ledger but no nominal ledger.
Removing the option for a nominal ledger speeds up Data Entry as no nominal account codes are required. If the link to CCH Personal Tax is being used, a client in CCH Trust Accounts usually corresponds to a client in CCH Personal Tax. However if a separate set of accounts is being produced for each beneficiary then the CCH Personal Tax client corresponds to the SA900 form (i.e. to the trust), while the Trust Accounts client corresponds to the beneficiary. When CCH Personal Tax is linked to CCH Trust Accounts, multiple accounts clients can update a single CCH Personal Tax client.
Creating a Client for the first time
- New to both CCH Central and CCH Trust Accounts.
- An existing user of CCH Central but new to CCH Trust Accounts.
- An existing user of CCH Trust Accounts but new to CCH Central.
- You will create the client in both CCH Central and CCH Trust Accounts and link the two.
- Only create the client in Trust Accounts and link to the existing client in Central.
- Only create the client in CCH Central and then link from within CCH Trust Accounts to CCH Central
Creating a new client within CCH Central
- Within CCH Central, choose File > New > Client. This opens the Add New Client Wizard. Note: If the client is already in CCH Central you can skip this step.
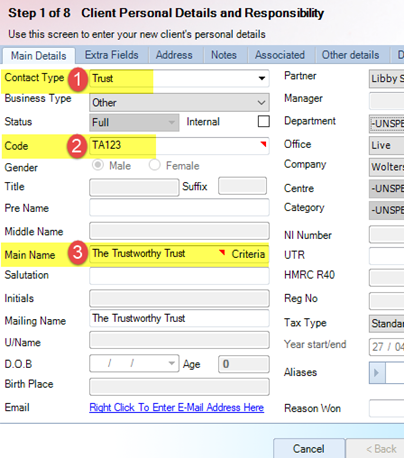
- Select the Contact Type as: Trust
- You must enter a Code, unless your database has been configured to automatically generate a code.
- Enter the Main Name of the Trust.
You may Finish at this point, unless you have compulsory Extra Fields to be completed.
Important Note: Do not create an accounting period for your Trust within CCH Central - this is done within CCH Trust Accounts.
Client List within CCH Trust Accounts
If you do not see the Clients window within CCH Trust Accounts, click on Activities > Manage Clients from the top of the screen.

Creating a new client in CCH Trust Accounts
- From the Clients window in CCH Trust Accounts, click on the New button:

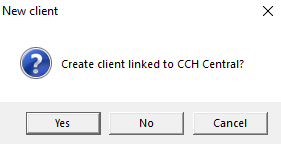
- A New client pop-up appears:
|
Linking to CCH Central upon client creation |
Not Linking to CCH Central upon client creation |
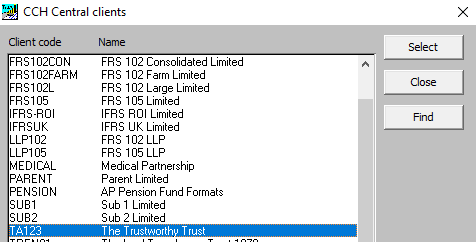
| Select Yes on the New client message, the CCH Central clients list will appear. There is a Find option to assist with finding a client in the list. Note the code in CCH Central and CCH Trust Accounts must be identical. | Select No on the New Client message and the dialogue box CCH Central clients will not appear |
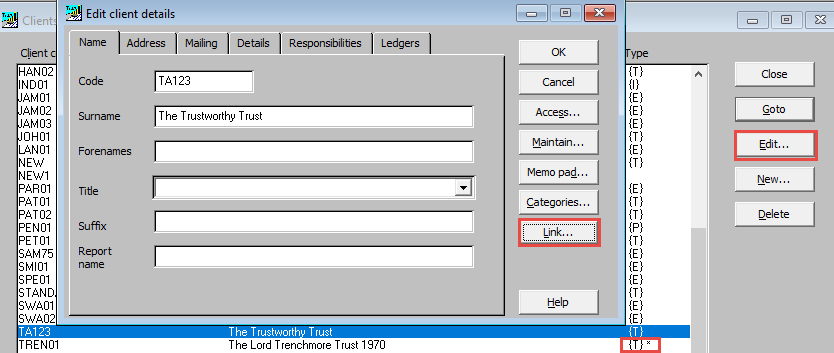
- For either scenario, Yes or No, the dialogue box Edit client details will follow.
If Yes in (2) above was selected, the Code and Surname fields are populated from Central and greyed out, if required enter the Report name, click OK. If No in (2) above was selected, enter the Code and name of Trust in the Code and Surname fields, if required enter the Report name, click OK.

Note: The tabs on this dialogue box are not relevant for most jobs as superseded by CCH Central.
Setting up Nominal Client details for the first time
To access the client, double click on the client name from the Client list (or single click and click on the Goto button on the right).
The first time the client record is accessed the Nominal Client Details dialogue box will open.
Ensure you select / enter the following:

Class: Chose the Class from the drop down, e.g. Trusts. Important: This cannot subsequently be changed on this screen. The format type must match the Class.
Currency: This will feed through and you will only change if you have the multi-currency module.
Year Ends: Enter the year end date for This year and Last year.
The Previous year and Next year will automatically populate. Important: Ensure Last year and Previous year are correct as they will be locked down.
This Year and Next Year may be edited later, if required.
A/cs formatter: This will default to Accounts Prod (unless changed by yourselves).
Format type: Ensure the format type selected from the dropdown matches the Class e.g. Trusts and Trust
To Finish Click OK, you will be shown a message advising that the Last Year End date cannot be edited later. If you are sure the dates are correct click Yes.
Explanation of other fields on the Nominal Client details screen:
Currency: The currency defaults to GBP but can be amended if required by pressing F2 and selecting from the available list of currencies.
A/cs formatter: All new clients created default to using Accounts Prod. Do not change.
Client file extn: This field is auto populated by the software and should not be changed. It is used by CCH Trust Accounts to identify client-specific files.
Rounding type: Recommendation is not to round.
Use Divisions: When enabled Divisions can be used to show sub-analysis of nominal accounts for use in the final accounts.
Beneficiaries: This chargeable module allows you to automate payments to beneficiaries.
Finding and Linking existing CCH Trust Accounts clients to CCH Central
From the Client list, select the client and click the Edit button to the right.
This opens the Edit client details dialogue. From here click the Link button and OK to close. An * will appear beside the (T) in the Type column. The example below show the selected client which is not yet linked and a different client that is linked.
Setting up a new Client
The following steps are usually taken in setting up a new client if it has a Nominal ledger:
-
The client is created and the first accounting period is defined as running from a very early date (e.g. 01/01/1930 up until the last year end). This is defined the first time you select the client in the client list after creating the client.

The This Year and Last Year dates form the posting window for Investment ledger transactions in the first period in Trust Accounts to allow the full Investment History to be entered if required. the Trial balance will be entered as at ;
- The Balance Sheet is coded up and posted as a journal to the Balance Sheet accounts with the following changes:
- The balance on the Capital Account is posted to the Capital Account B/Fwd. Similarly the balance on the Income Account is posted to Income Account B/Fwd. If either of these accounts are split by beneficiary then the posting needs to be split by beneficiary.
- The balance on the Investment ledger (i.e. Investments at cost as per the investment schedule), is posted to the Suspense Account.
-
The individual holdings are then ‘bought from the Suspense Account’. In other words a series of investment purchases are made with the Logged-In Account set as the Suspense Account. The idea is to recreate the capital history of the holding so that the CGT is correct on subsequent disposals. At the end of this process the Suspense Account should have a zero balance and all the cost should have been transferred to the Investment Cost account. There are a number of variations on this process depending on circumstances.
- It is not necessary to write up every purchase and sale, only the ‘unmatched acquisitions’ (i.e. acquisitions unmatched by a subsequent disposal). Also for transactions prior to 17/3/98 it is only necessary to write up the value of the 1982 pool and the s104 pool using one transaction for each pool. So if the pool values and subsequent unmatched disposals are available (e.g. from another CGT system), then just these transactions can be written up, greatly reducing the number of necessary entries. This is usually done using movement codes:
- P82 - 1982 pool
- P98 - s104 pool
- ACQ - Acquisition
- However, the source data may not come from a CGT system. In this case it may be necessary to enter the full history or possibly estimate the balances at 17/3/98 and enter the full history since. If purchases and sales are entered, this results in a profit on disposal being posted. At the end of the process the Investment account shows the correct cost, but the Suspense Account does not zero and an opposite balance is shown on the profit on disposal account. An extra journal is needed between these accounts.
- Sometimes producing the accounts is the top priority and there is not enough time to write up the full capital history, so you enter just an opening balance for each holding which is correct for accounting purposes. Then later on when there is a quieter period you go back and delete the opening balance and replace it with the full history. Trust Accounts allows this even though all the entries are before the start of the current year. These entries are referred to as Prior Year Entries. After a Year End, adding or deleting Investment ledger entries has no further effect on the Nominal ledger. So as long as the new entries give the correct CGT position then the data is correct.
-
Finally, a Year End is performed which produces the correct opening Trial Balance.
When are Nominal Accounts needed
Nominal accounts are needed for three purposes:
-
Producing accounts – The Accounts Formatter can only pick up balances from accounts on the Trial Balance, it cannot display individual entries. Usually the Accounts Formatter is used to produce all the accounts apart from the Investment Schedule and possibly a Dividend Schedule. So if the accounts show a list of bank accounts or a list of payments to beneficiaries then each item in the list needs to be a separate nominal account.
If a long list of transactions is required (e.g. if a long list of payments to beneficiaries is required), then it may save time to post all the payments to a single account and attach a nominal ledger print to the accounts. This could be quicker than setting up a new account for every payment.
However most users would set up one account for each beneficiary and show just the total paid to each beneficiary without the date of payment.
- Control purposes - Some nominal accounts are used for control purposes even though they do not appear in the final accounts. The most obvious example is the Suspense Account. By the time the accounts are produced this account should have a zero balance. Another example is the Income Bank Account. Some users check the Income Bank Account to determine whether there is enough cash available to make a distribution to the income beneficiaries. However the accounts themselves often show only the total bank account balance (i.e. for both income and capital).
- Tax purposes - Sometimes figures are needed for the purposes of tax return preparation which can be most easily obtained when the accounts are prepared by using separate nominal accounts. For instance, if UK tax returns are being produced without using the link to PerTAX then some users post Dividends from UK Unit Trusts to a separate account.
Normally the Income and Expenditure Account shows only ‘Income from investments per schedule’. The figure for Dividends from UK Unit Trusts is only used for tax return production. However most of these accounts are no longer necessary as the system can determine the nature of investment income by looking at the security.
So a general rule is that nominal accounts are mainly used for producing the accounts with extra accounts occasionally used for control or tax purposes.
Keeping the chart of accounts simple is likely to reduce posting errors.