Transaction Import

Importing a Trial Balance or journals from a .csv (comma delimited) file
Please note: A Trial Balance can only be imported for the first period being set up for a client in CCH Trust Accounts. For subsequent periods the year end process will carry forward balances so only transactional information can be imported, i.e. the movement from one Trial Balance to another. If you do need to do this there is an option within the Transaction Import spreadsheet to compute this, or make sure that when the movement is calculated that the transfers to the Capital and Current Accounts are taken into account.
Prior to import within CCH Trust Accounts:
- Set up the client matching the client code within the CSV file e.g. client code: TAIMP
- The year end in nominal client details must match the date in the CSV file, e.g. 30/06/2019
- Within the Nominal Ledger>Nominal Accounts ensure you have the matching nominal codes within the CSV file. Important to check before import.
Use of Transaction Import spreadsheet to create the CSV file to be imported.
A macro enabled spreadsheet has been created to simplify the process of creating the correct structure for the CSV file to be imported into CCH Trust Accounts. This spreadsheet can be obtained from your account manager and should ideally be accompanied by a short training session on its use.
The spreadsheet consists of multiple tabs controlled by dropdown selection boxes on the main Instructions tab. The spreadsheet can automatically create import TRIM files for transaction imports as well as standing data imports using the Special Program option.
Instructions for setting up the Special Program can be found here.
The spreadsheet also caters for multi-currency transactions on the Bank, Transaction or Journal and Securities tabs.
To import transactions using the spreadsheet, the general process is as follows:
- Select the type of transaction to be imported.

- Set the rounding to 2 (2 decimal places) or 0 for round pounds.
- Fill in the details of the transactions to be imported on the displayed tab in the appropriate columns.

- Return to Instructions Tab and click Save CSV File.
- Choose the folder to save into, don't type anything, click OK.
- The file will be saved with the filename TRIM then the first two characters of the Tab selected e.g. TB, and then a number which will increment if the same filename is found in the chosen folder, and with the extension type csv. i.e. TRIMTB1.csv.
The above screenshot is an example of a journal transaction import, the other transaction import screens (securities, bank transactions and property transactions) are laid out differently so as to suit the transaction types being imported.
Note: Please read the instructions on the Instructions screen before using the spreadsheet.
When deleting data do not delete rows from the input sheets, instead highlight the data and click delete on the keyboard to clear the contents, or use copy and paste to reposition information (not cut & paste).
If not using the Transaction Import spreadsheet the file can be created in Excel and saved as file type CSV as follows:
Preparing the file to import:
- File naming convention
All file names must start with TRIM (lower or uppercase) followed by ?????, where ????? is any number of alpha/numeric characters, e.g. trimtest123.csv
- File structure (Excel .csv)
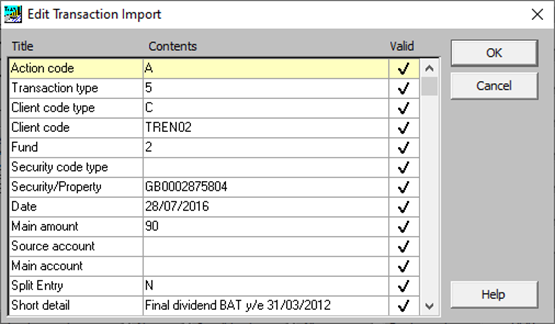
The line below illustrates a typical journal entry starting with column 1 (A).
A,4,C,TREN02,06/07/2019,658.45,7051,0001,N,”investment income”
Detailed notes on the fields used by Transaction Import can be found in the trimport.doc file in the WTRUMP folder .
Importing the .CSV file:
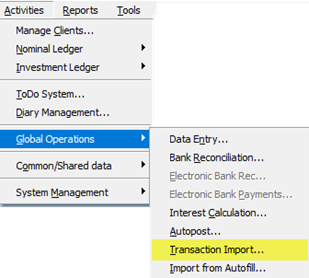
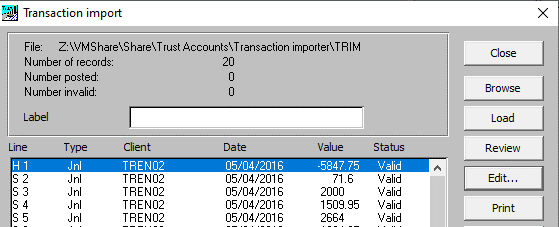
1. Within CCH Trust Accounts go to: Activities>Global Operations>Transaction Import…
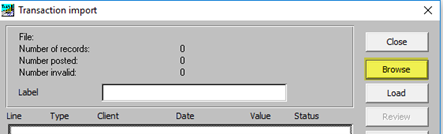
2. Click on the ‘Browse’ button, select the prepared “trim” file e.g. trimtest.csv, click Open.

3. Click on the ‘Review’ button and the status column will change from ‘Untested’ to ‘Valid’ indicating the data is ready to import.
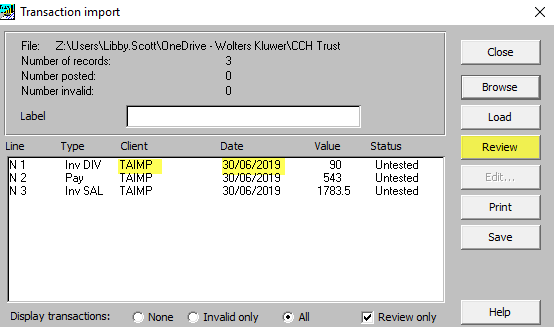
4. If the status changes to ‘Invalid’ check your data using the Edit button row by row to view the errors and make corrections, those with an error will not have a tick in the valid column.
5. When all entry status display ‘Valid’ deselect the ‘Review only’ tick box, the Review button will change to Post, select Post. The status column will change to “Posted”.

Using Headers and Splits
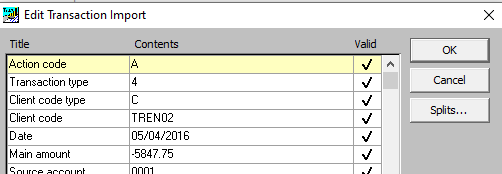
1. Where transactions to be imported consist of a Header row and multiple splits rows and the status is Invalid then the use of the ‘Splits’ button will indicate any codes which are missing on the client’s nominal accounts. Click in the header row and select Edit.
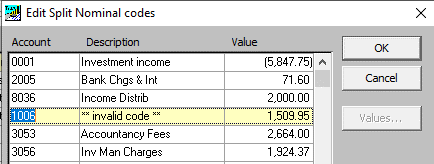
2. Then click on the splits button:
3. You can then check for any accounts marked ** invalid code **. If they exist in the master chart of accounts then they will be automatically added to the client’s chart on importing, so no further action is needed if all the rows are showing as Valid.
If they are not in the master chart then pressing F2 in the Account column will take you to the client’s chart where you can click on Other - Copy from Master and New to add the new codes at a master level. Then select the new master code to add it to the Client chart of accounts. This should then validate the row in the splits view when you cancel from the Edit Split Nominal Codes screen.
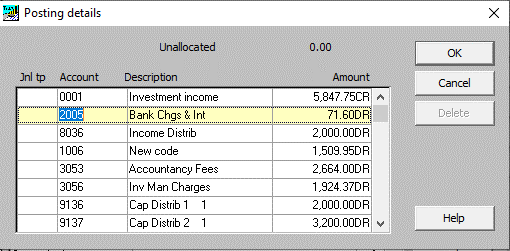
4. If the codes all exist, then the posting details screen will appear when clicking on the Splits button as above rather than the Edit split nominal codes. In this view all the nominal codes and values can be edited prior to import in the same way as in the posting details screen for a manual entry. The unallocated amount should be zero.
5. When you are ready and all rows are Valid, untick Review only in the main Transaction Import screen and the review button changes to Post.
6. Click Post to load the transactions into the client.
Importing divisions
From version 2022.1 of CCH Trust Accounts the division for a transaction can now be specified as field 35 and is optional. This matches Column D of the spreadsheet example shown above.