Authorising and posting from your Home Page

Authorise and Posting from your Home Page
-
Go to your Home Page.
-
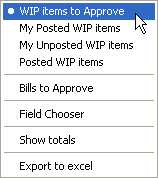
Right-click the WIP Approval list.
An example of the WIP Approval listing on a Home Page.

The sort options appear.
-
Select WIP Items to approve in the window.
-
Click the Status heading to group the Submitted items.
-
Select the check box beside each Submitted item that you want to authorise and post.
-
Click the Authorise
 button .
The selected items are marked Authorised. -
Click the Post
 button.
The items are removed
The items will appear in the Aged WIP.
Users will see a Field Chooser option within the right-click menu (as above), from which additional fields can be added. For example, Employee Company, Office, Department and Centre.
Related
If your Home Page is customised to show the Approve option, you can authorise and post more than one Timesheet, Disbursement Sheet and Expense Sheet at a time.