Add Assignment - Assignments, Schedules and Jobs mode

Add an assignment and job from a template
-
From the Assignments tab of a client record, click the top row of the table labeled "Click here to add new..."
-
Ensure that the Add from template option is selected. When this option is selected, a list of existing templates is displayed in a table below. You can use these templates to add assignments and jobs. All the templates are displayed by default.
-
Select a Job from the list.
-
The window will display all templates by default but if configured you can select an Assignment Template Group for the assignments to filter the list of displayed templates.
-
From the list of existing templates, select the template(s) you would like to add to the client. For every selected template a new tab is created next to the Client Details tab. For example, if you select a template called Audit, a tab called Audit is created.
-
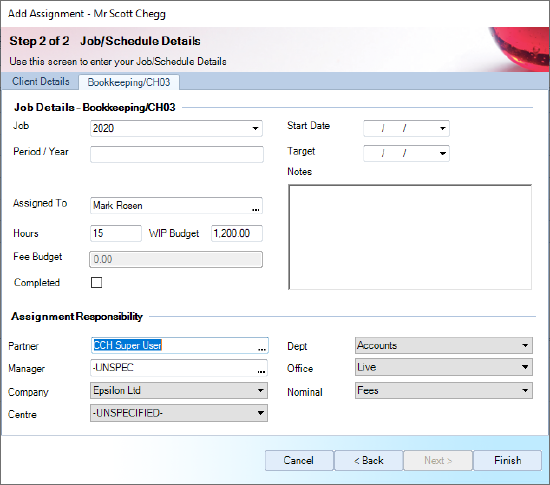
Click the newly created tabs to enter the Job details. The window title updates from Step 1 of 1 to Step 2 of 2. If a schedule template has been created for the assignment template, the schedule template details will be displayed.
Note: At this point you can accept the default information displayed and click Finish to create the assignment. It is not mandatory to complete further details. The selected Assignments and Jobs are added to the client.
Add Job Details
-
Specify the following details for the job:
- Job: Defaults to the current year that can be typed over as this is a text field.
- Assigned to: Optional field. Use the Ellipsis button to select an employee.
- Hours: Optional field. If entered this will populate the WIP Budget based on the selected Assigned To employee's Standard Charge Rate (hours x charge rate = WIP Budget).
- Target: Optional field. Enter a target completion date for the job.
You can enter Notes if required.
- The responsibility details will be taken from the assignment template. If the template does not contain the information, the details will be taken from the client. You can enter or edit the details.
- Specify the Partner, Manager, Company and Centre.
- Select the Department, Office and Nominal.
- Click Finish to be taken to the Client > Assignment window where all the newly added assignments and jobs will be displayed.
Note: You can click the Finish button at any point. It is not mandatory to view every tab.
Standard Job Name based on the Assignment algorithm
When a job is created on an assignment that has an algorithm set, the name of the job is now displayed by default in the format of the selected algorithm.
For example, if the assignment is using the 'YYYY/Qtr N' algorithm, when a job is created, it will have by default the name: 2020/Qtr 1.
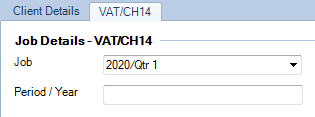
The name of the job can be amended if the name respects the format of the assignment algorithm. If the job name does not match the assignment algorithm, the changes cannot be saved and the following message is displayed:
