Letter paragraphs Window

Accessing the Letter Paragraphs Window
To access the Letter paragraphs window select the menu:
File > Maintenance > Tax settings > Personal tax > Tax return bundle > Letter paragraphs

You can resize the grid or word processing control by moving your cursor between them until it changes from a pointer, clicking and holding to get a bold line to appear and then dragging that live vertically up or down.
The letter paragraphs are entered separately for each Return type. Currently there are two:
- SA100.
- R40
Capital losses carried forward has been added to the data dictionary
Transmittal Letter – Adding multiple appendices
Page breaks can be created within the transmittal letter. A page break is added at System Management level to the letter paragraphs. Select File > Maintenance > Tax Settings > Personal Tax > Tax Return Bundle > Letter Paragraphs. Click New and add the text:

Click OK. From the Home tab click Page Break:
 The page break symbol appears and the remaining text is added:

When viewing the transmittal letter all text appearing after the {Page_Break} appears on a separate piece of paper.

Font Settings
The default font setting is Arial 12 pt.
To Amend the Default Font Settings
- To change the default font settings go to the Configuration window (via Maintenance > User Defined > Configuration);
- To change the font enter a Configuration key of CPGLetterDefaultFont and a Key value for the relevant font e.g. Trebuchet MS;
- To change the font size enter a Configuration key of CPGLetterDefaultFontSize and a Key value for the relevant font size e.g. 10.
If the font entered is invalid then the Tax Return Bundle will default to Arial.
If the font size entered is invalid then the Tax Return Bundle will default to a font size of 12 pt.
To Add a New Paragraph
Click on the New icon in the Paragraphs section of the Task Bar.

The New Paragraph window is displayed:

The functionality of the fields on the New Paragraphs window is as follows:
| Name | Format | Default Value | Editable | Mandatory |
| Area | String | NULL | Yes | No |
| Include | Boolean | FALSE | Yes | No |
| Can Delete | Boolean | FALSE | Yes, if Include ticked i.e. set to TRUE | No |
| Can Edit | Boolean | TRUE i.e. ticked | Yes | No |
| Section | Alphabetic e.g. AAA | NULL | Yes | Yes |
| Sub section | Numeric e.g. nnn | NULL | Yes | Yes |
| Start date | Date e.g. 6 April 20nn | NULL | Yes | No |
| End date | Date e.g. 5 April 20nn | NULL | Yes | No |
| Word processing area | String | NULL | Yes | Yes |
Populate the fields and enter the text of the paragraph in the word processing area.
Click on the OK button to save the changes.
Click on the Cancel button to discard the changes.
Where to Add Data Item
The Data item can be added in the word processing section of the New paragraph window or the word processing section of the Letter paragraphs window by entering the character { in the word processing section or by clicking on the Add data button in the word processing control:

If you want the { character to appear in the text then escape the character using the backslash character (\) e.g. \{.
Adding Data Item
- Click on the Add data button or type the { character in the word processing control.
- The Find Data window is displayed.
- Select the Data item you want to select and click on the OK button or double click on the Data item to select.
- The selected Data item is returned with brackets e.g. {Data item} within the word processing control.
NB: The Tax Return data items displayed will depend on the Return type. If the Return type is SA100 then the SA100 Tax Return data items will be available but not those for the R40 Tax Return.
Categories of Data Items
The Data Items are broken down into the following categories:
- Central Data Items.
- Personal Tax Data Items.
- R40 Tax Return.
- SA100 Tax Return.
- SA302 Tax Computation.
The Central Data Items include the Date of Issue from the Tax Return Bundle window.
The Personal Tax Data Items include the following items that are evaluated for 2013 as:
| Tax Year | 2013 |
| Tax Year + 1 | 2014 |
| Tax Year + 2 | 2015 |
| Tax Year - 1 | 2012 |
| Tax Return year | 2012/13 |
| Tax Return year + 1 | 2013/14 |
| Tax Return year + 2 | 2014/15 |
The SA302 Tax Computation items include the sub-set of the tax computation included in Tax Explorer in Personal Tax.
Boxes on the Tax Return Where There Can Be Multiple Instances
It is possible to have more than one instance of a supplementary page on the taxpayer's Tax Return e.g. SA102 Employment pages. This means that that it is possible for a single paragraph on the maintenance window that refers to a box on that supplementary page to generate two or more instances of that paragraph in the client's letter (depending on the number of employments).
Where the data item (box on the Tax Return) is capable of resulting in more than one instance in the client letter then it is restricted to being used with data driven paragraphs. There is validation that warns the user when this is not the case:

Note: it is best practice to make reference to the particular instance in situations where there can be multiple instances of a data item e.g. if this refers to a box on the SA102 then include the employer's name in the paragraph so as to identify which paragraph relates to which employment.
Using the Find Data Window
Selecting Data
You can simply scroll down the grid to find the Data item you want and then double-click on that row or click on the OK button to select the Data item. Use the following method for large datasets:
- Enter the search criteria in the Search for field.
-
Click Search to display all the Data items matching your search criteria.
-
Select the Data item you want to link to and then click OK or double-click on the Data item you want to select.
Filter Options
You can use the Filters to refine what Data items appear in the grid. The default value for each of the Filters is (All). When used with SA100 Tax Return then Filter 1 is populated with the following values:
- Central Data Items
- Personal Tax Data Items
- SA100 Tax Return
- SA302 Tax Computation
When used with the R40 Tax Return then Filter 1 is populated with the following values:
- Central Data Items
- Personal Tax Data Items
- R40 Tax Return
- SA302 Tax Computation
Filter 2 will only be populated when a value is selected for Filter 1. Similarly Filter 3 will only be populated when a value is selected for Filter 2. Not all data items will have values for Filter 2 and Filter 3. When the value of a Filter is changed then the value(s) of the child filters are reset to (All).
Use the Search within results field to further narrow down the set of Data items returned. This field searches within the values of the Data items.
If the Search any part of name check box is not ticked then the Tax Return Bundle searches for values within the Data items. Else it searches based on Data items that start with that criteria.
If the Hide from when one item found check box is ticked then if the search returns one result then that result will be selected without you having to press the OK button.
Central Data Items
The following Central Data Items are available:
- Main window
- Client code.
- Date of birth.
- Date of death.
- First name.
- Last name.
- Mailing Name.
- NI number.
- Suffix.
- Title.
- UTR.
- Extra window
- The list of Name from this window
- Responsibility window
- Department
- Office
- Company
Personal Tax Data Items
The following Personal Tax Data Items are available:
- Capital gains window
- Disposal date.
- Type.
- Losses brought forward - Unused losses of 1995-96 and earlier years (Calculated)
- Losses brought forward - Tick to provide override figures.
- Losses brought forward - Unused losses of 1995-96 and earlier years (User entered)
- Enterprise Investment Scheme window
- Amount
- Company
- Tax Return Other Information window
- Date tax return issued
Adding a Business Rule to an Existing Paragraph
Click on the Business rule (B.R.) button to open the Business Rule window:

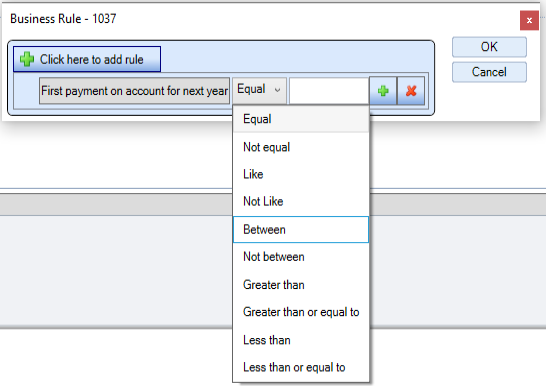
Note: The ID number of the business rule is displayed as part of the title.
Click on the Click here to add rule button to add a rule:

Click on the Select data item  button to open the Find Data window:

Either double-click on the Data item or select the Data item you want and click on the OK button to return to the Business rules window.
Select the relevant operator and then enter the value to use in the rule:
Click on the OK button to apply that rule to the paragraph. An icon indicates that this paragraph now has a business rule associated with it:
Note: you cannot add a business rule to a paragraph where the Include check box is ticked or there is a green tick on the Mutually Exclusive Paragraphs (M.E.P.) button.
True/ False Data Items
When a Data Item is selected which returns a Boolean (True/ False) value, e.g. check boxes, only the following results may be input:
True
False

Adding a Date Field to a Business Rule
Where the Data Item selected is a date then you have the choice of using a Relative date or a Calendar date. The control defaults to a Relative date:

To choose a Relative date click on the drop down field:

To instead choose a Calendar date un-tick the Relative date? check box:

Enter the date using the calendar control.
Making Letter Paragraphs Mutually Exclusive
Click on the Mutually Exclusive Paragraphs (M.E.P.) button for a paragraph where the Include check box is not ticked and there is no Business Rule associated with it:

This opens the Mutually Exclusive Paragraphs window:

1037,1038
Enter the ID numbers, from the Letter paragraphs maintenance window, of the mutually exclusive paragraphs, using a comma to separate multiple ID numbers:
and then click on OK. The M.E.P button is updated for this paragraph and the mutually exclusive paragraph(s) to show that they have been flagged as mutually exclusive:

If you hover your mouse over one of the green ticks on any M.E.P. button then a tooltip is displayed:

This indicates that the selected paragraph (ID 1038) and paragraph IDs 1039 and 1040 are mutually exclusive.