Using messages and documents in the advisor workspace

Messages & Documents will be available to your clients once you have activated their workspace.
Messages & Documents facility for advisor in CCH OneClick
- Messages & Documents is the functionality within CCH OneClick that allows you to exchange messages,files and information online. It is accessed through your practice workspace within CCH OneClick
- You are able to securely exchange messages and documents with your clients and perform some of the tasks through your OneClick workspace that you currently can through your Message Centre in CCH Central

Please note: Messages & Documents for your practice is currently a beta version.
Portal task permissions are not applied on Messages and Documents yet.
Please ensure that the team security is applied for your clients instead.
Messages & Documents dashboard
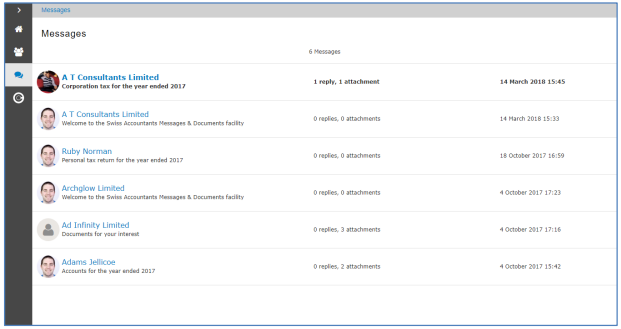
The Messages & Documents dashboard enables you to see at a glance if there are new messages needing your attention and how many messages you have in total

- Clicking on the Messages tile will list all messages that you have received/sent across all your clients with unread messages shown in bold
Client list with client record of Messages & Documents
- Select the Client menu to see a list of clients that have a OneClick account that you have rights to see (team security from CCH Central is applied)

- Messages will be grouped into conversations and will be seen in chronological order from the most recent to the oldest. Where messages are unread, the row will be in a larger font and bold
- When the message is opened, the message is treated as read and font style turns regular. The message status reverts to unread when further replies are added to that conversation

- There is a summary column to show how many replies and attachments a conversation has
- Clicking on a message will take you to the content (conversation) of that message in its own screen. The conversation chain shows the newest message first and the oldest last
- Any documents needing approval will have one of four statuses:-
- Approved: Document have been approved
- Rejected: Document has been rejected
- Pending: Document is awaiting approval
- Part Approved: Document has been approved by some, but not all approvers
- Clicking on the document status brings up any details regarding when and by whom a document was approved
- On the mobile view you will see a paper clip, so that you can see at a glance if there are files attached to a message
Please note: you cannot see your draft messages, the messages sent for review or if a message was forwarded
Create messages through the client record
- To send a new message click on the '+' button from a client's Messages screen.

- Enter subject and message and select OneClick users from the associated contacts list for that client to send to
- The Send button is inactive until text is entered in the Subject and Message fields and a recipient is selected in the To field
- Only those contacts you have chosen to send the messages to will then receive the message and the email notification (the CreateMessage email notification template)

- If you access the create message screen on a smartphone, the drop down is replaced with a field and an icon

- When you click here, you will be presented with a new select screen to add a recipient. You can select more than one To recipient before confirming your selection

Please note: you cannot attach a file to a message or save a message as draft or send it for review
Adding multiple employees to a message
- Practice employees can copy in other CCH OneClick activated employees who are in the client team into messages in the CCH OneClick advisor workspace. Multiple employees can be added and will appear in the 'CC' field

- All employees will receive a notification if they were included in a message through email (if enabled) and the activity feed within CCH OneClick
- All recipients of the message have visibility of who else received the message

Responding to client messages
You can respond to client messages that come in through the global messages view and through the individual client view.
- To reply to a message, click on a message and choose Reply
- By default, you will respond to all the contacts on the latest message, but you can remove/add contacts from the initial list of contacts that were involved from the beginning of the conversation. The contacts will also receive an email notification

Global messages
- On the Global Messages view you can see all messages that you have received/sent across all your clients with unread messages shown in bold
- As with the client messages view, the global messages view allows you to open each message, read the content within it, open any attached documents, see the documents status and respond to it.
- To see at a glance to which client a message is linked to, the client name is displayed instead of the sender. You can see which contact has sent the message by looking at the avatar
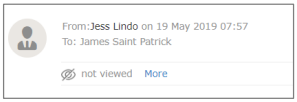
Read Receipts
- Read receipt functionality has been added to Messages & Documents that allows you to send a message and easily view which recipients have read that message
- This information is automatically visible without the need to request a read receipt when sending a message

- When you open the message, you will also be able to see the read receipt information. Click on More to show the details

Navigation between options
- Once you are in the Messages & Documents area on a desktop computer you will be able to easily switch between the available options using the corresponding icons on the left hand menu

- On mobile devices, you can use the hamburger menu to toggle between options

Please note: you can also click on the practice logo in the top left hand corner to go back to the home screen