Using messages and documents in CCH Central

The Message Centre subtab
Each OneClick activated client has a ‘Message Centre’ subtab. You can see all messages exchanged, and documents shared with the client.
This subtab is split into two parts:
- the left-hand pane displays all the message threads exchanged
and
- the right pane displays a preview of the currently selected message.

Here is the list of actions you can perform from the Message Centre tab:
|
Click on a message in the Message Thread (left-hand pane) |
Open the message on the Preview Pane (right pane) |
|
Right click on a message in the left-hand pane – Select Reply |
Create a message response to the thread. As standard the response will include the recipients of the original message, but you can amend the recipients if necessary. |
|
Right click on a message in the left-hand pane – Select Reply |
Reply to the message. |
|
Right click on a message in the left-hand pane – Select Delete |
Remove the message from the Client Message and documents. Internally the message is hidden. It can be seen by ticking the ‘Show Deleted Messages’ box located at the bottom left corner of the Message Centre tab. |
|
Right click on a message in the left-hand pane – Select Edit |
Edit is only available for draft messages and reopens the message to allow further editing before sending the message. |
|
Right click on a message in the left-hand pane – Select Forward |
Allows a message to be reviewed or approved by a colleague. The colleague must be activated as a OneClick employee to appear in the Find Employees list. The colleague will receive an email notification, a new task with this message to review or approve will appear in the colleagues messages and documents and Central tasks list. |
The preview pane also has a reply option top right.

Any attachments are visible in the preview pane.

An orange flag indicates that the message has been forwarded.

Click on the orange flag to open the associated task.
Messages in the Message Centre subtab
Create a new message
Open the client record
Click on the Message centre subtab
Click the Create Message icon on the ribbon bar

The new message screen is displayed:

Click on the drop down for the To: field and select one or more client contacts. You can also 'Select all'.

To copy in one or more colleagues, select the drop down in the CC: Field. Only colleagues who are part of the client team for this client are displayed.
 Type the subject of the message to your client.
Add attachments
Add one or more attachments by using the paper clip icon 
The documents may be located on your local machine or a network drive. Click the Browse button to open your file explorer.

Locate and select the required attachments, and click the ‘Open’ button.

If you use CCH Document Management, you can also add files from the client's document centre tab. Click the Document Centre button.

On this screen click the ‘Search’ button or click the ‘Advanced Search’ hyperlink to find the attachments you wish to send to your client.
When you click on search, you see a similar screen as below:

You can reduce the number of files in the list by applying an ‘Advanced Search’. For this click on the 'Advanced Search' hyperlink.

Tick each box of the documents you want to add to this messages and click the ‘Attach’ button.

Once the files are attached, a new screen is displayed:

If you are simply sending the documents to your client for their information, click 'OK" to close this screen, and continue to Complete the message creation below.
Sending documents for approval
Please note: Approval using eSign is an additional optional feature of CCH OneClick. To discover more about using eSign read the dedicated product pages found here.
There are two options for document approval: electronic approval and eSign. With both options you select the approver(s) from the contacts already included in the 'To:' and 'CC:' fields of the message.
The columns of the attach files grid are explained below:
|
File name |
The name of the attached file . |
|
Folder |
Click on the drop-down list to select the folder where your client can locate the attached file. |
|
Require Approval |
Tick this box to request electronic approval from your client for the attached file. |
|
Require eSign |
Tick this box to request an electronic signature from your client (only available if your firm has the optional eSign feature) for the attached file. |
|
Approval / eSign details |
Select at least one contact (from those already included in the 'To:' and 'CC:' fields of the message) as the approver of the attached file. |
If there is only one contact selected in the To: field of the message, their name is automatically populated in the Approval column.

If there is more than one contact in the To: field, click the 'Approval details' drop down arrow, and choose one or more approvers with a tick next to their name.

For electronic approval set the action to Required or Optional. Changing this value for one contact will change it for all contacts, and has the following effect:
- Required: All the selected approvers will need to electronically approve this document in turn, before the status is 'Approved',
- Optional: Only one of the selected approvers will need to electronically approve this document, and the status is 'Approved'.
Tip: For each approver, you can see their relationship to the client (Director, Partner etc). You can also see if the contact has not activated their CCH OneClick account.
See below where one contact has not yet activated their OneClick account.

Click OK once all the options for approval are complete.
Complete the message creation
The screen will then return back to the message creation. There is now with an orange banner as shown below:

Type your message to the client in the free text box.
You can also use any message templates that your system administrator has created in Central, by clicking on 'Insert template’ at the bottom left corner of the message: 
Send a message
Once the message is complete, click on the Send button  if you want to send the message immediately.
Once the message has been sent, you will get a confirmation:

The Message Centre subtab will display the Date and Subject of the message on the left pane. A preview of the message is displayed on the right.

Save a message as a draft
You can also save the OneClick message as a draft.
Click on the hyperlink below the Send button 
There will be a warning message:

Click Yes if you want to save it as a draft.
The draft will be displayed on the message thread with **Draft** at the beginning of the message subject and also on an orange banner on the right pane:

To reopen a draft, just double click on the draft message subject from the message thread. Once reopened, you can make further edits and then send it.
Ask a colleague to review your message
From the originator side
You can also ask a colleague to review your message before you send it to.
Once your message is ready to send, click on this icon  instead of the Send icon.

The review task window will appear. Select another employee, an action (Review), and add a comment for the attention of the reviewer.

Example of review task:

Once you click on OK, an orange banner highlights that the message will be sent for review.

Click on 'Send for review'.
Once sent for review, the Subject for this message is prefixed with ** In review ** .

From the reviewer side
The reviewer will receive the message to review on his main home page in the 'Messages & Documents' area.
There will be ** In review ** in the subject of the message (left pane) and an orange banner with : 'This message has been sent for review to ......... on date time'.
The reviewer should check the message and any attachments.
The reviewer will click on the red flag at the top right of the message:

A task screen is displayed.
The reviewer now has 2 options: send the message to the client (in their name) or send the message back to the originator (or another colleague) to be sent in the originators name.

Attention! If the reviewer clicks 'Mark As Completed' on the task, the message is immediately sent to the client. To make changes to the message, the reviewer should click 'Reassign Task' and pass the task and message to another colleague.
Option 1: The reviewer sends the message to the client in their name.
The reviewer can check the message and decide to send it in their name. They click on 'Mark As Complete' and the task is completed, and the message sent.

Option 2: the reviewer checks the message, reviews it and sends it back to the originator (or on to another colleague) to be sent in their name.

Click on Review Message button to open the message 'in review' and view it and any attached documents.

And click on the cross (top right corner) to close it.
The following message is displayed. Click Yes to save the new message as a draft.

And click the 'Reassign Task' button on the ribbon bar 
Change the action to 'Approved' in the following screen:

Select the originator (or another colleague) as User and add a comment in the Comment area. Click OK.
Now the task and associated message is back with the originator (or another colleague).
The reassigned colleague can open the 'in review' message by clicking the red flag at the top right of the message, and make any changed needed following the review.
When they click on 'Mark As Complete', the message will be sent to the client.
Documents in the Message Centre subtab
To view a summary of all documents shared with your client, select the Message Centre subtab and click the Documents icon on the ribbon bar:

The Documents screen will be displayed:

There are 4 areas in the Documents screen:
- Area 1 is summary of documents by status
- Area 2 is list of folders and subfolders available in your system
- Area 3 is the documents screen ribbon bar
- Area 4 is the list of documents within a selected folder or selected status summary.
Area 1
This area is the documents status summary with the number of documents pending approval, pending E-Sign, approved, E-Signed and rejected.
Each status is a hyperlink. Click any of them, the hyperlink becomes bold and a list of documents with this status is displayed in Area 4 as below:

Area 2
This area displays the list of folders and subfolders where you file every document for your client.
The first folder in the list is always named 'Shared'.
Note: if there are documents stored in any of the subfolders, the folder will display in bold to indicate this. Your client only sees folders shown in bold when they log into the client workspace.
When you click on any bold folder, the list of documents saved in it are displayed in Area 4 (with the name of the \folder\subfolder at the top).
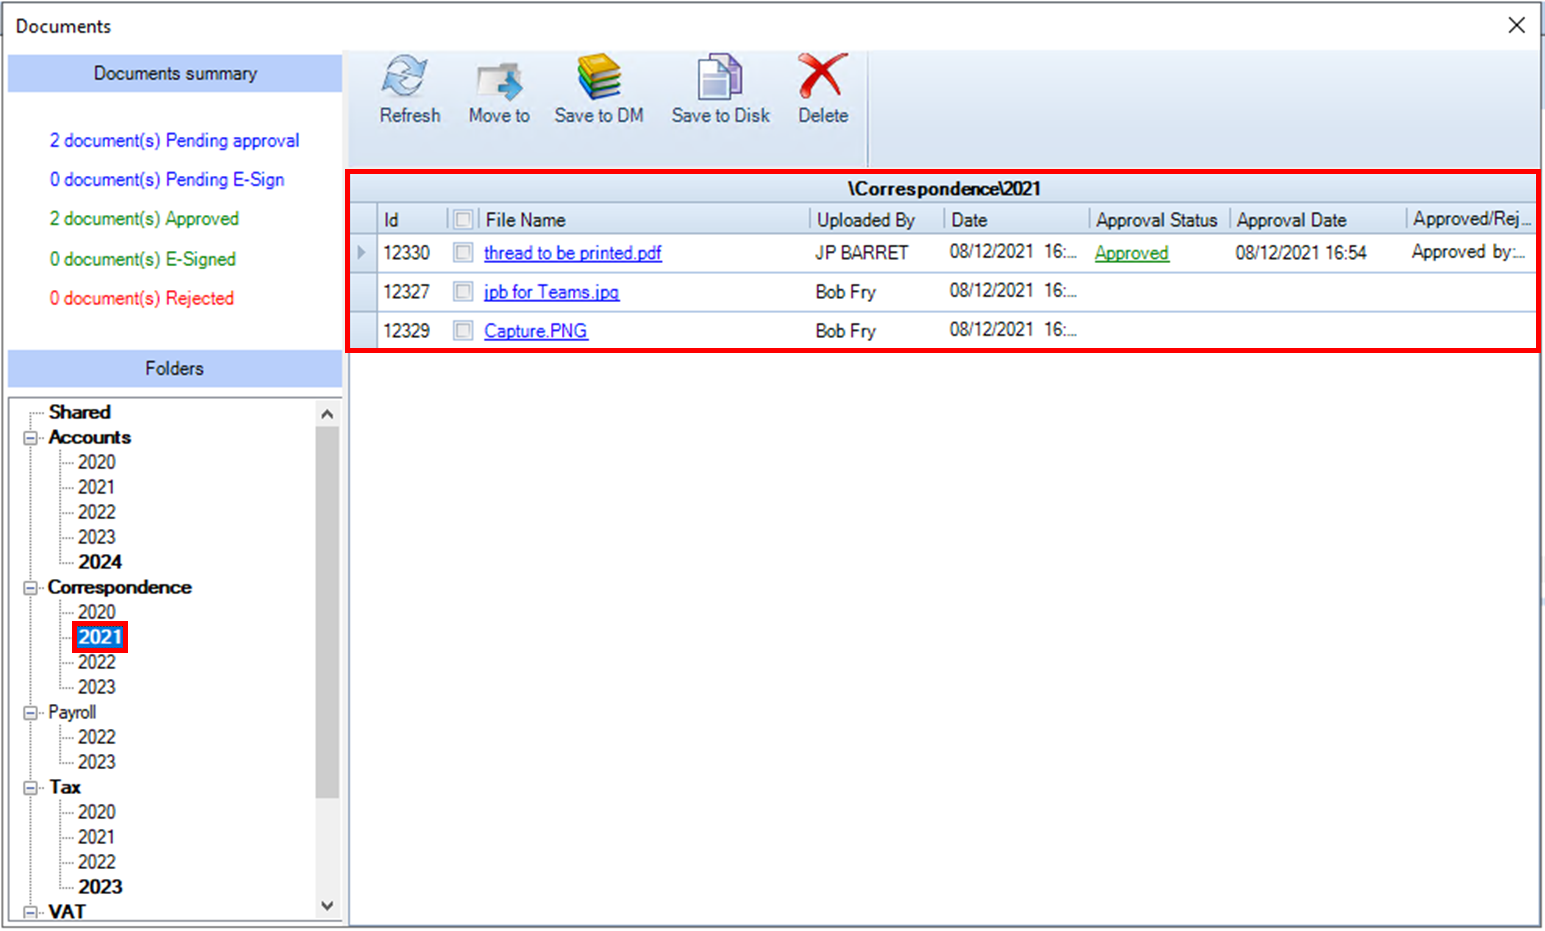
The ‘Shared’ folder
Documents stored in the shared folder must be moved out of shared and either stored in another folder, or saved elsewhere then deleted. This is where any documents that your client sends you are initially stored.
Any documents in the 'Shared' folder should be moved to another folder to ensure they are saved locally, and not just in the cloud.
Area 3
This area is the documents ribbon bar.

These are tools to manage your client documents.
 button will refresh your screen once you have completed an action, in case the screen has not done the refresh automatically.
 button will move one or more selected files from one folder to another.
Select the files you want to move by ticking the boxes to the left of the file names.

Click the Move to button on the ribbon bar.
Select the subfolder you want to move to. In this example, it will be Tax\2023. Click on 2023 under Tax to select it.

Click the Move button.
You can also use drag and drop to move one document from a folder to another one.
 button will allow you to save the document to CCH Document Management if this product is available.
Select the files you want to save to Document Management.
Click on Save to DM button.
The document profile screen is displayed. Complete the fields and click on OK.

 button allows you to save documents outside of CCH software.
When you click on this button in the ribbon, your file explorer is displayed:
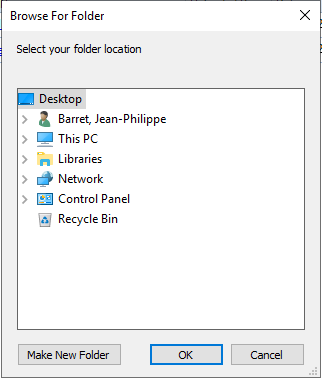
and you can choose the folder where the file will be saved.
 button deletes the selected documents. This can be used after saving the document to disk.
Central will ask to confirm the deletion of the selected file(s).

Click yes if you are sure the document is no longer needed within CCH Central. Click No if you want to cancel this action.