Sample Size - The Calculators

CCH Audit Automation includes three calculators, as follows:
Calculator - add lister
This is a straightforward add listing calculator that can be used to check casts, etc. One of the main benefits over a normal calculator is that you can amend entries on the listing and it will recast the total. It can also be used as a standard calculator with percentage and memory functions.
Sample interval selector
This operates in much the same way as the add listing calculator, but you are able to specify the item number by each line, and a sample interval. The calculator will highlight any item which takes the accumulator over the sample interval thereby indicating that the item should be selected for testing. All the calculator functions are active in this mode.
Sample stratification
This is a fixed model sample stratification calculator that allows the calculation of sample sizes based on a stratified population.
The add lister
To use any of the calculators, click on the button at the bottom of the Curent audit file navigation window. The calculators dialog will appear with the add lister being the first tab at the bottom.
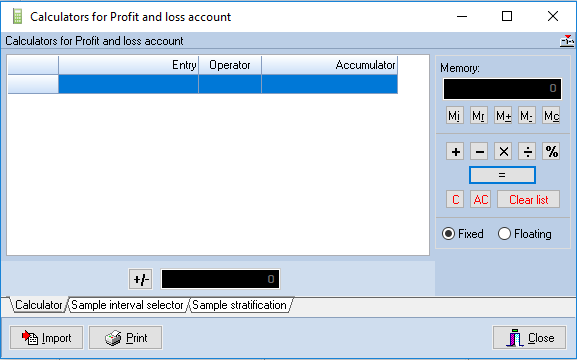
To use the calculator, type in the number on the keyboard, pressing the following keys to terminate your entries:
+ Add the next item
- Deduct the next item
* Multiply by the next item
/ Divide by the next item
<Enter> or = Total entries
The contents of the entry window can be stored in, added to or deducted from the memory, using the buttons provided, and the memory recalled when required.
If you have made an error, the entry can be edited by double clicking on it. The Edit entry dialog will be displayed to allow you to change either the number or the operator.
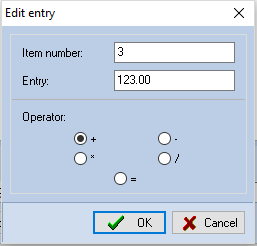
Edit entry dialog
You may scroll up and down the entry list editing entries as you go. On accepting the edit, by clicking on [OK] the system will recalculate the section of the list within which the item appears.
The percentage key can be used to calculate percentages, percentage uplifts and reductions:
Enter
Produces
X * 15 %
15% of X
X + 15 %
X+15% of X
X - 15 %
X-15% of X
X / Y %
X as a percentage of Y
The calculator can operate in fixed mode to 2 decimal places, or in floating point mode, and two radio buttons are provided to select the mode.
Buttons are provided to clear the contents of the entry window [C], the entry window and the accumulator [AC], the memory [Mc] and the add list [Clear list].
A facility is also provided to print the calculator list for this, and the other calculators. Pressing [Print] will cause the system to display the Windows Print dialog to enable you to select the printer to use, followed by a request for a heading for the listing.
Clicking on [Close] will close down the calculator and close the dialog, but the system will first ask you if you wish to print any unprinted entries for each of the three calculators.
The sample interval calculator
To use the sample interval calculator, click on the tab and it will be brought to the front. The layout of the calculator is the same, but the accumulator becomes a running total and two buttons appear for selecting the sample interval and next item number. In this mode the interval will have defaulted to 10,000.
Clicking on [Item], presents an entry dialog to allow you to enter the next item number, which could be an invoice number, cheque number, line number, or any other identification appropriate to the items being selected. The item number may be changed at any time during the run to cater for items out of sequence, or gaps.
Clicking on [Interval] presents an entry box to allow you to enter the sample interval to use.
The operation of the calculator is as set out for the add lister, but as the sample interval is exceeded the item causing the excess will be highlighted and the running total reduced. The printout of the calculator clearly indicates those items that were selected.
Sample stratification calculator
To use this calculator, click on the tab and it will be brought to the front. The stratification model used allows you to enter the following:
* Value of the population
* Value and number of key items examined
* Value and number of items covered by other work/identified risks
* Value and number of error prone items
* Value and number of negative items
* Materiality
* Risk factor

Sample stratification calculator
On entry of the items, it will calculate the number of items to test, for the population excluding specific and negative items, as follows:
Population-specific item values+negative item
Materiality * Tolerable error factor * Risk Factor
or
Population-specific item values+negative item * Risk Factor
Materiality * Tolerable error factor
The calculation used will be defined in the master pack. Our master packs are based on using the first formula and hence the higher the factor the lower the risk associated with the area and the smaller the sample size. Our packs use factors of 0.5 to 3.0.
On entering the data, the system will calculate the sample size and show this in the Results group.
Basis of risk factor selection in sample stratification calculator
When the system selects the risk factor for use in a sample calculation it reviews the risks that it is attached to and selects the highest level of risk found. This data can be viewed using the icon to the left of the risk edit box in the calculator.

When you click on this the system will display a popup window showing why the level of risk was selected.

In the case shown, the test is linked to both Valuation and Existence and the higher level of risk, associated with Valuation has been used.
Clicking the mouse button, or pressing a key, will close the window.
Calling the calculator form audit completion
As explained on click here and click here, the sample size calculator can also be called from the Audit documentation completion and Test completion dialogs. When called from here, the system will default to the sample interval, materiality and factor relevant to the audit area selected, and will open with the sample stratification calculator displayed.
Importing data
It is possible to import data into both the add lister and the sample interval calculators. This allows, for example, a list of debtors’ balances to be exported from the accounts programs and imported for the automated selection of balances based on a sample interval. The import file is a standard ASCII file and details of its structure are contained in the system manager’s manual.
To import a file, click on the [Import] button and the Windows Open file dialog will be displayed. Select the name of the file to import, using the standard functions to change drives, directories and the file extension, and click on [OK].