Viewing a Report On Screen

As described in the various sections that cover the printing of information, it is possible to direct a listing or report to the screen or the printer. If the report has been directed to the screen, the system will compile all the pages of the report and then display the first page on the screen in the View report window.
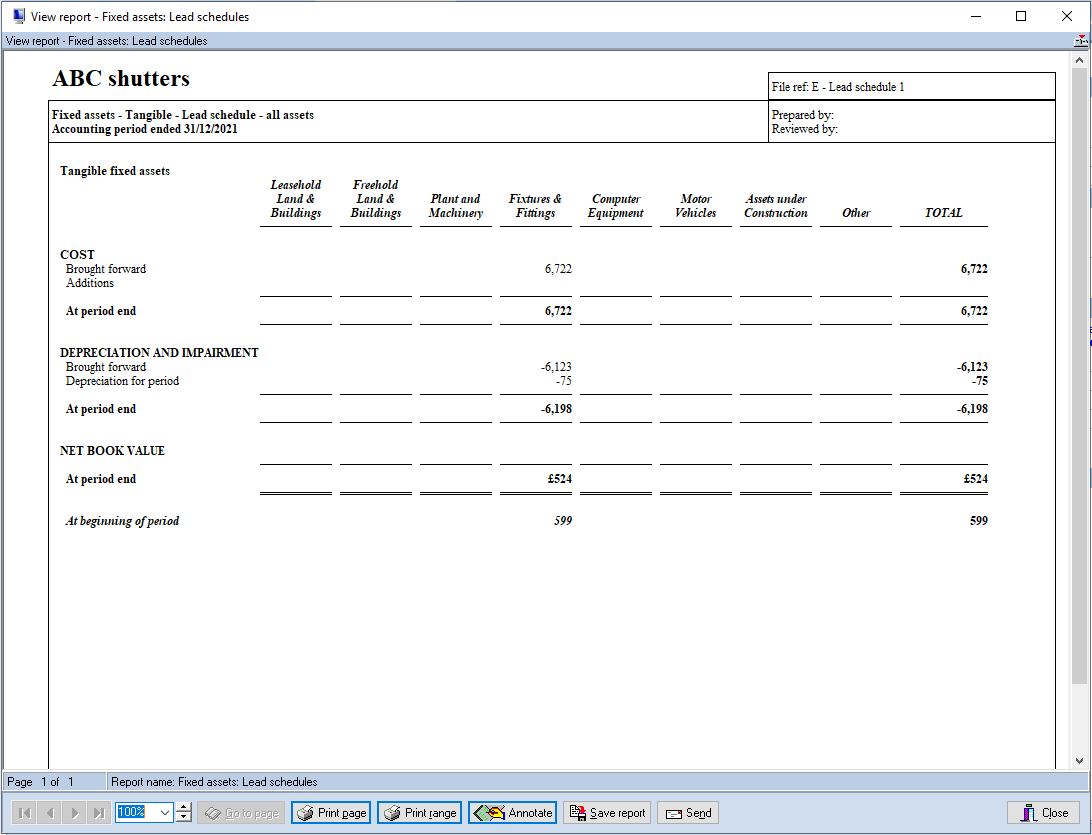
View report window
The toolbar of the window provides navigation and sizing facilities, and the status bar shows the current page being displayed and the name of the report. It is possible to scroll the current page of the report both vertically and horizontally using the scroll bars and to move from page to page either using the navigation buttons or the [Go to page] button.
Navigation buttons

There are four navigation buttons, from left to right they are:
- Jump to page 1
- Go to the previous page
- Go to the next page
- Jump to the last page
To scroll through the pages, or jump to the first or last page, click on the appropriate button and the action will be carried out.
Jump to a specified page
To jump to a specified page number, move focus to the entry box for the [Go to page] button, either using the <Tab> key or clicking on the entry box with the mouse, and enter the page number to be viewed. Click on [Go to page] and the page selected will be displayed.
Resizing page
By default, the system will display the page full size, and 100% will appear in the zoom box. If you would like to zoom in or out, click on the zoom box and a drop-down list will appear of the zoom percentages which are available. These vary from 25%, where the page is shown quarter size, to 200% where it is shown double normal size. Click on the percentage you would like to use and the screen will be displayed with that zoom factor. The zoom factor selected will remain active for the current view, until such time as you change it.
You can also change the zoom percentages in steps of 5% by clicking on the scroll buttons to the right of the percentage display.
Printing the report as previewed
After previewing the report, you may decide that you would like a copy sent to the printer. Two print buttons are provided in the toolbar to allow you to do this without having to close the preview screen. If you would just like to produce a copy of the current page being viewed, click on the [Print page] button and the system will display the standard windows print dialog to allow you to direct the report to the default printer or a printer of your choice.
On clicking on [OK] the system will print a copy of the single page that you are viewing to the printer.
If you would like to produce a copy of all the pages in the report, click on the [Print all] button and after accepting the default printer, or selecting a printer of your choice, the system will produce a copy of all pages of the report on the printer.
Lead schedule annotations
Audit Automation provides the ability to place text annotations on the face of lead schedules, or insert hyperlinks to other working papers in the client pack.
When adding a text annotation, you can enter a line of up to 250 characters and place it where you require. The annotation can be moved and removed after it has been created, and the background colour can be changed.
The annotation can either be a comment or it can be a cross reference (hyperlink) to a working paper you have created. If it is a cross reference, it is highlighted in blue and you will be able to click on the annotation to drill down to the working paper referred to.
To add an annotation, click on the [Annotate] button, which will be active whenever a lead schedule is displayed. The cursor will change to a book icon. Position the icon where the annotation is to appear and click the left mouse button. The Annotation dialog will appear:
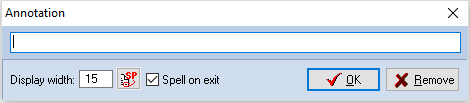
Enter the text, up to 250 characters, change the display width if you wish the rectangle used to display the annotation to be other than 15 characters wide, and click on [OK]. The annotation will now appear on the report. If the annotation is in the wrong place, point to it, hold down the left mouse button and drag it to the correct position.
The width of the rectangle used to display the annotation is calculated in standard character widths. The system will vary the rectangle height as required to show all the text entered. You may change the width at any time by editing the annotation, see below, and changing the Display width field.
To edit an annotation, point to it, press the right mouse button and select Edit annotation from the pop-up menu. The Annotation dialog will appear. To edit the annotation, change the text and width, and click on [OK].
To remove an annotation, point to it, press the right mouse button and select Remove annotation from the pop-up menu. You will be asked if you wish to remove the annotation and, if you confirm that you do, it will be removed. You may also remove an annotation by clicking on the [Remove] button in the Annotation dialog.
The final option of the pop-up menu allows you to change the colour of the annotation background. This is a persistent setting for your computers and once changed will apply to all annotations.
Annotations are positioned in absolute places on a page. This means that their position will not change if the content of the schedule changes as a result of audit journals. You should therefore check that the positions of existing annotations are correct before printing the final pack.
Cross references on lead schedules
As indicated, annotations can contain cross references to user created documents.
To use the facility, create an annotation and enter the reference of the working paper relating to the item being annotated. For this to work, you must only include the reference in the annotation and no other text other than the prefixes referred to below. When you display a lead schedule with annotations, the mouse pointer changes to the drill down pointer as you pass over an annotation to indicate that you can drill down to any working paper referred to therein. Double click on the annotation and, if it contains a valid cross reference, the working paper will be loaded. The original lead schedule will remain open for you to continue to view and click on further cross references.
The logic applied to test for a cross reference is as follows:
• If annotation contains a straight reference, say “5”, the system will look to see if a document 5 exists in the audit area to which the lead schedule relates.
• If a reference followed by a full stop and a reference is included, e.g. “D.5”, it will look for the document in the audit area stated.
• If a full stop is included but not preceded by a letter, e.g. “.5” or “.ENG”, it will look for the document in the permanent file section.
• Optionally, references can be prefixed by “Sch” or “Ref” which may also be separated from the reference by a “: ”.
When you double click on a reference, if no document is found, the annotation will be offered for edit.
When you have finished viewing the report, click on [Close] and the View report window will be closed.
Saving to a PDF file
To save the displayed report to a PDF file, click on the [Save report] button. The system will ask you to provide a name for the report and the folder in which it should be saved by displaying the standard Windows Save dialog. The report will be saved as a standard PDF file and can be viewed on any system on which Adobe Acrobat reader is installed.
Sending as an email
Clicking on the [Send] button will result in the report being saved as a PDF file, just as though [Save report] had been selected and an email being generated with the report attached. In this case the [To] field will be blank and you can enter the recipients as required.