Review and Print Planning Section

Review planning section
The Review planning dialog is provided to assist managers and partners carry out their review by showing a list of the areas you are going to wish to access and an indication of areas you have visited. To access the dialog, select Planning -> [Review/Print]. A checklist appears in the navigation window on the left.
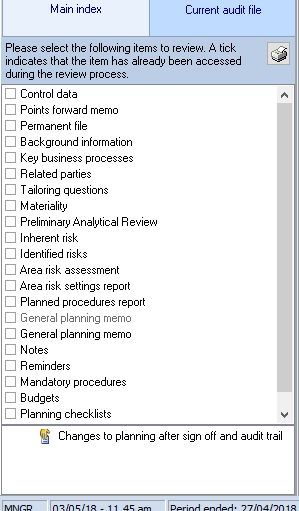
From this you can click on the name of each item in the planning section to review its contents. Once reviewed, a tick will appear in the box to the left of the item. These ticks are persistent and will therefore remain if reviewing is carried out in stages over a period of time. The ticks are cleared when the planning area is signed off and hence both the manager and the partner can use the bookmarks.
If you wish to remove a tick as you accessed a routine but did not review it, click on the checkbox of the item that contains the tick to be removed and the system will ask you to confirm that you wish to remove the tick.
Print planning section
To print the planning section, use the  button on the Review planning window.
This allows you to print the standard planning documents which are produced by the program. These are as follows:
Planning memorandum
Points forward memorandum
Staff briefing and planning schedules
Budgets
Materiality calculations
Inherent risk questions and answers
Specific risk questions and answers
Control risk questions and answers
Non-sampling detection risk
Sample sizes
Small population sample sizes
Books and records questions and answers
Equation results
These reports are in a fixed format and cannot be altered by the user. However, the master audit pack definition contains a number of other schedules which are printed within the planning section, forming a divider for the section, checklists and an analytical review schedule. These, along with all other dividers, working papers and audit programmes, can be customised to reflect your own individual requirements.
Some master packs may suppress schedules which are not appropriate to the audit methodology and these will be inactive when the dialog is shown.
On selecting [Print], the Planning schedules dialog.
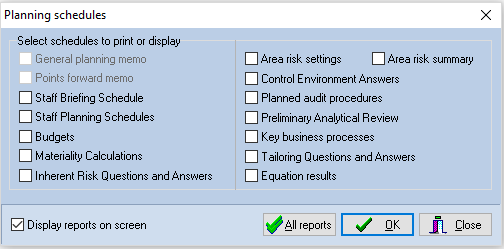
Planning schedules dialog
The dialog contains a Display reports on screen check box. If this box is unchecked, reports will be directed to the printer. If the box is checked, reports will be compiled for viewing on the screen, see click here for a description of viewing reports. The state of the check box is toggled by clicking on it, or on the narrative. It is not possible to select the memorandum for display on the screen.
When the dialog is first displayed, none of the schedules will be selected for printing. You may select a schedule, by clicking on its name, and the box by the name will be marked to indicate that it has been selected. To remove a schedule from the list of items to be printed, click on it again.
Select the reports to be displayed or printed and click on [OK]. If the reports are to be printed, the system will display the standard windows Print dialog for you to change printer, or printer options, if you wish. Please refer to your Windows manual if you are unsure how to operate the dialog. If you have directed the reports to the display, they will be compiled and presented on the screen.
To select all reports, click on [All reports], and the system will ask you to confirm your request before proceeding to print or display the reports.