Customising Audit Programmes

When you first open a new client, the system carries out an initialisation of the checklist and programmes, and checklists are also automatically initialised on a balance forward, automating the exclusion of tests which do not appear to be relevant to the client, drawing on information in the client’s TB, audit area overrides, books and records and the risk analysis, and then you may further customise the programmes, activating and inactivating tests for the client, changing the wording of existing tests and adding new tests.
If, in a subsequent year, you wish to clear your customised programmes and start with a new set based on the master to which the client is attached, the System Manager can release the initialisation routine to allow you to do this. Details of how to do this are contained in the System Manager's manual. It is also possible to clear any previous customisation if you switch to a new master audit pack, see click here for more information.
To update audit test exclusion
To carry out an update, select [Update Test exclusion] from the Planning menu. The system will check that the risk model has been fully completed and, if it has, ask you to confirm the action.
Once planning has been signed off, this option will only be available to the person who took responsibility for planning. This will be the person who completed the option to record date planning was completed, or the partner if the date completed option is not active in the master pack in use.
Automatic update of audit test exclusion
When a change is made to tailoring questions or certain perennial checklist are answered, the system offers to run Update question exclusion to ensure that the checklists and questions included reflect the latest position. It also includes the facility to automatically update audit test exclusion. Whenever you do anything which could have an impact on the contents of the checklists or programmes you are invited to run the routines.
When you make a change the system will display the following dialog:
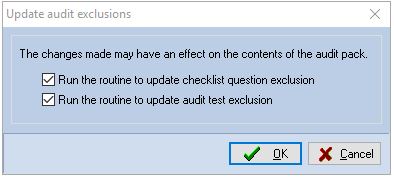
Click on [OK] if you wish to run the routines. You can remove one of the ticks to deselect the item before clicking on [OK], or click on [Cancel] if you do not wish to run either routine.
Note: The option to update audit test exclusion will be run in such a way that it will not overwrite any planner changes or change sample sizes. It will only consider the inclusion or exclusion of tests where the system originally made the decision for them to be included or excluded.
Update audit test exclusion after planning sign off
The option to update audit test exclusions remains active after planning sign off, however in completion mode it cannot be used to recalculate sample sizes or overwrite planner changes.
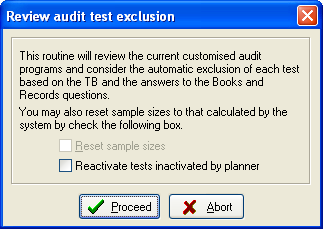
Review dialog
You may either let the computer just review each test for inclusion, or you can ask it to reset the sample sizes to that currently recorded for each audit area, either as calculated or overridden. On the first occasion that you run the routine each year, you should tick the Reset sample sizes checkbox so that the sizes relevant to the current year are shown in the programme.
The second option, Reactivate tests inactivated by planner, is used to advise the system if it should reconsider every test, or just those that the planner did not inactivate. If it is not ticked, which is the default setting, the system will not reactivate any tests that the planner has inactivated, if you tick the checkbox, it will reconsider all tests and activate them based on the criteria for the test.
Check the first box if the sample sizes are to be updated and the second if you wish to override planner inactivation, and then click [Proceed]. Audit Automation will scan the audit programmes carrying out your instructions to update the programmes.
Customising audit programmes
After the programmes have been initialised, or updated, you may customise any programmes further by selecting [Customise procedures] from the Planning menu.
On selecting this option, the Customise mandatory procedures window will be displayed:
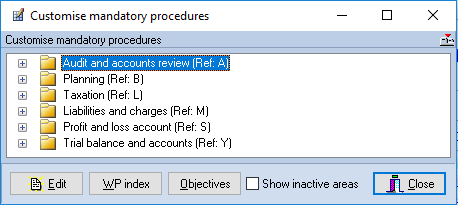
Customise mandatory procedures window
This dialog contains a list of folders representing the active areas for the client. Double click on a folder to open it, or click on the + sign, and it will list the audit programmes that it contains. You may then select an audit programme by highlighting it and clicking on [Edit] or by double clicking on its name and it will be presented for customisation.
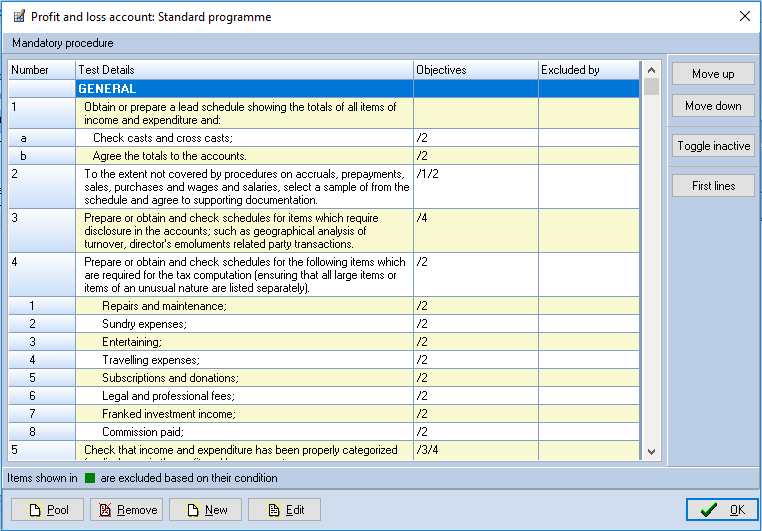
Customise programme dialog
The audit programme includes all the tests from the master even if they are not to be included in the customised programme for the client. Tests which are not to be included are shown in a different colour, grey by default but this may have been changed on your system. You may scroll through the program using the scroll bar, edit the text of an existing test, add new tests or toggle the active state of tests, as follows:
| Move up / down | If you wish to change the position of the questions within the list you can highlight the relevant question to be moved and click on [Move up] or [Move down] accordingly. |
| Toggle active/inactive | If you wish to exclude a test that is currently included, or include one that is excluded, highlight the test and click on [Toggle active] or [Toggle inactive]. The colour of the test will change to indicate that your request has been accepted. If the test selected has sub parts, the active mode of the sub parts will also be changed. |
| First lines | When the programme is first displayed, the full text of the tests will be visible. If you wish to see an overview of the programme, click on [First lines] and only the first line will be displayed. The button will change to [Full tests] and this may be clicked to revert to the original mode. |
| Pool | You can choose tests to include from the pool tests by clicking on [Pool] as described previously. |
| Remove | If you wish to remove existing questions you can highlight the relevant question and click on [Remove]. It will confirm with you that you wish to remove it before doing so. |
| New | If you wish to insert a new test, or a new part to an existing test, highlight the position in the audit programme where the new item is to appear, and click [New]. See below for more details. |
| Edit | If you wish to edit existing questions you can highlight the relevant question and click on [Edit]. See below for more details. |
Inserting a new item
As indicated, you may insert a new item, by positioning the highlight and clicking [New]. The system will present the Customise test dialog:
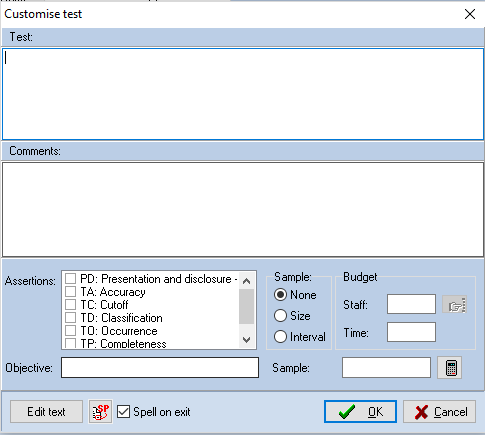
Customise test dialog
The fields may be completed as follows:
| Edit text | To enter the text of the test, click on [Edit text], the test box will become active and the insertion point positioned in it to allow you to enter the text of the test. When you are adding a new test this automatically happens and you can start typing the text of the test immediately. |
| Test | Enter here the text of the test. |
| Comments | Enter here any comments or instructions relating to the test. |
| Assertions | Select the audit assertions that the item is designed to test by clicking the relevant checkboxes. The field may be left blank. |
| Sample | Enter in this field the sample to be selected for the test. The field may be left blank, or you may use the stratification calculator to calculate a sample if the population is known. |
| Staff | Enter here the staff member who is allocated to carry out the test, or leave the field blank if this feature is not being used on the audit. The [Pick list] button can be used to select a member of staff from the staff allocated to the audit. |
| Time | Enter here the time that it is budgeted for the test to take, or leave it blank if this feature is not being used. |
When you have entered the details of the new item, click on [OK] and they will be added to the programme.
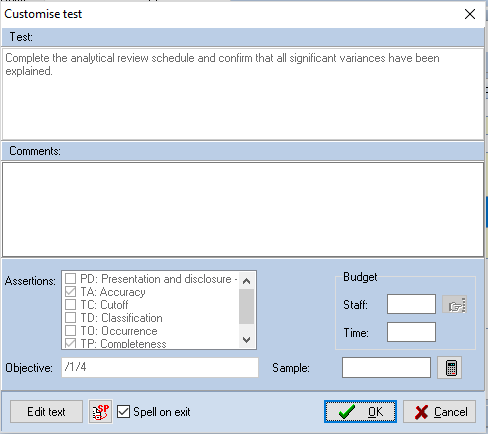
Editing an existing test
To edit an existing test, highlight it and click on [Edit], and the Customise test dialog will be displayed showing details of the test highlighted:
Customise test dialog
You may change the wording of the test by clicking on [Edit text], and you are free to edit any of the other fields shown, or to calculate a stratified sample. If you enter, or change the staff member allocated to carry out the test, and if the item selected has sub parts that are not allocated, the system will allocate the sub parts to the same member of staff. This is a useful way of allocating whole sections of the audit programme as you may also allocate a member of staff to a main heading and all the unallocated tests within the heading will be automatically allocated. However, time budgets can only be allocated at test level, not to headings.
Any test where the wording has been customised for the client, and all tests added for the client, will be highlighted with a blue dot.
Click on [OK] to close the Customise audit programmes window and save your changes.
Caculating sample sizes
If you wish to calculate a sample size using the stratification calculator, click on the [Calculator] button and the audit calculator will be shown.
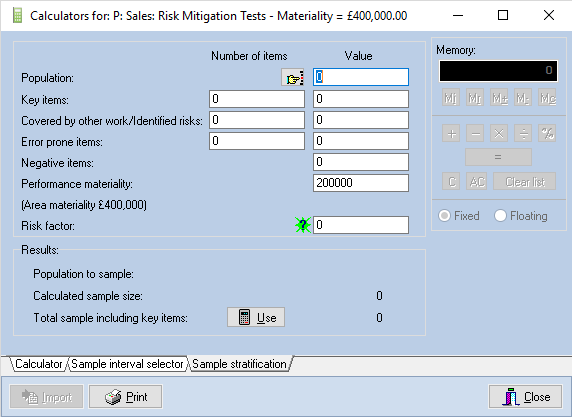
Stratification calculator
The system will insert the risk factor and materiality that is appropriate to the audit area. You may now enter details in the other edit boxes, and pick an account to extract the population from the trial balance, and the system will calculate the sample size to be applied. When you are happy with the calculation, click on [Use] and the system will close the calculator, insert the sample in the Customise test dialog and turn the calculator icon white to indicate that there is a calculated sample. The sample calculation is linked to the test and will be printed on the face of the audit programme, and it can also be recalled during completion for review or amendment.
Other options
It is also possible to view and edit the working paper index and to view the objectives for a selected area from the Customise mandatory procedures dialog. To do this, highlight the area name and click on the [WP index] or [Objectives] button. Details of how to edit the working paper index are set out on click here.
When you view the audit objectives, the system will analyse the audit program and show which tests satisfy each objective. This is a very useful facility allowing you to check that you have not removed all tests that satisfy a particular objective. The Objectives dialog also contains a button that allows you to copy the text of an objective to the Windows clipboard so that you can insert it in your working papers. Simply highlight the objective to be copied and click on [Copy].
In the Customise mandatory procedures dialog, pointing to the list area and clicking on the right mouse button will display a pop-up menu, from which you expand and collapse all areas. If an audit program is selected in the list, the option to customise the procedure will be active and selecting this has the same effect as double clicking on the programme name