Edit Client Details

The information provided when the client was created can be edited by selecting [Control], followed by Control data... from the File menu.
Select this option and the Client control data dialog will be displayed, showing the data currently stored for the client.
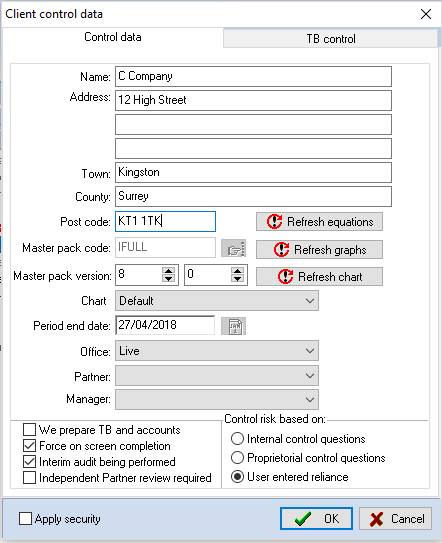
Client control data dialog
The fields included in this dialog are as follows:
1) Name - the client’s name may be up to 50 characters long and should be entered exactly as you would like it to appear at the head of reports.
2) Address, Town, County, Post code - enter here the address of the client, which may be up to 3 lines of 40 characters, the town name, county and post code. The address entered is for record purposes and is available to the mail-merge facility for addressing letters and documents.
3) Master pack code - when CCH Audit Automation creates the client’s data, it will copy a standard chart of accounts to the work area and will create a link to a master audit pack which informs the system what to include within the customised audit pack for the client. The standard risk model, section dividers, audit working papers and audit programmes are not stored with the client but are drawn from this master audit pack when the customised audit pack is produced. The master pack to which a client is attached can only be changed after a client has been balanced forward and before the checklists and programmes have been initialised. If you are upgrading from one version of a master pack to another the system will amend your customised audit programmes to reflect master tests that have been added, deleted or changed. However, if you are changing to a pack which follows a different audit approach, say from the Small to the Full pack, the audit programmes will be based on a different set of masters and base programmes and any user customisation of the audit programmes will be lost. If the pack cannot be changed the field will be inactive and you will not be able to select it.
To change the master in use, enter the new master audit pack code. It is not necessary to enter the extension given to all master audit packs of .MST, as the system will append this for you. Please note the remove duplicate area's routine will now run as part of the change master pack routine when the master pack code the audit is based upon is changed.
If you are unsure of the code identifying the master audit pack you wish to use, select the [Pick list] button.
If you have changed the pack, when you click on [OK] to save the changes you have made, the system will ask you to confirm that you wish to change the master pack used and then ask you if you wish to merge the programmes. If you are upgrading select [Yes] and your customised programmes will be amended - if you are changing pack type select [No] and the customised programmes will be cleared.
It will then ask if you wish to copy the working paper index from the new master. If you do this it will delete your existing index and replace it with the new one. If you are updating from one release of a pack to another it is likely that you would not wish to do this as the index will be similar and you will wish to retain the index as it exists in the client. However, if you are changing pack concept and the new pack has a different index, you may wish to carry out the copy, but if you do you will need to add any user defined working papers brought forward from the previous year.
The final question you will be asked is if you would like the system to initialise a fresh set of checklists based on the new pack. This will have to be done at some time and if you do not confirm that you wish this done the option to initialise checklists will become active so that you can run it at a later date.
To change the master in use, enter the new master audit pack code. It is not necessary to enter the extension given to all master audit packs of .MST, as the system will append this for you.
If you are unsure of the code identifying the master audit pack you wish to use, select the [Pick list] button.
If you have changed the pack, when you click on [OK] to save the changes you have made, the system will ask you to confirm that you wish to change the master pack used and then ask you if you wish to merge the programmes. If you are upgrading select [Yes] and your customised programmes will be amended - if you are changing pack type select [No] and the customised programmes will be cleared.
It will then ask if you wish to copy the working paper index from the new master. If you do this it will delete your existing index and replace it with the new one. If you are updating from one release of a pack to another it is likely that you would not wish to do this as the index will be similar and you will wish to retain the index as it exists in the client. However, if you are changing pack concept and the new pack has a different index, you may wish to carry out the copy, but if you do you will need to add any user defined working papers brought forward from the previous year.
The final question you will be asked is if you would like the system to initialise a fresh set of checklists based on the new pack. This will have to be done at some time and if you do not confirm that you wish this done the option to initialise checklists will become active so that you can run it at a later date.
4) Master pack version – this shows which version of the master pack is in use.
5) Office, Partner, Manager – this allows you to set the engagement Office, Partner and Manager by selecting entries from the drop-down lists.
6) Chart – The chart of accounts that will be used for the client, a master pack can have multiple charts of accounts assigned to it.
7) Period end date - enter the period end date for the period currently being processed on the system. This can be changed at any time.
CCH Audit Automation allows you to store a full trial balance for the current year and 9 comparative years data. If you are running Accounts Production, this information can be imported from the Accounts Production client on a year by year basis. If you are running another accounting package, which is capable of outputting ASCII files, the importing of the data can be automated, or carried out manually via Import TB from other systems from the Data entry menu.
If previous year’s data is available to you in computer form, either from Accounts Production or another system, how you proceed will depend on the links available to you, you will either:
1. create the client with a year-end date of the first year which is available. It will then be possible for you to import the trial balance for each year, balancing forward after each import has been carried out, to create the historical data on the system, or
2. use the automated import routine, importing all the historical data in one run.
Details of how to configure the system for each method are contained in the System Manager’s Manual and you should refer to your System Manager if you are not sure of the method in use.
If the information is not available on disk, the current year’s and previous year’s trial balances can be entered through the facilities provided in the Data entry menu.
8) We prepare TB and accounts - Check and uncheck this box by clicking on it. The risk analysis model followed by the programs is outlined in the risk section. From this section it will be seen that the system can include in the non-sampling detection risk, added reliance for the fact that the firm prepares the TB and Accounts, and this check box informs that system where this is the case. The master packs use the full range of non- sampling reliance to take account of other sources of comfort and this flag is not therefore used in our masters. In our model, comfort taken for the preparation of the TB and accounts is included in the Proprietorial Control questions, so that control risk can be reduced to take account of the firm’s involvement.
9) Force on screen completion - Check and uncheck this box by clicking on it. If this check box is crossed, the system will require the audit documentation to be completed on screen and will not allow the client to be balanced forward until all sections have been completed and the audit signed off. If the box is not crossed, the system will assume that the audit is being completed from printouts and, once the planning stage has been completed, will release the option to balance forward.
10) Interim audit being performed - If this option is ticked, the system shows an additional menu item on the Planning sign off menu, called Interim planning sign off. This is for record purposes only and when selected allows you to record the date that you signed off the planning for the interim audit to commence. After it has been run, a tick appears by the menu item to show it has been completed and details also appear in the Audit progress summary dialog.
11) Independent partner review required – If this option is ticked, additional menu items appear in the Planning and Completion menus allowing the evidence of an independent partner review. If an independent partner review is required, the system will not let you indicate that fieldwork has started until the review has been signed. If Force on screen completion is selected in the Client control data, you will not be able to balance forward until the independent partner sign off has been completed. The dates of the reviews are shown in the audit progress dialog and report.
12) Apply security turns on and off the client security facility which only allows the staff members assigned to the audit to access a client. This option can only be accessed by a system manager, partner or manager and once ticked results in only the staff members who are listed in the staff file being allowed access to the client. The only exception to this is that system managers are given access to all clients.
When security has been turned on, it will only be activated once the staff have been recorded as assigned to the audit by completion of the Staff records.
13) Control risk based on - As set out on click here describing the risk model, it is possible for the system to arrive at control risk in one of three ways:
• ask a series of Internal Control Risk questions and evaluate the results.
• ask a single list of questions relating to Proprietorial Controls
• ask the user to enter the level of reliance to be taken
The Control risk group box contains three radio buttons to cater for each of these options. Only one button can be selected, and you should click on the option to be used for the client being created.
14) Refresh equations - When a client is created, it receives a set of equations based on the master pack to which it has been attached. If the equations in the master are updated at a later date it is possible to refresh the background data equations stored with the client by using this button.
15) Refresh graphs - When a client is created, it receives a set of graphs based on the master pack to which it has been attached. If the graphs in the master are updated at a later date it is possible to refresh the graphs stored with the client by using this button.
16) Refresh chart - When a client is created, it receives a chart of account based on the master pack to which it has been attached. If new nominals are added to the master pack this option can be used to update the client with the new codes.
On the TB Control tab:
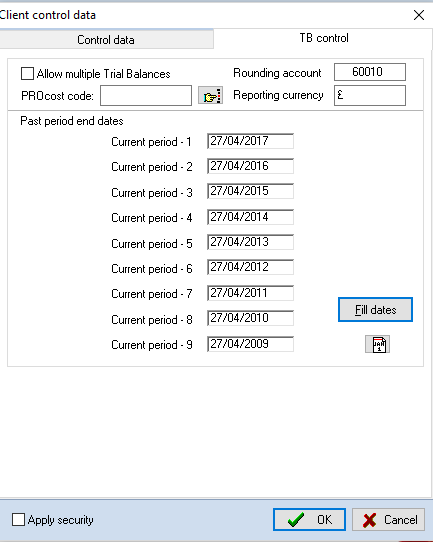
TB Control tab
1) Allow multiple trial balances – This option will only be active if you have acquired the optional module. It allows you to maintain more than one TB for the client, either representing departments or currency data. It can also be used to carry out consolidations of subsidiary audit packs. If multiple TBs are appropriate for the client being processed, check the checkbox, otherwise leave it unchecked. For details on processing with multiple TBs, refer to the section Multiple TB processing.
2) Rounding account – This is used in conjunction with the previous option to identify the account where rounding differences are to be adjusted for the conversion of currency TB.
3) ProSystem Practice Management code – For firms using our CCH ProSystem Practice Management system (Practice Management), the static data held for the client is automatically synchronized with the information held therein. Where the code of the client in Practice Management matches that used in CCH Audit Automation this field can be left blank and the system will match the records using the codes. However, if the code of the client’s record in Practice Management does not match that used in CCH Audit Automation, enter here the Practice Management code that the data should be synchronized with.
4) Reporting currency – Enter here the symbol of the currency in which the accounts are prepared. This will default to the currency set in your Windows environment, and may be changed as required.
5) Past period end dates – This section provides 9 edit fields to allow you to record the past period end dates associated with each of the 9 comparative TBs. You can populate these fields, based on the current period end date, using the [Fill dates] button. This routine assumes that each period is 12 months long. You may then edit any field where the date does not coincide with the date of the accounts. You may also use the [Calendar] button to select a date for the field currently being edited.
Make any changes required and click on [OK] to save the changes and close the dialog. If you make changes but then decide that you do not wish to save them, click on [Cancel].