Editing and printing charts

The chart of accounts stores the nominal ledger structure for the client, together with details of the analysis of the accounts into major classifications and categories.
Each account is identified by a unique account number, from 1 to 64,000 and this account number is used within working papers and audit programmes to print details of the accounts on lead schedules, and for the system to make decisions about including sections of the audit programme, where this is dependent upon the balance of an account.
In addition, each account can be allocated a 20-digit alphanumeric code, which allows CCH Audit Automation to communicate with other accounting systems so that the trial balance can be imported, and for journal entries to be posted across.
The chart of accounts is edited by selecting [Chart of accounts] from the Reference menu.
On selecting this option, the system will present the Nominal ledger account codes list.

Nominal ledger account code list
Adding an account
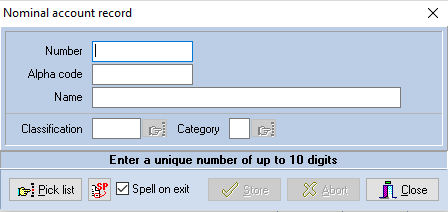
To add a new account, click [Add] and the Nominal account record dialog will be displayed.

Nominal account record dialog
Enter the code and details of the new account and then click on [Store]. Providing the code does not already exist, it will be saved and the dialog cleared to allow further entries to be made. When you have finished adding codes, click on [Close] to return to the list window. If you start making an entry and do not wish to store it, click on [Abort].
The pick list is provided to allow you to view existing codes.
The following is a description of each of the fields which go to make up a record:
| Alpha code |
The alpha code associated with the account may be up to 20 digits of alphanumeric data, and is used to interact with accounting systems, it is possible that the other system may not be based on an account number structure, or if it is based on an account number structure it may not be the same as used within the CCH Audit Automation masters. You use the alpha code to tell the system which account from the other system to link with the account number selected and when the trial balance import routine is invoked, the system will attempt to match the incoming code with the alpha code to determine in which account it should place the balance. If, however, you are not intending to import from other systems, it is not necessary to enter an alpha code and it may be left blank, or it may be set to the same as the account number. The system will not allow you to allocate the same alpha code to more than one account. When completing the dialog, you may use the [Pick list] button to view a list of current records. |
| Name | Account name, which may be up to 50 characters long. |
| Class | Enter the classification code which represents the class to which the account belongs. Classification codes give the highest level of trial balance analysis and is the means by which CCH Audit Automation can summarise figures into major accounting groups. For example, in our masters the classification TFA identifies tangible fixed asset codes, and all tangible fixed asset codes should therefore have the classification code of TFA. When the entry field is sitting on the classification code you can use the [Pick list] button to obtain a list of codes which are available. |
| Category |
Categories provide sub-analysis of classifications for the purpose of identifying sections of the audit programme to include in the audit pack for the client. Categories are as follows: B Balance sheet or brought forward To continue the above example, all addition codes for tangible fixed asset cost accounts should be identified by category of A, and this enables the system to determine whether or not there are any additions to fixed assets and whether it is appropriate to include that section of the audit programme. A [Pick list] button is also available for this item. Enter the category which is relevant. Invalid entries will be rejected. |
Editing an account
To edit an existing account, display it in the list, either using the scroll bar or by typing the code in the Go to edit box, and either double click on the item in the list, or highlight it and click on [Edit]. The Nominal account record dialog will be displayed with the name selected for edit. Edit the name and any other details which need changing, and click on [Store] to save the revised data. Clicking on [Abort] will close the dialog and return to the List window without recording your changes.
Deleting an account
To delete an account, highlight it in the list and click [Delete]. The system will ask you to confirm that you would like to delete the highlighted entry and, if you confirm this by clicking on [Yes], will remove the item from the list. CCH Audit Automation will only allow you to delete accounts if they are not active, i.e. they do not contain data in any of the 10 years TB which are held.
Printing nominal accounts
To print a list of nominal accounts, click the button containing the printer icon. The system will display the standard windows Print dialog, allowing you to select the number of copies, and change the printer and printing options, if required. Clicking on [OK] will cause the list to be printed, clicking on [Cancel] will abort the print run and return to the list.
