Preliminary Analytical Review

Audit Automation contains a formal method of recording your preliminary analytical review and allows this to be linked with the equation editor where you have designed equations which are good analytical review indicators.
To access this routine, select Planning > Analytical tools > Preliminary analytical review.
The first time you access this, the system will populate the review records with a line for each of the main areas in the audit file and associated financial data.
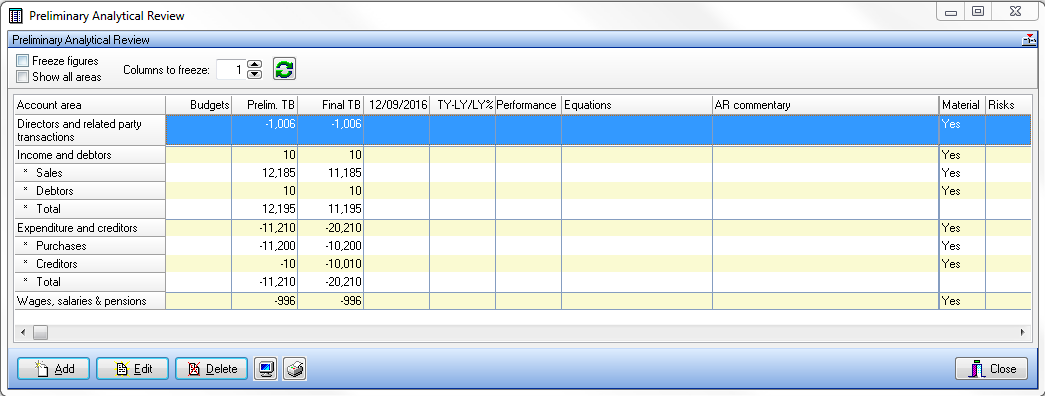
The window contains the following columns:
• Account area
• User defined data column – Budgets by default
• Prelim TB – financial data for the current year as it existed when the review was first carried out
• Final TB – financial data from the TB after agreed audit journals
• Last year – financial data for the prior year
• Year before last - financial data for the year before last or Percentage change (this year to last year)
• Working materiality - as calculated by the system, but can be changed on an area by area basis.
• Equations – This contains a list of equations which have been linked to the area, together with the result for the current and prior periods.
• Analytical review commentary – as entered by the user
• Material – yes or no. This is set by the system when the data is calculated, however, can be overridden.
• Risks – any audit risks associated with the line will be displayed here.
When the dialog is first accessed, the system will calculate the figures for the preliminary data for the current year and for two prior years based on the list of classifications for the area. By default it displays the preliminary and final trial balance figures, the figures for last year as a comparative, and shows the percentage movement between this year and last year. You can optionally show the figures for the previous year, instead of the percentage movement figures. To do so you should either click the button, or right click on the column and select the Show 3 years menu option. This works as a toggle, so to re-display the percentage column you should re-click the button or select the Show percentage change option from the right click pop-up menu.
It will also calculate the working materiality as a percentage of materiality. This percentage is defined in the Master Pack Settings dialog and will have been set by the master pack creator. Finally, if the total of the area exceeds materiality, the system will set the flag to indicate that the area is material.
Setting the user defined column heading
The first value column on the Preliminary Analytical Review dialog can be used to maintain any other set of values you require. By default, this is assumed to hold budget values and the column heading displays Budgets.
If you wish to maintain different values in this column, you can change the column heading to identify these values e.g. Next year forecast.
To change the column heading, right click on the column to display a pop-up menu and choose the Change name of user defined column option. The Heading for user entry field dialog appears and you should enter the column heading you require and click OK.
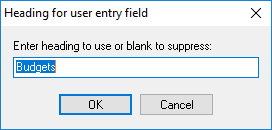
This also changes the field prompt that appears for this value when you choose to add or edit the details for an area.
Entering/editing details
To enter or edit details in respect of an existing line, double click on the line, or select it and click on [Edit]. The following entry dialog will be displayed:
If you have selected an area that was defined in the master pack, it will be described as the Main area and you will not be able to edit the sub area name.
Financial data – preliminary
You are free to edit the figure calculated in this area, however you should be aware that the data will be recalculated and any entered figures overwritten the next time that routines are accessed, unless the option to Freeze figures has been ticked.
Each main area can have a list of classifications set in the master pack that define the total for the area. However, you may overwrite these, if required, by defining your own list of accounts and classifications. These are entered in the Account range field described below.
Financial data – other
The data for the final TB and the two prior years are calculated based on the master pack list of classifications, or the account range. Unlike the preliminary figure, the fields will be updated as journals are entered or the comparative TB edited, even if the figures have been frozen. Hence this will always reflect the current balances.
Material area
If the area has been deemed as material, the checkbox will be ticked. You may change this setting if you wish.
Working materiality
Again, this will show the calculated figure which you are free to edit if required.
Account range
If you have added your own lines to the analytical review area list (see below), you can enter here the account ranges and classifications that go to make up the item and the system will use these to auto calculate the figures on subsequent accesses. You may also overwrite the master pack calculation of the total for the area by completing this field. After entering the ranges, click on the [Refresh] button to the right of the edit box, or for a main area to the right of the preliminary figure, to force an immediate calculation to be carried out.
Budgets
Enter or amend the amount in the user defined amount field, if required. For example, enter a budget value. The meaning of this value is user defined and will be identified by the heading displayed. By default the column heading and field prompt here displays as “Budgets”, but this can be changed using the Change name of user defined column option on the right click menu, as described previously.
Analytical review commentary
Enter your review comments, if required.
Completion review
This area will only become active after planning has been signed off and is intended to hold a record of the conclusions of your review of the PAR after the audit field work has been completed.
Equations
You can associate equations with the PAR area. To do this, add equations by using the [Add] button. To remove an equation, select it and click on the [Delete] button.
Audit risks
To enter an audit risk, click on the [Identified risk] button and proceed as indicated in the section dealing with the entry of identified risks.
Moving between areas
You may move to the next or previous area without closing the edit dialog by using the blue arrow buttons.
Adding a new account area
You may add new account areas as sub areas of existing main file areas. Select the line containing the relevant main area and click [Add]. The entry dialog will be displayed, but this time the Sub area will be active to allow you to enter the name of the area. Enter this and the other details as described above.
If you add sub areas for an area, the system automatically displays a total of the sub areas that have been added, as illustrated below.
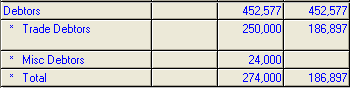
Removing an area
You may remove any sub area by selecting it and clicking [Delete]. You may not remove main areas.
Freezing the figures
After running the PAR for the first time, you will want to freeze the figures so that the system does not recalculate the preliminary financial data and working materiality each time the routine is accessed. To do this, place a tick in the checkbox at the top of the dialog. If you try and exit the dialog without ticking this option, the system will warn you of the consequences.
Display freezing
You can change the number of columns that are always displayed on the left of the grid by increasing the number shown in the “Columns to freeze” edit box.
Adjusting column widths
It is possible to adjust the column widths by dragging the divider between the columns. The system will remember your settings for future use. You may also hide the navigation panel, as described earlier, to provide more space for the display of the dialog.
Show all areas
Ticking this checkbox will display all the audit areas, showing those that were excluded from the PAR. Excluded areas will be shown in grey.
Viewing or printing the preliminary analytical review results
The Preliminary Analytical Review dialog includes print and preview report
  buttons that allow you to print or view the Preliminary Analytical Review report. The preview button displays the report and allows you to save it as a PDF file, either as a permanent record, or to attach to an e-mail