Master Pack Control Data

The operation of the pack is controlled by a set of master settings that apply to the pack as a whole. These, together with the control over releasing the pack for use, can be edited via the Control data option on the Master options list.
To edit the pack settings, load the pack for editing and click on the Control data option in the Master options. The system will display the Master pack control data dialog.
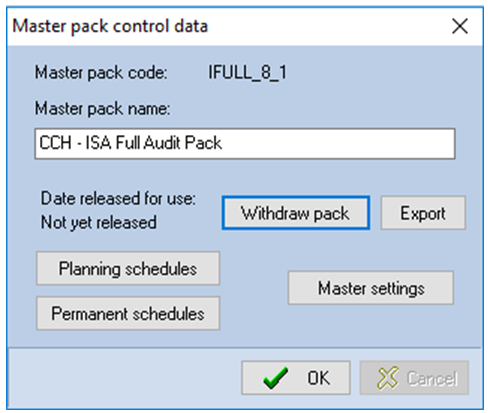
Master pack control data dialog
This dialog allows you to edit the name of the pack, select whether or not the pack is released for use, and open the Master audit pack settings dialog to customise the operation of the pack.
Master Pack name
The name of the master pack appears in the index of master packs and should therefore be descriptive of the type of client to which it is appropriate. You may edit the name, which may be up to 50 characters, at any time and the new name will appear in the index as soon as a change has been made.
Release/Withdraw pack
Before you may link a client pack to a new master the master pack must be released for use. A pack should only be released after it has been fully developed as users may then start using it and it will no longer be possible to edit certain areas of the master. This is a security measure to ensure that a user does not plan an audit and customise the audit programme based on one set of criteria, only to find that the master has been changed and the resulting client audit pack is not as anticipated.
To release a pack, click on the [Release pack] button and the system will show the current date as the date the pack was released for use. In addition, the wording on the button will change to [Withdraw pack]. It is possible to withdraw a pack at a later date by clicking on this button.
If you withdraw a pack and you still have clients attached to it, the system will warn the user that the pack has been withdrawn when they next access the client. They will still be able to load the client and operate on it (assuming the pack has not been physically removed from the system) but they will be aware that they need to attach the client to a new updated pack.
Version control
When a client is first linked to a master, the date that the master pack was released for use is recorded in the client’s control data. If a System Manager later withdraws a pack, makes some changes and re-releases it for use, the date of the original master and the one now in use will differ. If this has happened, the system will warn the user when the client is next loaded that the date of the master pack does not match that which was used by the client in the past. Again, the user may continue to operate on the client, but the change should be investigated and the effect of any changes noted.
If the user is happy that the updated master can be used, he can link the client to the new version by accessing the Client control data dialog, clicking in the Master pack code field and then on [OK]. See section 68 of the reference manual for details of how to access this dialog.
Export
The publish option can be used to download a master pack from the system so that it can to imported into another system.
Planning schedules
When you click on the [Planning schedules] button, the Planning schedules dialog will appear.
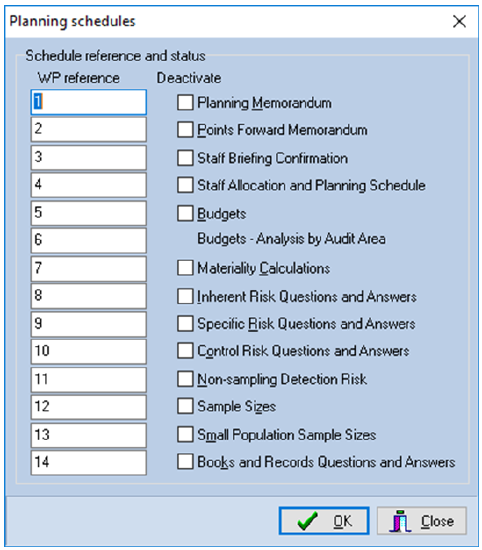
Planning schedules dialog
- This dialog lists each of the schedules generated by the system to record the Audit Automation driven planning documentation and allows you to enter the working paper reference to be allocated on each. The actual reference shown will be the area reference for the planning section of the file followed by the reference that is entered here.
- Not all packs will wish to include all of the possible planning schedules. For example, a pack may not use the small population size schedule and it is therefore possible to suppress this, or any other schedule, within a pack by ticking the checkbox shown by the side of its name.
Permanent Schedules
CCH Audit Automation maintains a database of permanent file information for each client that is entered and maintained using the Permanent file data option on the Reference menu.
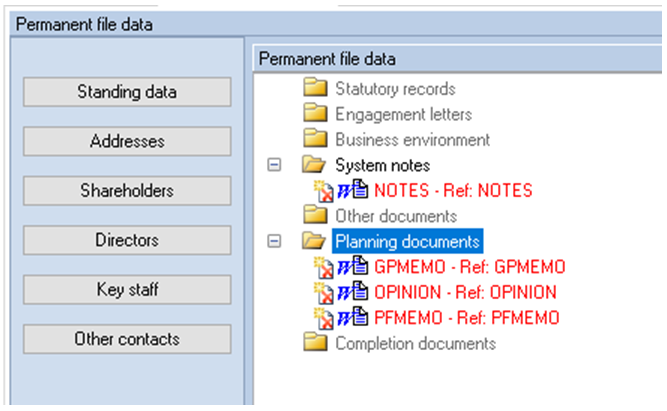
Permanent file data dialog
The type of information maintained as permanent data can be configured using the Permanent Schedules option. When you click on the [Permanent schedules] button, the Permanent File Schedules dialog will appear.
This dialog is divided into 3 tabs all of which are used to tailor the appearance and contents of the Permanent File section of the master pack. The default Permanent file section is illustrated below:
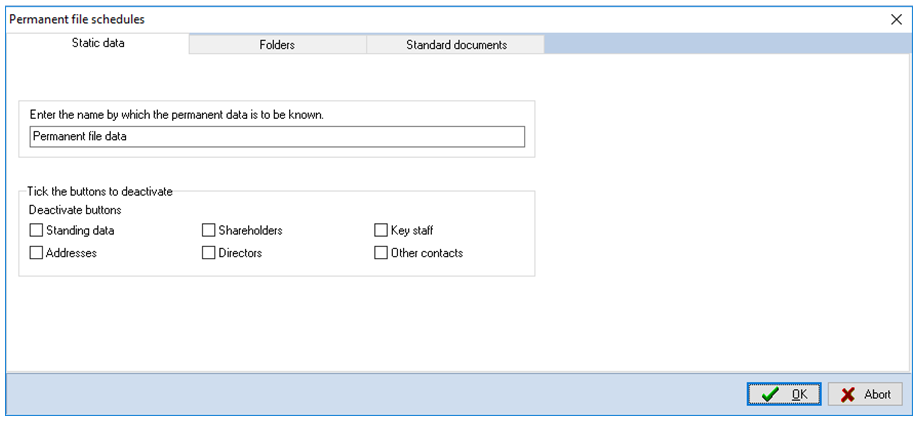
Permanent File Schedules dialog
Static Data Settings
In the Static Data tab you can define the name used for the permanent file data within each master. This name is used as the caption in menu items and buttons, on the Permanent file dialog and on listing. This defaults to “Permanent file data”.
As illustrated previously, the Permanent file data option can consist of six different types of data: Standing data, Addresses, Shareholders, Directors, Key Staff and Other contacts. All of these data types are available by default. To remove any of these options, tick on the appropriate Deactivate button.
Folders
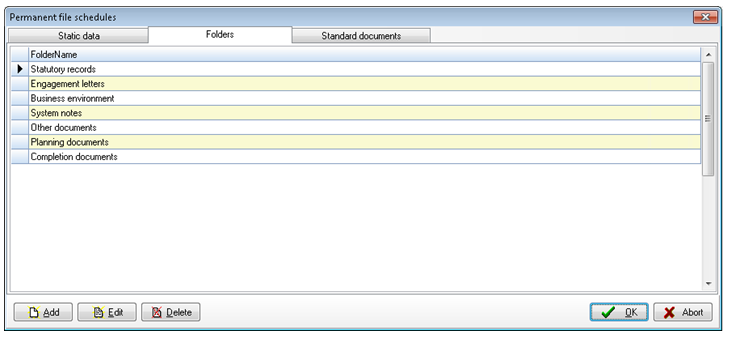
Permanent File Schedules – Folders dialog
Use the Add, Edit and Delete buttons to maintain the standard folders.
Standard documents
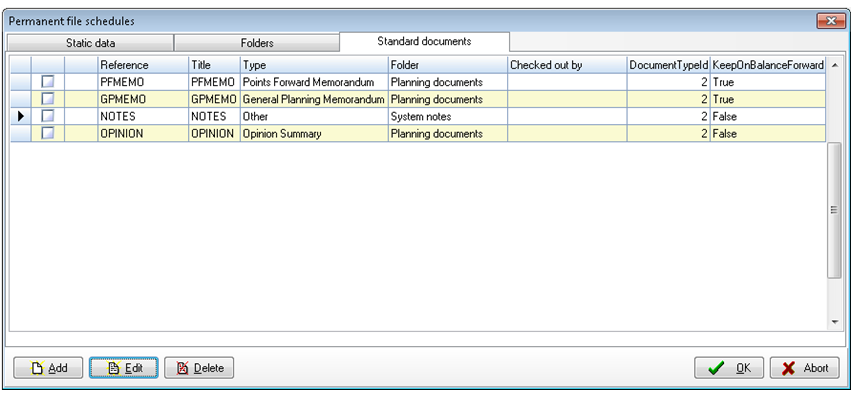
Permanent File Schedules – Standard documents dialog
The third page of the Permanent Schedule options allows the user to define the names of the standard schedules to appear in the permanent file, the name of the template to be used and the folder of the permanent file within which the schedule is to appear.
To add a document click Add. The following dialogue will appear:
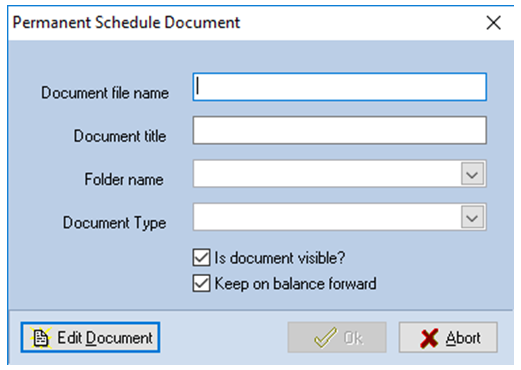
From here you can enter the name and title of a template, select the folder that the document is to appear under and select the document type. Select Edit Document to open the document this will either be offered in the internal word processor dialog or Word, based on the setting in system options. To deactivate the document uncheck the Is document visible? box.
If you include the Points forward memo, the General planning memo or the Opinion summary in the list, you must use the standard template names of:
- PFMEMO
- GPMEMO
- OPINION
This links them to the options on the Audit Automation menu. If you include these but assign different names to the document, these revised names will be used throughout CCH Audit Automation. (Note however, that the active graphic maps are bitmaps and hence the text on these will not change – you will have to redraw them to reflect any changed wording).
Master Settings
The Master audit pack settings dialog is accessed by clicking on the [Master settings] button.
Master audit pack settings dialog
This dialog contains a number of master parameters that control the way the pack operates and prints schedules. The parameters are grouped into four different pages. Any of the options can be changed and changes saved by clicking on the [OK] button. Clicking on the [Cancel] button will close the dialog without saving the changes made.
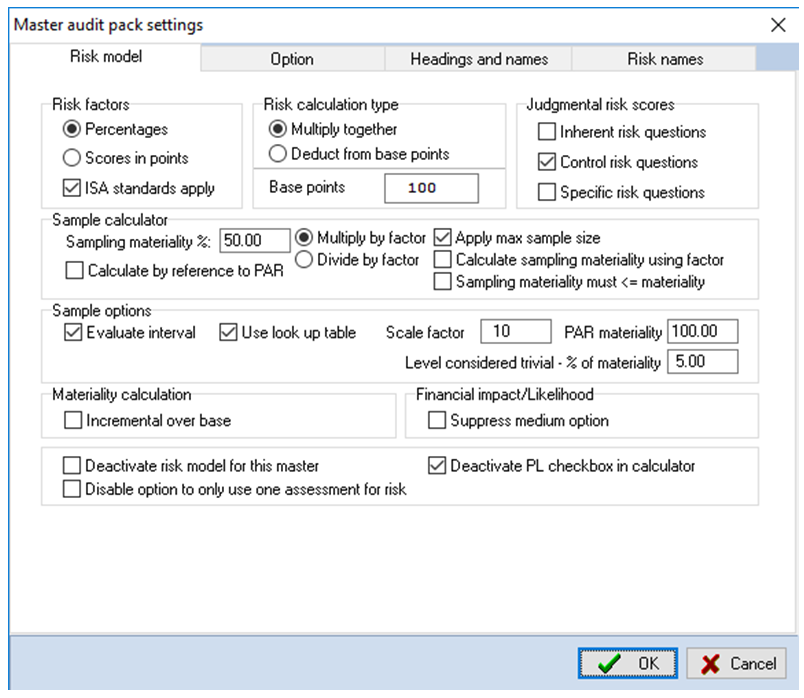
Risk Model Page
The following parameters are included on the Risk Model page.
- Risk factors - Two settings are possible for this item, Percentages or Scores in points. The radio button selected will affect the way in which the risk model calculates total risk. If Percentages is selected, the factors entered in the lookup tables, see page 74, will be divided by 100 before they are used, and the overall result will be multiplied by 100. If Scores in points is selected the figures entered will be used without modification. The Normal model checkbox should always be left ticked for standard external audit packs.
- ISA standard apply - If this option is ticked the system uses the ISA approach to risk analysis. If it is not ticked, Audit Automation operates as it has in the past.
- Risk calculation type - Two settings are possible for this item, Multiply together and Deduct from base points. If the first option is selected, the system will multiply the risk factors together to arrive at total risk, normally used in conjunction with Percentages. If the latter is selected, the risk scores will be deducted from a base risk score to arrive at the total risk, normally used in conjunction with Scores in points.
- Base points - The value shown in the base points edit box is the base from which risk scores are deducted if the calculation type has been set to operate in this way.
- Judgment in risk scores - Some firms operate a judgmental risk model whereby the user can enter the score associated with each question, within upper and lower limits. This allows the model to be less black and white and a scale to be introduced. The three options in this group box indicate whether the system should allow the user to edit the points score after the system set them based on the yes/no answers entered. Different principles can be applied to each of the three risk areas:
- Inherent risk
- Control risk
- Specific risk
Each check box operates independently and if checked the system will allow the user to amend the point score for questions in the area indicated.
- Sample calculator options -
- Apply max sample size – Using the stratification sample calculator, you can specify a maximum sample size to be used in a calculated sample. This option indicates if the system should apply maximum sample sizes.
- Calculate sampling materiality using factor - This allows the tolerable error shown in the sample stratification calculator, calculated by reference to materiality and the area risk factor, to either be Materiality * Factor or Materiality / Factor. Simply select either the “Multiply by factor” or “Divide by factor” option, as required.
- Sampling materiality must <= materiality - If the option is ticked, restrictions will be applied in the stratification calculator that won’t allow the sampling materiality to be less than that of materiality.
- Calculate by reference to PAR - Where sample materiality is calculated as a percentage of PAR materiality and not by reference to audit materiality, there is the facility for this to be built into the pack by ticking this checkbox. Where this is implemented, the user will not be allowed to override the Sampling materiality in the Materiality Override dialog.
- Sample options
- If the check box called Evaluate interval is checked, the system will calculate sample intervals for each audit area based on the interval factor and the materiality base associated with the area. If it is not checked the system will simply report the sample interval factor wherever the sample interval would have been reported.
- If the check box called Use look up table is ticked, the system will arrive at the area risk factor, i.e. the sample interval factor, by taking the calculated risk score and applying it to the look up table. If the checkbox is not ticked, the calculated risk score will be used as the area risk factor and the look up table will be ignored.
- Where the look up table is not being used, you may wish to multiply or divide the calculated risk score by a fixed number to arrive at the risk factor to be used. If you enter a number in the Scale factor edit box, and do not tick the Use look up table checkbox, CCH Audit Automation will use the scale factor. If the item is negative, the system multiplies the residual risk by the factor, however if it is positive, it divides by the factor
- In the PAR Tol Err field, enter the percentage to be applied to materiality to arrive at the working materiality calculated for the preliminary analytical review.
- Materiality calculations - As explained on page 58, the materiality model can use a graduated percentage for the purpose of calculating the base amounts. If the Incremental over base checkbox is ticked, the model used will be to apply the percentage to the difference between the TB figure and the previous band limit and add the result to the minimum for the band. If it is not ticked then the percentage is applied to the whole of the TB figure and used subject to the result being above the minimum level set for the band.
- Deactivate Risk Model for this master - This is used to indicate that the master pack does not require risk assessment i.e. that no risk calculations are required. If this option is ticked, the following happens during completion:
- The menu and tool bar routines called Risk analysis are renamed Materiality. Selecting these will take you directly to the Materiality override dialog.
- The Risk analysis option on the Active Graphic will become inactive.
- The option to Review unanswered risk questions on the Planning menu will become disabled.
- The audit programmes can be initialised or updated at any time as no check is carried out for risk model completeness.
- The 3 items relating to planning in the Planning review dialog are deactivated.
- No risk related pages are printed with the planning section.
- The materiality calculation and override remains active as it is possible that you may wish to calculate materiality even though risk assessment is not relevant.
- Deactivate PL checkbox in calculator - This is used to suppress the P&L checkbox in the stratification calculator.
- Disable option to only use one assessment for risk - Tick this option to suppress the option to carry out one risk assessment for all assertions. In this case the checkbox will not appear in the risk assessment screen, unless risk has already been assessed on the client and one risk assessment was used.
Risk Names Page
The following parameters are included on the Risk names page illustrated below.
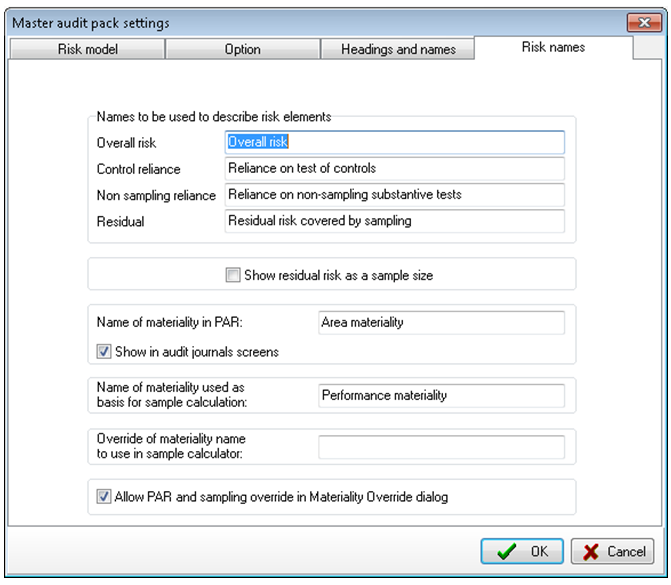
Master audit pack dialog – Risk names page
- Risk element headings - This section provides four edit boxes for you to define the headings for the 2nd to 4th columns of the sample size table, when the ISA model is in use. These columns are used to enter the maximum sample size to be used in a calculated sample via the stratification sample calculator.
- Name of materiality in PAR: - This is the default name of the materiality calculated within the program for PAR. If you wish this to be changed to fit a different methodology, you can change this heading here.
- Show in audit journals screen - This allows you to suppress the appearance of the PAR materiality in the audit journal screen. If you do not wish it to be displayed, remove the tick from the checkbox.
- Override of materiality name to use in sample calculator - If the override field is blank then the Name of materiality used as a basis for sample calculation will be used, otherwise any text entered in this field will be displayed in the calculator.
- Allow PAR and sampling override in Materiality Override dialog - This allows you to block the user from overriding the percentage or absolute values of the PAR and sampling materiality. Remove the tick to block the ability to override these figures.
Headings and Names Page
The following parameters are included on the Headings and names page illustrated below.
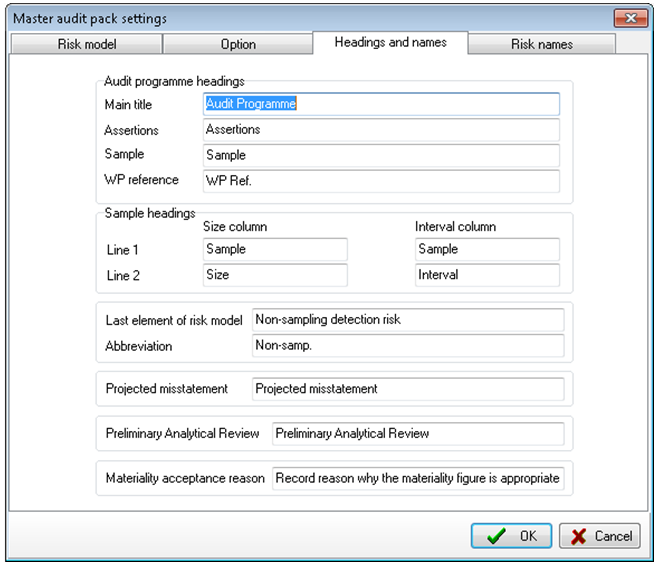
Master audit pack dialog – Headings and names page
- Audit programme column headings - This section provides four edit boxes for you to define the headings that will appear as the main title of the work programmes, the optional assertions column and the two following columns in the audit programme.
- Sample headings - This group contains the two line headings for the sample size column and the sample interval column and is used in screen displays and printed reports wherever these figures are reported.
- Last element of risk model and Abbreviation- These fields are used to defined the name of the last risk item, historically “Non-sampling detection risk”. The name entered in the Last element of risk model field will appear on the screen and in reports as it is entered. The first 2 words will be used on the button in the Audit area risk questions dialog. The Abbreviation is used in column headings on reports and in the Sample size summary dialog.
- Projected misstatement, Preliminary Analytical Review, Materiality acceptance reason – These headings can be changed if desired by using these edit boxes.
Option Page Settings
The following parameters are included on the Option page illustrated below.
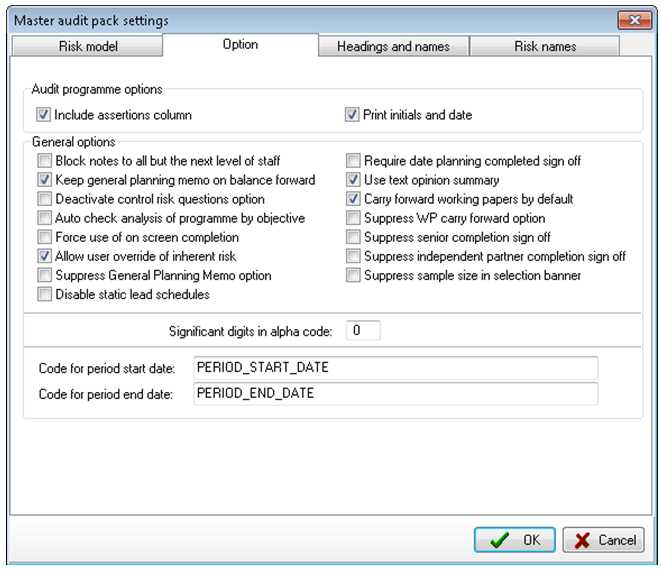
Master audit pack dialog – Option page
- Audit programme options - There are two check boxes in this group box, which operate independently. If Include assertions column is checked the system will include a column in the audit report showing the main audit assertions defined for each test - if it is not checked the column will not be shown and more space will be allocated to the text of the tests. If Print initials and date is checked the system will include on each audit programme the initials of the person who signed off the planning - if it is not checked, the box will be left blank for manual completion.
- Block notes to all but next level of staff - If this checkbox is ticked, Audit Automation will only allow members of staff to direct notes to the next level up. E.g. a senior will only be allowed to enter a note for the attention of a manager but not for a partner.
- Keep general planning memo on balance forward – if this checkbox is ticked, the system will retain the client’s general planning memo when the client is balanced forward from one year to the next. If it is not ticked, the memo will be cleared.
- Deactivate control risk questions – This option allows the suppression of the “Internal control questions” option where these are not appropriate to the pack. Placing a ticking in the checkbox deactivates the Internal control questions radio button in the Client control data dialog.
- Auto check analysis of programme by objective– This is used to suppress the automatic analysis of the audit programme by objectives. By default, the option will be true and the system will check the programme after it has been customised and report if there are any objectives with no tests. It will force you to enter a comment by any such objectives.
If the option is not ticked, the check will not be carried out. If you carry out the analysis using the objectives button, any objective that has no tests will still be shown in red, however, the system will not force you to enter a comment.
- Force use of on screen completion - Tick this option to prevent normal users from being able to remove the tick from the “Force on screen completion” option in the Client control data dialog. System managers will, however, still be able to change this setting for a client.
Note: that this can only take effect after the client has been created. During the creation process, the tick could still be removed by the person creating the client but if the new option is selected, the system will turn it back on as the client is created. Hence with this set all new clients will be created with force on screen turned on.
- Allow user override of inherent risk - to suppress the ability for the user to override inherent risk.
- Suppress General Planning Memo option - tick to wish to show the general planning memo.
- Disable static lead schedules - Tick to turn off the system generated static lead schedules for each section.
- Require date planning completed sign off – If this checkbox is ticked, as it will be by default, the system includes an option on the planning sign off menu to allow the person who has carried out the planning to record the date that planning was completed. The initials of the person who does this appears in the Prepared by box on Audit Automation generated documents. If the option is not ticked, the system will treat the partner sign off as closing planning and opening the completion menu. In this case, canceling the date planning completed will also cancel the partner sign off, and the Prepared by for printed documents will be the lowest sign off presented on the planning menu.
- Use text opinion summary – This option allows you to choose if the opinion summary is presented to the user as a text document or as a third note type. If the option is ticked, the system will display a text document in either Word or the internal word processor when the opinion summary is selected. If it is not ticked, they will be presented with the Notes dialog with the Opinion notes radio button selected and any outstanding opinion notes listed. In this mode, the system will include a third radio button showing Opinion notes in all dialogs where the type of note can be selected or changed.
- Carry forward working papers by default – Is used to indicate if working papers created for the current year’s audit file are to be set to carry forward by default. This has no effect on permanent file WP which will always be set to carry forward when they are created.
- Suppress WP carry forward option – this is used to suppress the option to carry forward working papers on a balance forward.
- Suppress senior completion sign off – tick this to remove the requirement for the senior to sign off the audit from the completion menu.
- Suppress independent partner completion sign off – tick this to remove the requirement for the independent partner sign off from the completion menu.
- Suppress sample size in selection banner – tick this to suppress substantive size and interval in the Test selection information banner.
- Significant digits in alpha code – This identifies the number of significant digits to use from a third party code when importing the trial balance. This allows the system to accumulate data from, say sub accounts, into a main account. Leave the number as 0 to use the whole code.The length of the alpha code in the Nominal account edit dialog matches the number of significant digits set for the master pack.
- Code for period start date/Code for period end date – These fields identify the codes to be used to identify the period start date and period end date in condition statements.