Lead Schedules - List Imported Balances

A new code has been added to lead schedules definition to allow you to list the details of imported transactions to be listed. The code takes the following format:
^999/I^
The code should be used in a text line containing no other text. It will result in the printing of multiple lines of output, the number of which will depend on the number of entries imported to the account. The output takes the format:
Value Description
##,###,### Description of entry 1
##,###,### Description of entry 2
Etc.
The code can be used in repeat loops. For example, the following definition:

will produce:

Editing a report definition
To edit a report definition, select the report to be edited and click on [Edit]. The Report definition dialog will be displayed completed with the information for the highlighted report. You are free to edit any of the information shown and save it by clicking on [OK]. If you click on [Cancel] any changes that you have made will be discarded.
Printing a report definition
To print a definition, load the report definition for editing, as described above, and click on the [Print] button, the button displaying a picture of a printer. You will be asked to confirm that you wish to print a copy of the form before it is printed. If you confirm that you wish the form printed, a copy of the dialog box will be printed to the default printer.
Copying a report
You may copy the report, both definition and format, by using the [Copy] button. To copy a report, highlight the report and click on [Copy]. A copy of the report will be placed on an internal clipboard and may now be pasted to another report number in the same audit area, or to another audit area.
Pasting a report
You may paste a report that has been copied to the clipboard to any audit area within the same client. Select the audit area and click on [Lead schedules] so that the Working papers dialog is displayed and click on [Paste]. The system will ask you to enter the number under which to store the report and when you click on [OK] will add it to the list of available reports. If you click on [Cancel] the process will be aborted. Whatever action you take, the report will remain on the clipboard and may be copied to other report numbers and audit areas.
Deleting a report
You may delete a report by highlighting it and clicking on [Delete]. Audit Automation will ask you to confirm that you wish to delete the report before carrying out your instructions.
Edit report format
Once a report definition has been created, you must edit the report format to tell the system what information you wish included in the body of the report. To do this, highlight the report in the Lead schedules dialog and click on [Edit details]. The Report format dialog will appear in which will be shown the existing format of the report, if any.

Report format dialog
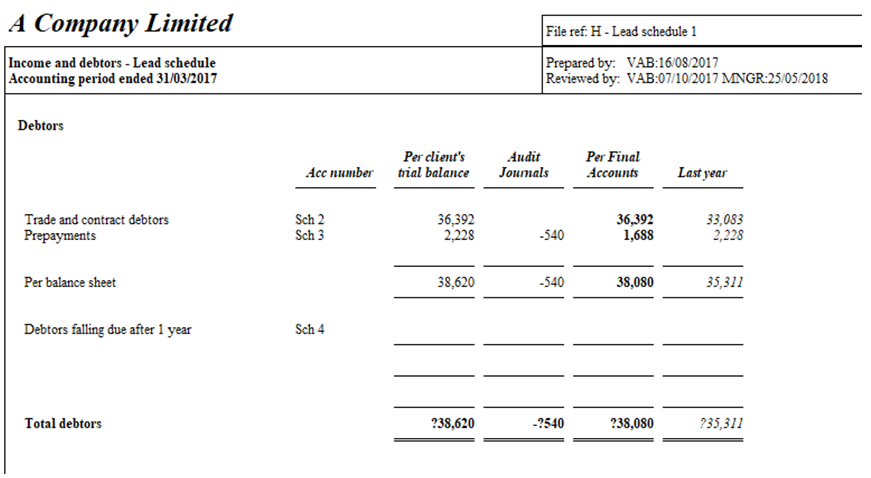
This dialog displays a schematic representation of the report showing the commands that make up the body of the report and the bold and italic formatting in force. From this it is easy to visualise what the final report will look like. The above is an example of the Trade debtors lead schedule, and the following is the report it created presented for viewing from within client reports.
When a report is first created it will only contain one blank line. To define the contents of the report you insert one line at a time indicating the nature of the line and providing any data required for the system to compile the line at print time.
Each line may contain either a line that results in something being printed, for example a heading or a data line, or an instruction to the system to carry out a command that does not directly result in something being printed, for example a test or an instruction to repeat a block of lines. Lines that contain instructions are displayed in grey, although this can be changed.
Inserting a new line
To insert a line, highlight the line where you wish the new item to be inserted, and click on [Insert], the New report line dialog will be displayed listing the possible items that you may insert, in the form of a series of radio buttons.

New report line dialog
Select the type of line to insert and click on [OK] - if you click on [Cancel] the dialog will be closed and no new line inserted.
If you insert a Blank line or an End if, the dialog will close and a blank line or end if item will be inserted, if you select any other item a dialog box will be opened appropriate to the item selected to enable you to enter the information relevant to the item. The following is a description of each dialog and the data it contains.
Headings

Report format column headings dialog
This dialog allows you to enter up to three lines of text to be used to head each of the columns defined for the report. The system will only display edit boxes for the number of columns that have been defined.
Enter the headings to be used, each line will be centered over the defined column width when printed, and that single line heading to be used for the reference column, if any.
The formatting of the headings can either be normal, both the Bold and the Italics check boxes are unchecked, or bold, italics or both. Check the desired format check boxes and click on [OK] to close the dialog and return to the Report format dialog. The new heading will be inserted, formatted as requested.
As will be seen, the caption to the left of the report line shows the data type for the item. A heading produces three lines on the report and the captions for these will be “Head”, H2 and H3. To edit, delete or insert a line above the heading, you must select the line which defines the item, the “Head” line in this case, as the two following lines are simply display lines produced by the instruction line.
Data line
A data line allows you to define a line of data drawn from the TB, and other sources, to appear in the defined columns.

Report format data line dialog
The following is an explanation of each element of a data line:
- Narrative - Enter here the text of the narrative to appear beside the data. When printed, the narrative will wrap to fit in the available space, even though it may be truncated on the schematic display. The narrative may be up to 50 characters long and can contain embedded control codes, see below for an explanation of these codes.
- Reference - The reference will appear in the reference column. It may be up to 20 characters and can contain embedded control codes.
- Column data - The dialog will include an edit box for each column defined in the report. This field allows you to enter the data that you wish to appear in each column, which can either be nominal account data, variables or classification data. The edit box allows up to 20 characters to be entered for each column. Each column can contain different data, but if all columns are to contain the same data you only need enter this in the first column and leave the rest blank - the system will then repeat the data in the blank columns as any blank column will assume the data of the previous column. The data that can be included is set out in the following table:
|
Data |
Nature of data |
|
9999 |
A single nominal account (9999 may be any number from 1 to 65,535 and does not have to padded with 0s) |
|
9999+9999[+9999].... |
A series of individual accounts |
|
9999:9999 |
A range of accounts, all accounts in the range will be considered for inclusion. |
|
VARAAAA! |
A variable. If AAAA is a single letter the reference will be to a runtime variable, if it is more than one letter it will be to a global system variable. |
|
EQUAAAA/9! |
The results of a specified equation for a specified year. AAAA is the code of the equation and 9 the year, 0 = current year to 9 = 9 years ago. |
|
Classification |
A classification, e.g. STK for stock. |
If the data line appears within a repeat loop, see below, all references to nominal accounts or runtime variables will be incremented by the repeat increment for each iteration of the loop.
- Restrictions - If no restriction is applied the system will include all data defined for each column irrespective of the contents of the data. If, however, a debit only or credit only restriction has been selected, the system will consider each item of data for inclusion and only include it if it matches that requested.
- Formatting - The data line will appear formatted in accordance with column formatting unless line formatting is selected by either the Bold and/or Italics check boxes being checked. If either, or both, are checked the whole line will appear in the selected format, overriding any column formatting.
- If the narrative contains a reference to the nominal account description, account number or account code, using the embedded control codes ^@...^, ^#...^ or ^*...^ as described below, when the line is compiled the system will only print the line if one or more columns contain non- zero figures.
Account list
An account list allows you to define multiple accounts, or ranges of accounts, that are to be listed on the face of the lead schedule. This therefore operates in a similar way to the data line, but lists the accounts rather than adding them together to produce a single figure.
The details for the accounts are entered using the same dialog as for a data line, shown above, but the only edit fields that you can change are: Reference, Column 1 data and the restrictions. The description appears as “Account name” and the data entered in column 1 is repeated for the other active columns.
The multiple accounts or ranges of accounts are all identified in the Column 1 data field. Each account or range must be separated by a space e.g. “100 150 250:300” would be a valid entry.
Sub total and Grand total
The sub total and the grand total share the same dialog box. They simply result in the default options being set as appropriate.
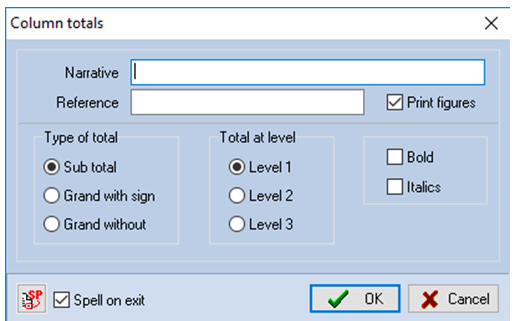
Column totals dialog
The system maintains three levels of running balance for each column of data and these may be sub totaled or totaled at will. Level 1 is the lowest level and level 3 is the highest. Totaling a level clears the running total for that level and all lower levels. A grand total will result in the figure printed being preceded by a money sign and a double line being printed to rule off the column, whereas a sub total will print the figure without a money sign and only rule off with a single line.
- Narrative - Enter here the text of the narrative to appear beside the data. When printed, the narrative will wrap to fit in the available space, even though it may be truncated on the schematic display. The narrative may be up to 50 characters long and can contain embedded control codes, see below for an explanation of these codes.
- Reference - The reference will appear in the reference column. It may be up to 20 characters and can contain embedded control codes.
- Print figures - Id this check box is checked the system will print the total figures otherwise it will simply clear the running totals and rule off the column with a single or double line.
- Type of total - Select either Sub total, Grand with sign to produce a total with a currency symbol in front of the amount, or Grand without to produce a total with no currency sign.
- Total at level – Select the level to be printed and cleared.
- Bold / Italics – The totals will appear formatted in accordance with column formatting unless line formatting is selected by either the Bold and/or Italics check boxes being checked. If either, or both, are checked the whole line will appear in the selected format overriding any column formatting.
- Note: Where columns are calculated purely by column arithmetic, e.g. B1 % B2, the system recalculates the column totals using the column arithmetic so that the totals contain meaningful data (rather than simply totalling the column values).
Text line
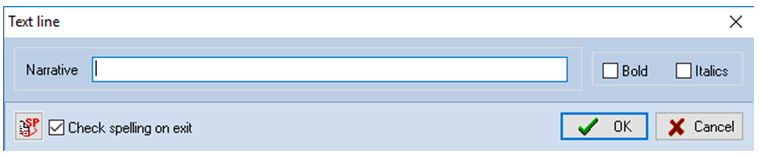
Text line dialog
This will result in a single line of text being produced, up to 254 characters, no word wrapping takes place.
- Narrative – Enter here the text of the narrative to be printed. The narrative may contain embedded control codes, see below for an explanation of these codes.
- Bold / Italics – The line is printed in normal format unless line formatting is selected by either the Bold and/or Italics check boxes being checked. If either, or both, are checked the whole line will appear in the selected format.
Paragraph
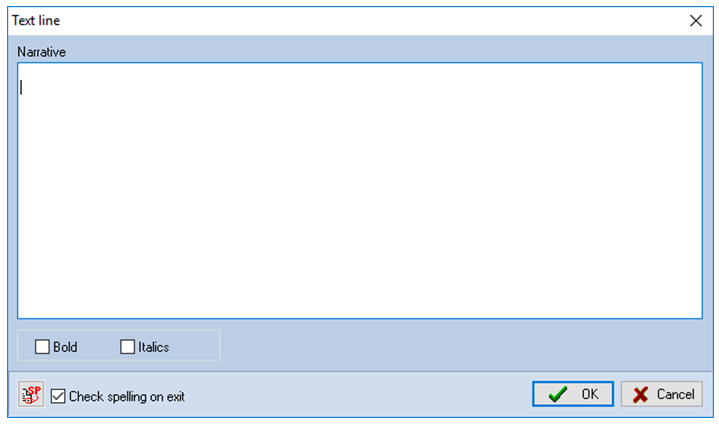
This will result in a block of text being printed. The text will be word wrapped to fit on the report, taking up the full width available.
- Narrative – Enter here the text of the paragraph to be printed, although it is called a paragraph there is no limit to the amount of text that is entered and it may be split over more than one actual paragraph. The narrative may contain embedded control codes, see below for an explanation of these codes.
- Bold / Italics – The paragraph is printed in normal format unless line formatting is selected by either the Bold and/or Italics check boxes being checked. If either, or both, are checked the whole paragraph will appear in the selected format.
If test

If tests are used to include, or exclude, blocks of report lines based on the test defined. Each If test must be accompanying End if, and tests cannot be nested.
- If – This field contains the expression to be tested. The expression can include reference to account codes, classifications, variables and constants and takes the same form as that for a variable assignment, see Variable calculation below.
- Test – The test may be one of the following:
= Equals
<> Is not equal to
> Is greater than
< Is less than
>= Is greater than or equal to
<= Is less than or equal to
- Test against – This field contains the expression to be tested against. The expression can include reference to account codes, classifications, variables and constants and takes the same form as that for a variable assignment, see Variable calculation below.
Audit Automation will evaluate both expressions and then carry out the comparison based on the test selected. If the test passes, processing will move on to the next line of the report, however, if the test fails, the system will scan down the report for the next End if, skipping all lines in-between and processing will continue from the line following the End if found.
Repeat

The repeat instruction allows you to repeat a specified number of report lines for a given number of iterations, increasing references to account numbers and runtime variables by a set amount.
- Number of lines – This field holds the number of report lines to be repeated on each iteration. The reference is to the lines immediately following the repeat instruction.
- Number of repeats – This field holds the number of iterations to carry out.
- Increment to add each time – This field contains the value to add to the account and variable reference on each iteration.
As an example, if the repeat was set to the following:
Number of lines 1
Number of repeats 3
Increment to add 2
and the line following the repeat instruction contained a data instruction printing account number 1, the instruction to print would be repeated 3 times printing accounts 1, 3 and 5.
Variable calculation
The system can store up to 26 run time variables, called A to Z, and these may be recalculated at any point within the report. These variables can be printed, by making direct reference to them in a data line, included in tests and in column arithmetic.

- Variable letter – This field contains the letter identifying the variable to be calculated and can be any letter from A to Z or number from 0 to 9.
- Formula – The formula can be up to 254 characters long is an expression made up of Operands and Operators:
Operand [Operator Operand [Operator Operand].........]
I.e. you may have a single data type defined, the operand, or any number of data types combined in a calculated result which is then assigned to the variable.
The allowable entries for the operand are as follows:
|
Operand |
Nature of operand |
|
9999/X |
A single nominal account (9999 may be any number from 1 to 65,535 and does not have to padded with 0s) of data type defined by “X”. “X” may be one of the following: · Current year client TB, to · TB of 9 years ago A Total of adjusting journals C Current year after adjusting journals R Total of reclassification journals T Current year after all journals J Total of all journals U Total of unadjusted errors |
|
9999/X:9999/X |
A range of accounts of data type defined by “X”, “X” may be as defined above. All accounts in the range will be considered for inclusion. The second data type is ignored as the first data type defines the nature of the range, but it has to be included for completeness. |
|
VARAAAA! |
A variable. If AAAA is a single letter the reference will be to a runtime variable, if it is more than one letter it will be to a global system variable. |
|
(9999) |
A constant figure. “9999” can be any valid number and could, for example, be used to produce reports in ‘000 by dividing data by (1000). |
|
Classification/XY |
A classification of the type defined by “X” and the category defined by “Y”. “X” may be one of the following: · Original client TB balance A Total of adjusting journals C Current year after adjusting journals R Total of reclassification journals T Current year after all journals J Total of all journals U Total of unadjusted errors and “Y” may be one of the following: · Total for category B Brought forward A Additions D Disposals R Revaluations P Profit and loss account items M Movements · Other items For example, STK/J- refers to the total of all journals to stock. |
The allowable entries for operators are set out in the following table:
|
Operator |
Nature of operator |
|
+ |
Add the next operand to the accumulator |
|
- |
Deduct the next operand from the accumulator |
|
* |
Multiply the accumulator by the next operand |
|
/ |
Divide the accumulator by the next operand |
|
% |
Express the accumulator as a percentage of the next operand |
· Restriction – If no restriction is applied the system will include all data defined for each operand irrespective of the contents of the data. If, however, a debit only or credit only restriction has been selected, the system will consider each item of data for inclusion and only include it if it matches that requested.
Embedded control codes
Embedded control codes appear in narratives surrounded by circumflex, and in most cases, are replaced by data, at print time, drawn from the client and the TB. There is one exception to this and that is the code for setting the number of decimal places to print. The following table sets out the codes which are available:
|
Code |
Result |
|
D9 |
Set the number of decimal places to be printed for this report from this point on. 9 may be from 0 to 4. |
|
DSY |
Today’s date |
|
DYT |
Date of client year end for the current audit year |
|
YTY |
Year of the client year end for the current audit year |
|
YLY |
Year of the client year end for the previous audit year |
|
D~9 |
Date of the period end relative to the current period end. 9 is the number of periods back whose date is to be inserted, 0 = this period, 1 = 1 period ago, etc. The date is printed in the format dd/mm/yyyy. |
|
Y~9 |
Year of the period end relative to the current period end. 9 is the number of periods back whose date is to be inserted, 0 = this period, 1 = 1 period ago, etc. The year is printed in the format yyyy. |
|
@9999 |
The description of account number 9999. 9999 may be any number from 1 to 65,535 and does not have to be padded with 0s. If the line appears in a repeat loop, the account reference is incremented accordingly. |
|
#9999 |
The account number of account 9999. 9999 may be any number from 1 to 65,535 and does not have to be padded with 0s. If the line appears in a repeat loop, the account reference is incremented accordingly. |
|
*9999 |
The alpha code of account number 9999. 9999 may be any number from 1 to 65,535 and does not have to be padded with 0s. If the line appears in a repeat loop, the account reference is incremented accordingly. |
|
9999/B |
A list of the numbers of all adjusting journals made to account 9999. 9999 may be any number from 1 to 65,535 and does not have to be padded with 0s. If the line appears in a repeat loop, the account reference is incremented accordingly. |
|
9999/S |
A list of the numbers of all reclassification journals made to account 9999. 9999 may be any number from 1 to 65,535 and does not have to be padded with 0s. If the line appears in a repeat loop, the account reference is incremented accordingly. |
|
9999/N |
A list of the numbers of all journals made to account 9999. 9999 may be any number from 1 to 65,535 and does not have to be padded with 0s. If the line appears in a repeat loop, the account reference is incremented accordingly. |
|
9999/X |
A full print of all adjusting journals made to account 9999. 9999 may be any number from 1 to 65,535 and does not have to be padded with 0s. If the line appears in a repeat loop, the account reference is incremented accordingly. This code is only for use in a Text line and should appear on its own. It will result in a headed list of the full details, including narrative, of the journals specified and will use as many lines as required to produce the list. |
|
9999/U |
A full print of all reclassification journals made to account 9999. 9999 may be any number from 1 to 65,535 and does not have to be padded with 0s. If the line appears in a repeat loop, the account reference is incremented accordingly. This code is only for use in a Text line and should appear on its own. It will result in a headed list of the full details, including narrative, of the journals specified and will use as many lines as required to produce the list. |
|
9999/D |
A full print of all journals made to account 9999. 9999 may be any number from 1 to 65,535 and does not have to be padded with 0s. If the line appears in a repeat loop, the account reference is incremented accordingly. This code is only for use in a Text line and should appear on its own. It will result in a headed list of the full details, including narrative, of all journals and will use as many lines as required to produce the list. |
|
T99/#### |
Prefixing any of the above journal list codes with T, followed by the TB number and an “/” will restrict the list to journals of the specified type for the TB quoted. |
As indicated, placing ^9999/D^, ^9999/U^ or ^9999/X^ in a text line causes the system to print a number of lines of data for each journal made to the account, in the format:
Type Journal Number Account number Amount Narrative
and hence no other codes or text should appear in a text line containing this code.
The relative period end codes can also be used within nominal account names. These take the form ^Y~9^ and ^D~9^, and can appear anywhere in the account name. The 9 is replaced by a number from 0 to 9 and the codes are expanded wherever the name is displayed or printed as a relative reference to the year in question. For example, if the current year is 31 December 2001 “^Y~0^” will produce “2001” and “^Y~1^” produces “2000”, while “^D~0^” will produce “31 December 2001” and “^D~1^” produces “31 December 2000”. These codes allow you to automate the varying of dates where the business needs to segregate different years data, e.g. Underwriters, without the need to change account descriptions each year.
Copying and pasting lines
Single or multiple lines of a lead schedule definition can be copied and pasted within a report definition. These options are provided on a pop-up menu that appears when you click the right mouse button.

- To copy a single line, highlight the line, right mouse click and click on Copy line. Highlight the line where the copied line is to be inserted and click on the right mouse button and then on Paste.
- To copy multiple lines, highlight the first line to be included, right mouse click and select Copy multiple lines. The message “Select last line to include in copy” will appear at the foot of the dialog. Point to the last line to include and press the left mouse button. Now highlight the line where the copied lines are to be inserted and click on the right mouse button and select Paste.
We suggest that you work through some of the formats provided with the CCH masters to gain an understanding of how they have been constructed.
Printing a report format
The report format may be printed by loading it for edit and clicking on the [Print] button. The [Print] button is the small button containing a picture of a printer.