Audit Areas

The system stores the following information for up to 99 audit areas:
- Control data
- Specific risk questions
- Control risk questions
- Audit programmes
- Checklists – annual and perennial
- Lead schedules
- Working paper index
- Objectives
- Conclusions
- Default Conclusions
- Information Links
This data is used to determine if an audit area is relevant to a client and, if it is, the area specific data.To edit the information for each audit area, select the master pack for editing and choose the Audit areas option in the Master options list.

Audit areas dialog
This dialog contains a list of the audit areas that are currently defined and a series of buttons representing the options that are available to you.
The top group of buttons allow you to add, edit or delete audit areas from the list, the middle group of buttons provide for the editing of the area control data and risk questions and the third group of buttons allow you to define the audit pack documentation for the area.
Adding an audit area
To add an audit area, click on the [Add] button and the Audit area name dialog will appear.
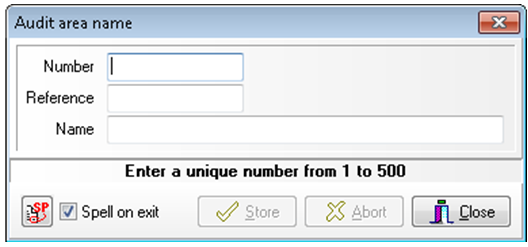
Audit area name dialog
Enter the number for the new area, from 1 to 99, the working paper reference for the section in the annual audit file and the name to identify it, which may be up to 50 characters. Click on [Store] to save the area and clear the contents of the dialog to allow you to enter another new area. When you have finished adding entries, click on [Close]. The [Abort] button is provided to allow you to clear the contents of the dialog if you have started to make an entry but decide that you do not wish to proceed with it.
Each record area is identified by a number from 1 to 99 and two areas may not have the same number.
When you close the dialog the system will return to the Audit areas dialog and the new entries will be included in the list of areas.
Editing the name or reference of an audit area
To edit the reference or name of an area, either double click on the name of the area in the list, or select it and click on [Edit] in the top group of buttons. The Audit area name dialog will be displayed presenting the name for edit. You may edit the name and the reference and click on [Store] to save your changes, clicking on [Abort] will clear the form without recording any changes that you may have made.
It is not possible to edit the number associated with an area, once a number has been allocated it cannot be changed.
Deleting an audit area
To delete an area, select the area in the list and click on [Delete] in the top group of buttons. The system will request that you confirm your actions before deleting the entry.
Please note that deleting an area only deletes the area record and associated control data, see below for details of the control data, it does not delete the underlying risk questions and audit pack definition. If you delete an area that contains questions and audit pack schedules, and later reuse the number of the audit area, the original information will reappear linked to the new area. If you wish to remove both underlying data and the area you must therefore first delete the questions and pack definitions then the area itself.
Partner review area
Audit Automation provides the concept of a “Partner” area in the audit file. Simply including “Partner” somewhere in the title of the area identifies this. Where such an area exists, the system will exclude this for the purpose of checking completeness when the senior and manager sign off the audit file. Any programmes and checklists in this area can therefore be incomplete and will not stop the senior and manager signing off the audit from the Completion menu.
When the partner selects the partner sign off from the Completion menu, if there is a partner area, the system will open the Audit document completion dialog with the partner section selected. The partner may then complete the programmes and checklists in the area and sign off the area. Note that you should only have a partner sign off for this area. When the partner signs off the area, the system will carry out the partner sign off of the file as a whole and close the completion dialog. The partner will only be able to sign off the area if all programmes and checklists have been signed off, and there are no notes outstanding. The partner does not have to do this from the menu, they can go directly to the completion dialog if they prefer.
If there is no partner area defined, the partner has to sign off the pack from the Completion menu.
Second Partner Review
A condition item can been added to an area in the master pack to require a second partner review. It takes the form “*=Y” or “*=N” and tests to see if a second partner review is required for the client. Conditions are described on page 87.
Audit area control data
Each audit area is driven by key control information. This is accessed by highlighting the area in the list and clicking on [Control data]. On doing this, the Control data dialog will appear.
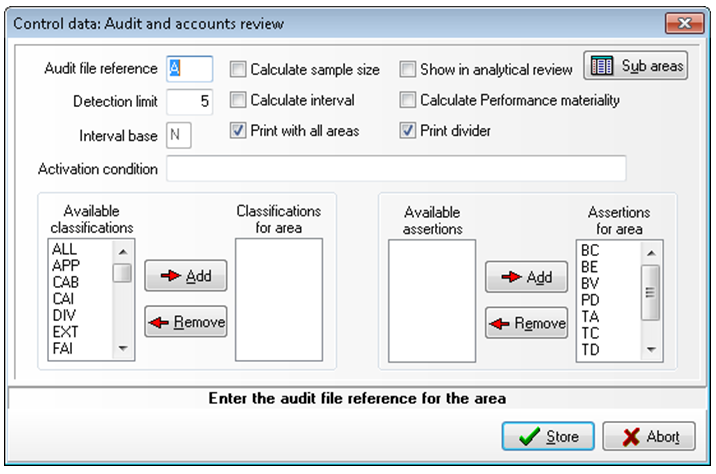
Control data dialog
Using this dialog you may edit each of the key options relating to an area, which are as follows:
- Audit file reference - This is the reference given to the audit area in the annual audit file. It may be up to 3 characters and can be edited here or via the Audit area name dialog described above. The references may be alphanumeric and can appear in any order. The audit pack is printed in area number order and if this does not represent a logical order when making reference to the area references, the pages may require resorting after printing.
- Detection limit - This is the upper limit for the amount of reliance that can be placed on non-sampling detection methods. Entering 5 informs the system that no reliance may be placed on these auditing methods and the user will not be able to enter anything other than 5 if he accesses the User entered reliance dialog for the audit area. Entering, say, 2 will restrict the user to entering from 2 through to 5 as the reliance level when the question is asked during risk analysis.
- Interval base - Where a sample interval is to be calculated, enter a number from 1-4 representing the materiality base to use in the calculation.
- Calculate sample size - If you wish the system to calculate a sample size for this section of the audit make sure that the check box is checked. Leaving it unchecked will inform the system that no sample size calculation is required.
- Calculate interval - If you wish the system to calculate a sample interval, or a sample factor, for this section of the audit make sure that the check box is checked. Leaving it unchecked will inform the system that no sample interval factor calculation is required.
- Print with all areas - If this box is checked the system will include the audit programmes, checklists and working papers when the options are selected to print the schedules for all audit areas. If the box is not checked the system will not include the area in the all areas print, and the user must select the option to print the schedules for the area on an individual basis. The object of this option is to allow the user to print selected checklists and working papers when planning the audit, e.g. ratio analysis and planning checklists, and for them not to be replicated when a request is made to print the pack as a whole. In addition, it is often desirable to print the full pack without the accounts disclosure checklists and this section may therefore also marked to only be printed when selected.
- Print divider - If this box is checked a divider is printed for the area when the option to print dividers for all sections is selected. The purpose of this option is to suppress the printing of dividers for areas which are created for convenience, e.g. a holding area for accounts disclosure checklists, or where an audit area has been split into two to allow different risk criteria to be applied to sections thereof, and a divider is therefore not required for the audit pack.
- Show in analytical review – If this is ticked, the audit area will be included in the preliminary analytical review routine.
- Calculate performance materiality – If this is ticked, Audit Automation will calculate and show the level of the tolerable error (working materiality) in the preliminary analytical review for the areas.
Sub analysis in Preliminary Analytical Review
By selecting Sub areas the master pack author can add sub analysis to audit areas in the preliminary analytical review. Any such sub areas will appear in all clients attached a master where they have been defined.
To add or edit sub areas, select the [Sub area] button and the following dialog will appear.

From here you can add, edit or delete sub areas.
Adding a sub area
To add a sub area, click on [Add] and the following dialog will appear.
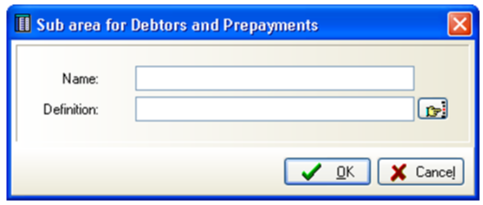
Enter the name of the sub area and the definition of how it will be calculated. The definition follows the same format as that for user added sub areas and can be a mixture of classifications, single accounts and account ranges.
To include classifications simply enter the classification code, account numbers can either be entered singularly or as a range, e.g. 700:709. Any number of elements can be entered separated by “+”. The pick list to the right of the field allows you to select classification code and account numbers from a pick list.
After entering the data, click on [OK].
Editing a sub area
To edit a sub area, select an existing sub area form the list and click on [Edit]. The above dialog will be displayed populated with the existing data and you are free to edit either field before clicking on [OK] to save your changes.
Deleting a sub area
To remove a sub area, select it in the list and click on [Delete]. The system will ask you to confirm your instructions before removing the entry from the list.
When you access the PAR in the client’s audit pack any sub analysis areas that have been defined at master pack level will appear with the  icon by the sub area name.
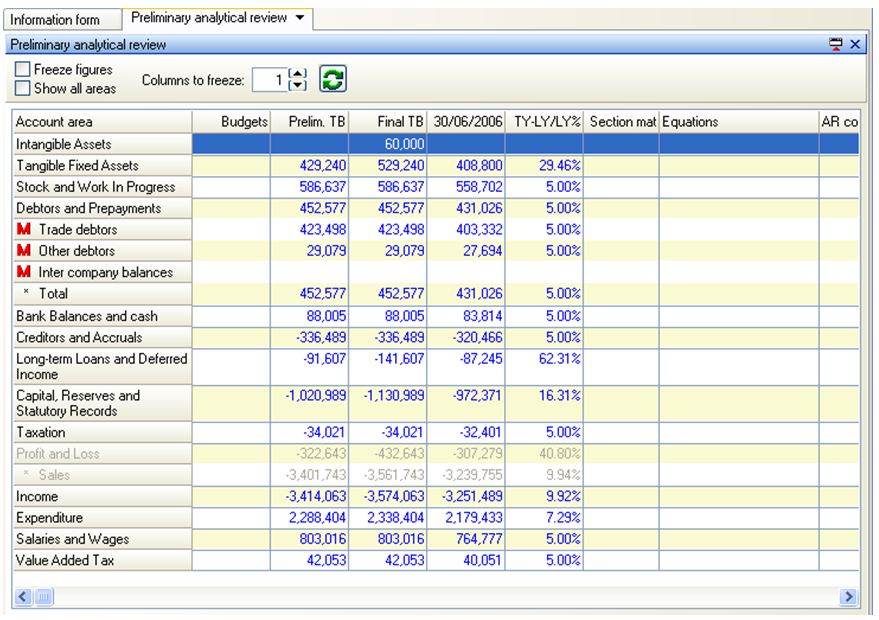
In this example, the master pack contained 3 sub areas analysing Debtors and Prepayments into its associate parts.
When you first attach a client to a new master pack where sub areas have been defined, they will appear in the client even if you have previously defined your own sub areas in the client’s data. This could result in duplication if you have previously defined a sub area that is now included in the master pack. If this occurs, you can remove the client level sub area, you will not be able to remove the master defined sub level.
Although you cannot remove the master level sub areas, you can edit them. If you select a master sub area and click on [Edit], the system will display the edit dialog and you are free to change any of the data shown, in the same way that you can for client sub areas.
Activation Condition
The system uses the Activation condition to determine whether or not to activate the audit area for the client e.g. an area can be activated on a tailoring question answer, or an inherent risk answer, etc.
When the cursor enters the Condition field, the Conditions to test dialog appears automatically. This dialog allows you to either manually type in the condition, or use the [Select item] button to select the items to include from a pick list. The system verifies the validity of the condition entered and provides an English description of the condition entered.
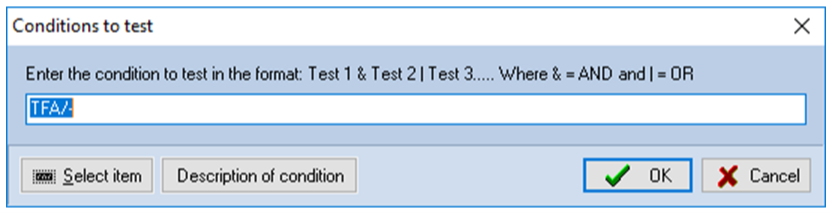
Condition Item Selection
To select an item to include in the condition, position the cursor where the item is to appear and click on [Select item], or press the right mouse button. A pop-up menu will appear listing the conditions that are available to make up a test.
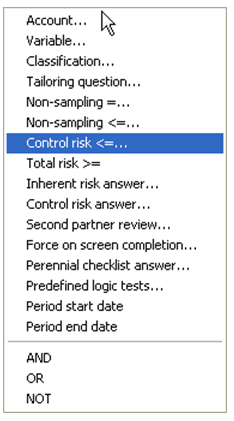
Selecting some of the options will result in the display of a subsidiary dialog requesting further information, others will be entered without the need for further data.
Notice the AND, OR and NOT items in the list. These allow you to define complex conditions. The NOT option reverses the condition that follows it, i.e. NOT PCLSMALL=Yes means if you have answered anything other than Yes, i.e. it is the same as PCLSMALL <> Yes.
After you have entered the details, click on [Store] and the record will be stored and the dialog cleared to allow you to enter another item. To clear the dialog without storing the entry, click on [Abort]. When you have finished making new entries, click on [Close].
The following different conditions can be selected from the pop-up menu:
|
Condition |
Nature of condition |
|
|
Account |
Account_Number=? |
Where Account Number is an account number and ? may be any of the options listed above. The balance tested is that for the current year after any audit journals. |
|
Variable |
VARAAA=? |
Where AAA is the name of the variable and ? may be one of the following: A Active, i.e. non zero D Debit balance C Credit balance Z Zero |
|
Classification |
Classification/X |
Test the contents of a classification/category, where X may be: - Total for class B Brought forward A Additions D Disposals R Revaluations P Profit and loss account items M Movements O Other items If the specified classification/category is not zero the test succeeds. The figure tested is that after all journal entries. |
|
Tailoring Question |
#66/99=? |
Test the answer to a question in the books and records section, where 66=the section number and 99=the question number. Please note that both numbers must be given as two digits so numbers under 10 must have a preceding “0”. In this case the ? may be either Y or N. |
|
Non-sampling = |
!9 |
Test the level of the non sampling detection reliance for the area and if it is equal to the number following the "!" the test succeeds. |
|
Non-sampling <= |
{9 |
Test the level of the non sampling detection reliance for the area and if it is less than or equal to the number following the "{" the test succeeds. |
|
Control risk < = |
?9 |
Test the level of control reliance for the area and if it is equal to or higher than the number following the "?" the test succeeds. |
|
Total risk > = |
$999.99 |
Test the level of calculated audit risk for the audit area. This may either be the calculated percentage or points score, based on the way that the model is structured. If the percentage or score exceeds the level shown then the test succeeds. |
|
Inherent risk answer |
@66/99=? |
Test the answer to a question in the inherent risk checklist, where 66=the section number and 99=the question number. Please note that both numbers must be given as two digits so numbers under 10 must have a preceding “0”. In this case the ? may be either Y or N. |
|
Control risk answer |
%99=? |
Test the answer to a question in the control risk checklist, where 99=the question number. Please note that the number must be given as two digits so numbers under 10 must have a preceding “0”. In this case the ? may be either Y or N. |
|
Second partner review |
*=? |
Tests to see if a second partner review is required for the client. It takes the form “*=Y” or “*=N”. |
|
Force on completion |
^=? |
Include or exclude a whole programme or checklist, or an individual test or question, based on whether or not Force on screen completion is set for the client. It takes the form: ^=Y True if force on screen is switched on, false if it is not ^=N True if force on screen is off and false if it is on. This condition therefore allows you to exclude tests and questions which are not relevant if you are completing the pack on screen, but would be relevant if the pack were being printed and completed manually. |
|
Perennial checklist answer |
PCLQQQ=? |
Each perennial checklist question can be given an identifier and you can enter a condition that will be dependent on the answer provided during completion. It takes the form PCL followed by the question identifier (QQQ) and the test to carry out (=?), e.g. PCLQ1030=Y, where Q1030 is the question identifier. You can select the perennial checklist question id by drilling down to the checklist. |
|
Predefined logic tests |
PIFnnn |
Include a complex logic test where nnn is the logic test code. These logic tests are defined using the Predefine logic tests option in Master Options (see page 155). |
|
Period start date |
PERIOD_START_DATE=#YYYY/MM/DD# |
Test the period start date against the date entered in the condition. |
|
Period end date |
PERIOD_END_DATE=#YYYY/MM/DD# |
Test the period end date against the date entered in the condition. |
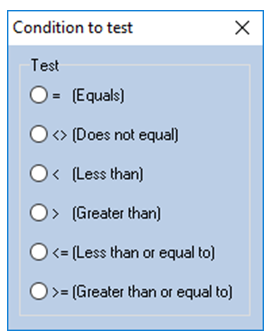
Selecting the Condition
Once you have selected the item to be tested, you must select the condition to apply to the item. You can enter this manually using the symbols illustrated below, or if you use the [Select item] option you can pick the condition to test from the selection list provided.
Support for Parentheses
You can include any number of parentheses () pairs, nested to any depth to change the order that tests are evaluated.
When entering a condition, you can select a predefined logic item via [Select item]. Select Predefined logic tests from the popup menu and the following pick list will appear:
Saving the Condition
When you have entered the condition, click on [OK] and the system will test that the condition is valid before saving it and returning to the calling dialog. If the condition is not valid, the system will display a description of any valid part of the test and an indication of the part that it does not understand.
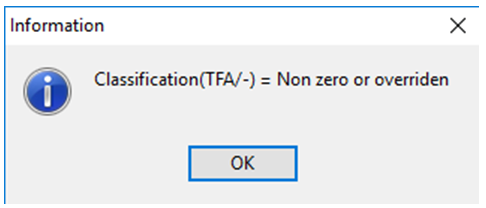
Description of Condition
You can also display a description of the condition by clicking on the [Description of condition] button.
Classifications
The list box headed Classifications for area contains a list of all the classifications that represent data in the TB which relate to the audit area. For example, the audit area relating to tangible fixed assets may have one classification of TFA, while that relating to debtors could have two classifications of TRD for trade debtors and OTD for other debtors.
To select a classification for the audit area, either double click on it in the list of Available classifications, or select it in the list and click on [Add]. The code will be removed from the list of available codes and will be added to the list for the area. To remove a classification from the list, either double click on the code in the list for the area, or select it and click on [Remove]. The code will be removed from the list and added to the list of available codes. Codes may be used in more than one audit area, e.g., the code for turnover may be used in both the area relating to sales and that relating to debtors.
Assertions
The list box headed Assertions for area contains a list of all the assertions that are relevant to the area. To do this, simply double click on each relevant assertion in the list of Available assertion so that they appear in the list of Assertions for area.
To select an assertion for the audit area, either double click on it in the list of Available assertions, or select it in the list and click on [Add]. The code will be removed from the list of available codes and will be added to the list for the area. To remove an assertion from the list, either double click on the code in the list for the area, or select it and click on [Remove]. The code will be removed from the list and added to the list of available codes. Codes may be used in more than one audit area.
Manually Activating Audit Areas
There may be times when a user wishes to active an inactive audit area, overriding the result of the condition statement. The user can do this as part of the Area risk assessment on the Audit area risk dialog. The [Show all audit areas] button displays a full list of the audit areas and those that are not relevant are greyed out.
To activate an inactive area, right click on the greyed audit area name and choose Force area to be active from the pop-up list.
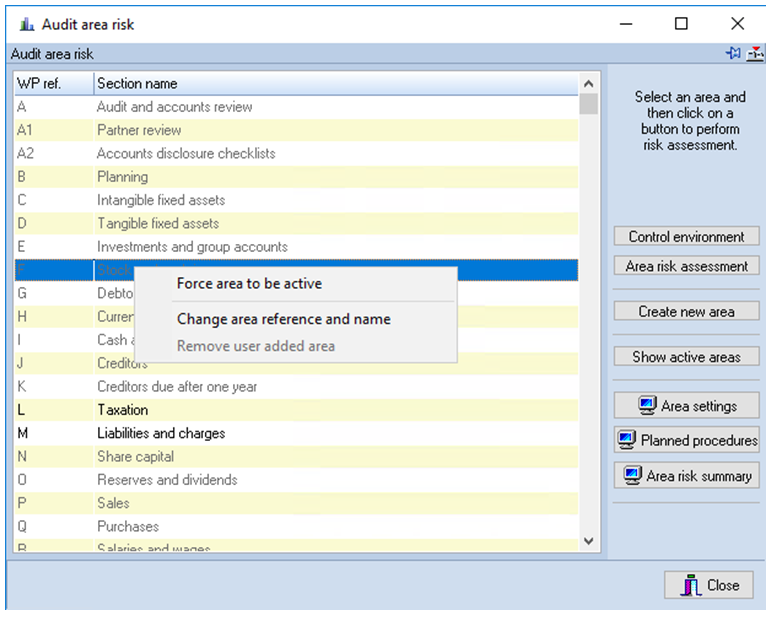
This is a toggle, so you may select a forced area, pop up the menu (the option will be ticked to show that the override is active), and you may click on it to remove the tick and inactivate the area.
Specific risk questions
The list of specific risk questions for each audit area can contain up to 99 questions with a point score for a Yes or No answer in each case.
To edit a question, select the area and click on [Specific risk questions]. The questions for the area will be displayed and may be edited using the same procedures as outlined for editing the list of inherent risk questions on page 62.
If you leave the list of specific risk questions blank, the system will use the default list of specific risk questions when carrying out risk analysis for each client. If the calculation of specific risk is not appropriate to the audit area, enter an “*” or “None” as the text of the first question and this will inform the system that it should not ask specific risk questions in connection with the audit area, and should not reduce overall audit risk for this element.
Control risk questions
The list of control risk questions for each audit area can contain up to 99 questions with a point score for a Yes or No answer in each case.
To edit a question, select the area and click on [Control risk questions]. The question for the area will be displayed and may be edited using the same procedures as outlined for editing the list of inherent risk questions on page 62.
If you leave the list of control risk questions blank, the system will display the User entered reliance dialog when the [Control risk questions] button is selected, to allow the user to enter the level of reliance being placed on controls for the area.
Audit programmes, checklists and lead schedules
These options allow you to enter the master documentation in respect of the audit pack and are covered in detail in the following sections.
Working papers index
The working papers index option allows you to define a default set of indexes for the audit pack. The default index is copied to the client data when the client is first created and it may then be customised on a client by client basis. The index is used, along with the audit objectives and conclusions to form the divider for the audit area.
To edit the default index, select the area and click on the [WP index] button and the Index list will appear.
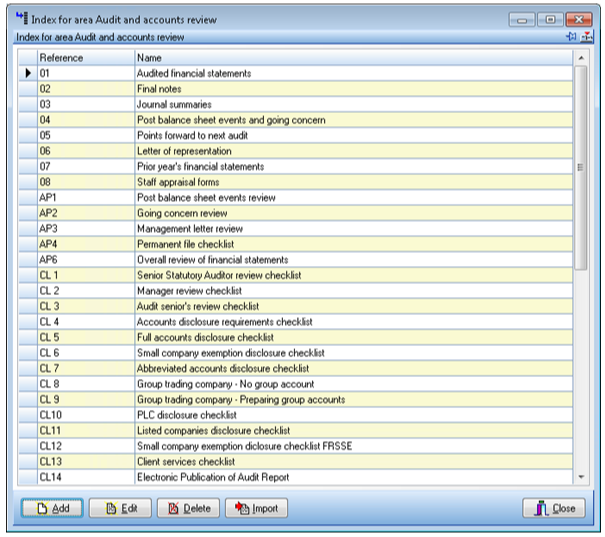
Index list
If there are more entries than will fit on the list you can scroll through the list using the scroll bar. To add entries, click on the [Add] button. A dialog will appear inviting you to enter the working paper reference and name.

Index entry dialog
The reference may be up to 10 characters, alphanumeric, and should be unique for each entry. Click on [Save] to store your entries.
To edit an entry, highlight it and click on the [Edit] button. The same dialog will appear to allow you to change either the reference or the name. To delete an entry, highlight it and click on [Delete]. You will be asked to confirm your instruction before the item is removed.
Importing data
If you already have your data stored in electronic format the import option allows you to bring it into Audit Automation from an ASCII file to save you typing it again. The format that the import file takes is:
{Reference_item_1}
Name_for_item_1
{Reference_item_2}
Name_for_item_2
Etc...................
Hence the file for importing the index for Stock in our standard packs would take the format:
{1}
Lead schedule
{2}
Raw Materials
{3}
Finished Goods
{4}
Work In Progress
{5}
Stock-Taking observation report
{6}
Third party certificates
{AP1}
Audit programme - Substantive
{AP2}
Audit programme - Stocktake attendance
To import a file select the [Import] button and the Windows File open dialog will be displayed. Use the features of the dialog to find and select the file containing the index for the area and click on [OK].
Objectives
It is possible to record the main audit objectives for each audit area. These can be viewed when the audit staff are completing the audit, and also appear on the divider produced for the audit pack. Any number of objectives can be recorded and it is recommended that each is identified with a letter to indicate the audit assertion it covers. This then provides a link from the audit test to the objective.
To edit the objectives for an area, select the area and click on [Objectives]. The Objectives for area dialog will be displayed.
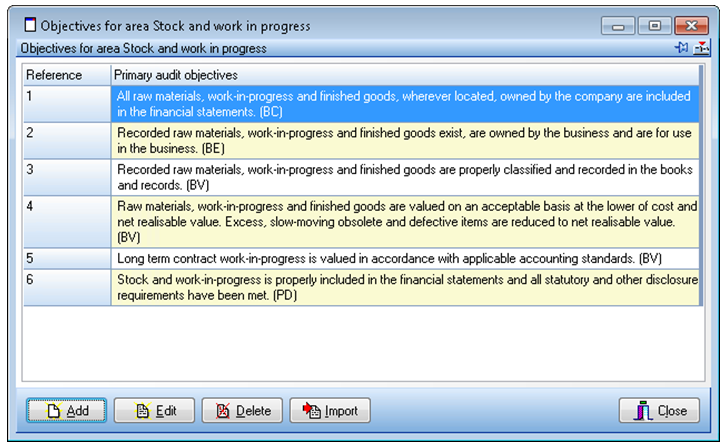
Objectives for area dialog
Adding an objective
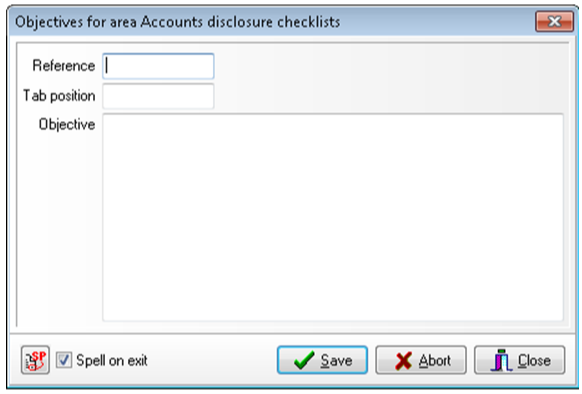
To add an objective, click on [Add] and the Objectives entry form will be displayed.
Objective entry form
Enter the reference for the objective, which may be up to 10 alphanumeric characters, the tab position where the text of the reference should be printed and the text of the objective. To allow you to include items in the list without anything appearing in the reference column, the system will not print any reference that ends in "\\".
References are stored and printed in alphabetical order of reference so bear this in mind when creating your entries. The tab position must be a number from 1 to 40 and can be used to indent text to show main and sub objectives.
To save your entry click on [Save] and the dialog will be cleared to allow you to enter the next objective. [Abort] will clear the dialog without saving the current data.
When you have finished adding entries, click on [Close] and the system will close the dialog and update the list of objectives.
Editing an objective
To edit an objective, select it in the list and click on [Edit]. The Objective entry form will be displayed completed with the information of the objective to be edited. Make the changes required, all fields may be edited, and click on [Save] to record the changes made.
Deleting an objective
To delete an objective, highlight it in the list and click on the [Delete] button. The system will ask you to confirm that you wish to delete the entry before carrying out your request.
Importing data
If you already have your data stored in electronic format the import option allows you to bring it into Audit Automation from an ASCII file to save you typing it again. The format that the import file takes is:
{Reference_item_1}
Text_for_item_1
{Reference_item_2}
Text_for_item_2
Etc...................
Hence the file for importing the objectives for Stock in our standard packs would take the format:
{1}
All raw materials, work-in-progress and finished goods, wherever located, owned by the company are included in the financial statements. (C)
{2}
Recorded raw materials, work-in-progress and finished goods exist, are owned by the business and are for use in the business. (E)
{3}
Recorded raw materials, work-in-progress and finished goods are properly classified and recorded in the books and records. (A)
{4}
Raw materials, work-in-progress and finished goods are valued on an acceptable basis at the lower of cost and net realisable value. Excess, slow-moving obsolete and defective items are reduced to net realisable value. (V)
{5}
Long term contract work-in-progress is valued in accordance with applicable accounting standards. (V)
{6}
Stock and work-in-progress is properly included in the financial statements and all statutory and other disclosure requirements have been met. (C)
To import a file select the [Import] button and the Windows File open dialog will be displayed. Use the features of the dialog to find and select the file containing the objectives for the area and click on [OK].
Conclusions
Standard Senior, Manager and Partner conclusion can be set for each audit area. To inform the system that the area requires signing off by each level, simply enter a conclusion for the appropriate grade. If no standard conclusion is recorded, the system will assume that the area does not require sign off by that level and will inform the user of this fact if a sign off is attempted.
The standard conclusion entered here can be accepted by the person completing the audit, or can be amended to reflect any special circumstances.
To enter the standard conclusions, select the audit area from the list and click on [Conclusions]. The Conclusions for area dialog will be presented.
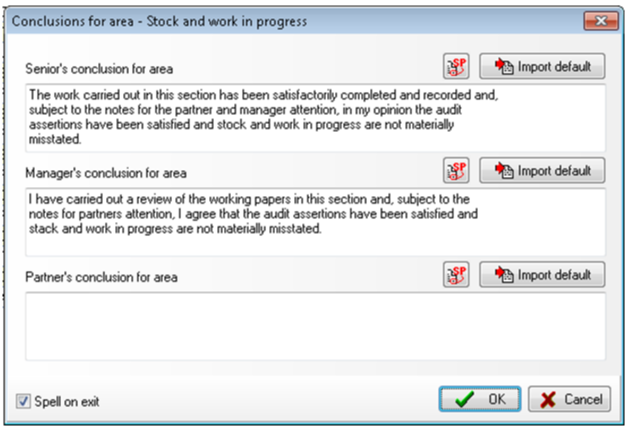
Conclusions for area dialog
You may type in a conclusion for one or more of the levels, or bring in the default conclusion and then edit it for the area. For details of default conclusions see below. To import a default conclusion, click on one of the [Import default] buttons and the conclusion in the edit box below the button will be deleted and replaced by the default.
When you have finished editing the conclusion, click on [OK] and your changes will be saved. Click on [Cancel] to close the dialog without storing your changes.
Default conclusions
The system can record a default conclusion for each of the three grades and this can be imported as a template to be customised for each audit area.
To enter, or amend, the default conclusions, click on the [Default conclusions] button and the Default conclusion dialog will be displayed showing the defaults currently recorded.

Default conclusion dialog
This is the same as the Conclusions for area dialog with the [Import] buttons inactivated.
Enter or edit the defaults and click on [OK] to save your changes.
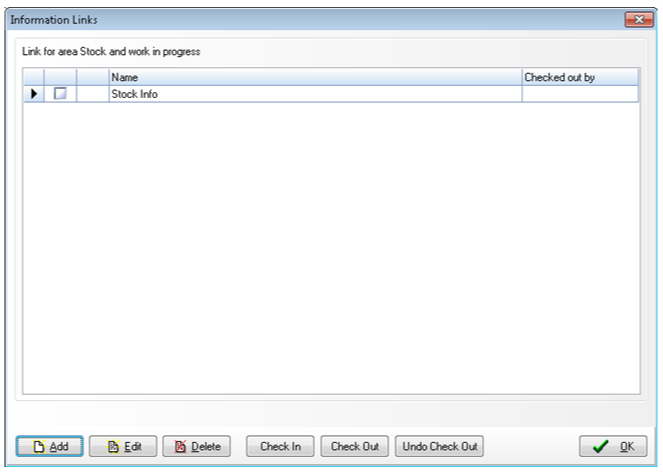
Audit Area Information Links
The system can maintain links to sources of useful information for each audit area.
To enter, or amend, the information links, select the audit area and click on the [Information Links] button and the Information Links dialog will be displayed showing any existing information links for the area.
Current File Template
You can create a default template for the current audit file, this can contain standard template working papers that will automatically appear when a client is created. Any merge codes will be resolved the first time a working paper is opened and once the client is created working papers not required can be deleted.
This facility will also be used in conjunction with the Audit Automation Office Add-in we are currently working on to provide a replacement for our current lead schedule reports. This will allow lead schedules to be defined in Excel, providing the ability to customise lead schedules at a client level.
The template can also contain entries that link to internal AA routines, e.g. the General Planning Memo option on the Planning menu.
The current audit file template is defined via the Audit areas window. Select the new Current file template button from the panel of buttons on the right.
The Current audit file template window will open:
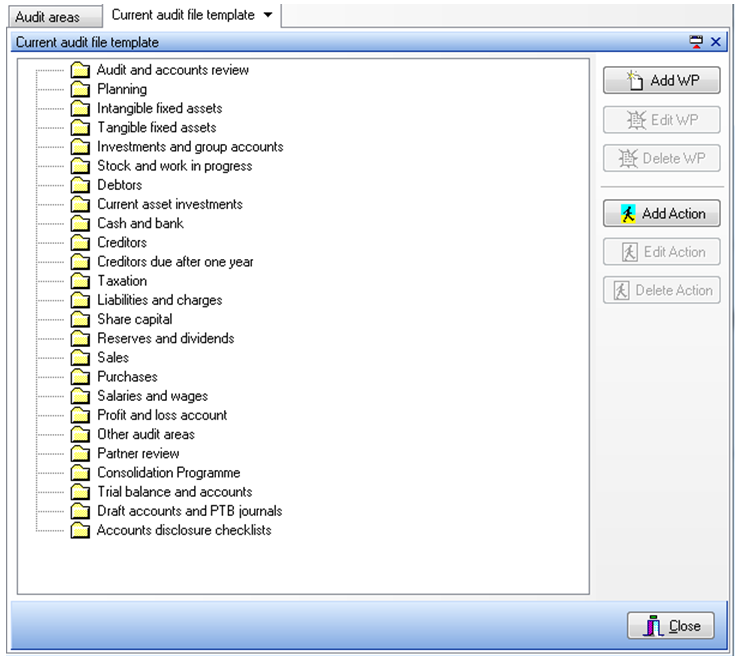
From here you can add, edit or delete working papers or actions. These options work in a similar way to defining the Main index in the master packs.
Working papers
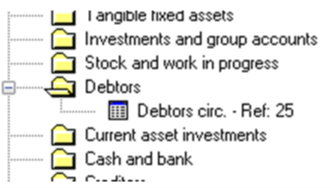
Select the audit area and click on Add WP. The Client document dialog will be displayed to allow you to add the working paper using the same features available when you are adding a working paper to a client audit file. You can add a working paper based on a document template or as a blank document and create it from scratch. After adding, say, a Debtors Circularisation working paper to debtors as reference 25, the template tree appears as follows:
When you select an existing working paper, the Edit and Delete buttons become available to allow you to make changes or remove it from the area.
Actions
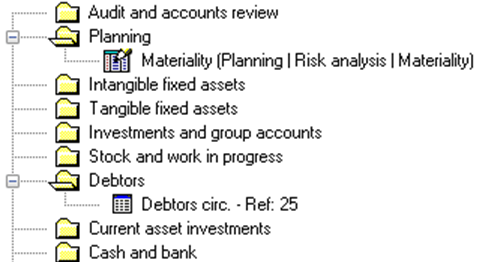
You can also add links to internal Audit Automation routines in the same way as you can to the main index. To do this, select the audit area and click on Add action. For example, to add a link to materiality, select the Planning area and click on Add action and the Action title dialog will be displayed:
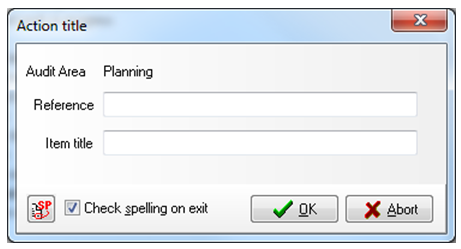
Enter the reference and title, say 35 and Materiality, and click on OK. The Run a PROaudit routine dialog will be displayed:

From this you can select the routine to run when this entry is selected and it will appear in the template tree.
When you select this, the Edit and Delete buttons become available for you to edit or delete the action.