System Settings

The data path is the active path to the database where the clients to which you currently have access are recorded, this may either be on the local computer or a network drive. The data path is normally automatically set by the system based on the mode you selected at log in, however, there may be occasions when you wish to change it manually, for example, if you have more than one database holding Audit Automation data.
Details on how to change the database are contained in section 2 of the reference manual, and the System Manager should ensure that all users who will regularly need to change this setting are competent to make the change and understand the reasoning and implications of the actions they are taking.
International Settings
CCH Audit Automation includes the following features to meet international requirements:
- it uses the Microsoft Windows regional settings on the computer on which the software is running to determine the date format to be used throughout the system.
- it allows accented characters and other international symbols e.g. the Euro sign to be included in notes and comments.
- it defaults to the local currency and system currency sign when Audit Automation is loaded.
Other System Settings
Other system settings are stored in an "INI" file in the Audit Automation directory and affect the way Audit Automation operates on each machine. These will normally only require consideration when Audit Automation is first installed.
The system settings are as follows:
- A flag to indicate if the show hints option is set.
- A flag to indicate if the alternate grid rows should be shown.
- The active graphic bitmap files
- The colors used to display various items within the program.
To change any of the above settings, select System options from the File menu from the Main window and the System settings dialog will be displayed.

System settings dialog
This is a tabbed dialog containing five pages. The options available on each page and how to change them are set out below.
System options tab
Third Party Accounts Package Import
It is possible to automate the import of data from third party accounts preparation packages. Some packages will have an option on a menu to create a file for import into CCH Audit Automation, others require the production of a special report or a separate conversion program. Whichever method is used, the result will be a file written to this directory named with the code by which the client is identified and an extension of “.CSV”. See appendix 1 for a description of the format that this file takes.
If CCH Audit Automation is set to check for an import file, it will look for this file each time the client is loaded and ask the user if they would like to import the file. See section 8 of the reference manual for more details. To set this option, carry out the following:
1. Check the check box called Check for import file.
2. Enter the name of the third-party accounts package in the Name edit field.
3. Select the path where the files will be stored by clicking on the [Change] button to the right of the existing path setting. The system will open the Select directory dialog box from which you may select the directory to use. If you are unsure how to operate this dialog please refer to section 2 of the reference manual.
Finally make the appropriate settings in your accounts preparation package to write the file to the selected directory.
Amend Pack Completion Status
It is possible that users may need to access this option when on site and a system manager is not available. Hence, there is an ability to relax the restriction on access to this menu option. From the drop down select the level of user that can amend the completion status of an audit pack when the data has been travelled.
Force Change of Passwords
It is possible for the System Manager to set the system so that you are forced to change your password at predefined intervals. If this option is active and your password has expired, you will see the warning message:
“Your password has expired, please enter a new password”
And the Edit password and user details dialog will be displayed to allow you to do this.
Please note that if you are working locally or accessing data using network at client mode, this will only change your password locally and you will also need to change it when you log in at the office. If you change it when logged in using network at office, this will change the record on the network and this will only update the password stored with your local data when you next transfer a client from the network.
To activate this feature, tick the checkbox and enter the number of days, between 30 and 180, after which you wish passwords to expire.
Use Internal word processor
If you wish to use the internal word processor, PROword, for editing the internal text based documents, tick the checkbox called Use internal word processor. If this checkbox is not ticked, Audit Automation will call Microsoft Word to display and offer for edit all internal text based documents.
If you are using the internal word processor, Audit Automation can maintain a backup of any file you change. If you tick the checkbox called Keep WP backup, backups will be created with a file extension of ".BAK".
Allow Passwords on Audit File Backups
This option is no longer available as the data is now restored into an SQL database.
Render Graphs as Bitmaps
Graphs are printed and copied as Windows Metafiles. The benefit of these are that they are small, only a few Kbytes per graph, and will therefore keep the size of working papers down, and result in faster and better quality printing. However, metafiles can have minor problems when printing to some laser printers (colour printers should always result in perfect results) and this is most noticeable when using patterns in bars.
To overcome this, there is an option, called Graphs as bitmaps, which when ticked will cause the system to copy and print graphs as bitmaps rather than Metafiles. This will result in lower quality reports, and much higher file sizes, but does not suffer from the same problems when printing to laser printers.
Perform a Full Launch prior to First Call
If you tick the Perform a full launch prior to first call checkbox, the system will carry out a full launch of Word, including running any macros that have been set up to run at launch, before loading the requested document. If this checkbox is not ticked, the macros are bypassed.
Allow Juniors to access Planning
Tick option to allow juniors access to the planning section. By default, this will not be ticked and the program will prevent juniors from accessing planning.
Use quotes in Command line
This option is the system requires quotes around the command line when calling other programs.
Allow Risk Factor Edit
This system setting allows users to edit the risk factors included in the stratification sample calculator.
Update nominal descriptions on Data Import
If this option is ticked the system will update the descriptions of existing nominal account if the account is present in an automated existing automated import file.
Third-party code in VAP format
Tick this option to have the system convert the last digit of the alpha code to a 2 digit number.
Auto-open background info documents
Tick this option if you want the system to automatically open the attached documentation when using the background information links.
Auto-refresh Audit Notes
Tick if you want the system to automatically refresh audit notes.
Assess Risk Level on identified risks
The system allows you to assess the risk levels associated with identified risks and for the residual risk assessment to affect the size of samples calculated for tests linked to it. The adoption of this way of assessing risks is not mandatory and can be activated or suppressed using an option in the System settings dialog.
Auto add tests to Risk program
When you first select a residual risk, the system automatically includes any tests found in the standard and mandatory tests for the area and assertion, and links them to the risk. Some practices have indicated that they would prefer that this did not happen. If this option is ticked then the system will add the tests. If the option is not ticked then tests will not be automatically included and the first time that a work programme for a residual risk is opened it will always be blank.
Automatic update of Audit test exclusions
This system option is for use by firms that experience performance issues with the area sign off procedures. If the option is unticked the system will not trigger the Update audit test exclusion and Update checklist question exclusion routines speeding up the process of signing of the audit area.
Disable creation of staff users
This system option is for use by firms that want to control the creation of new users from central. If you have selected this option users will not be able to create a new employee from the staff details area when in an audit pack, and will only be able to select existing users from the pick list.
Auto download hyperlinks
With this system option selected the system will automatically check out any documents that are linked to the original document that is opened. With the option unselected the user will be present with a list of documents to confirm if they want to check them out.
Apply Central Data Security
With this system option selected the system will implement the data security as per the setting in central. This will allow the restriction of audit clients to authorised users.
Allow docucment file assembly period
With this system option selected the system will allow documents to be edited and added to the file for 60 days from the date the file is finalised.
Keep WP backups
If you have selected the option to use the internal word processor this option can be selected to keep a backup of the working papers.
One assessment by default
Tick this to allow the system to default to a single risk assessment for all assertions when an area is first accessed. This allows firms to “direct” planners to this way of assessing risk if their policy is to use this approach. This can be overridden in a master pack’s settings.
Carry forward Risk Justifications
A system settings option is available to allow practices to specify whether the justifications entered in the Area Risk Assessment dialog are to be carried forward on an annual balance forward. If the option is ticked, the system will retain the justifications that you have entered in risk analysis when you balance the client forward.
Carry Forward annotations
This option allows practices to set a system wide option that will result in annotations being removed from lead schedules on a balance forward. If the tick is removed the system will delete all annotations from lead schedules when a client is balanced forward.
Client Code in Journal entry
This option will activate an extra column when entering a journal allowing the user to record the client codes in the journal entry dialog. These codes can then be exported in the porting file is required depending on the Use client codes in Export system option.
Use Client Codes in Export
If this option is ticked, the system will use any client codes entered in the journal posting file, if it is not ticked the alpha codes of the nominal account will be used.
Seniors to conclude on Risks
The system default is that seniors are not required to conclude on identified risks and key controls being tested before they can sign off an audit. They are only provided with a warning that there are risks and controls that have not been concluded on. The logic of this is that there may well be some areas where the seniors are not qualified to conclude and hence the manager needs to give it consideration. Managers cannot sign off until all risks and key controls have conclusions. Some practices would prefer the system to force the seniors to enter conclusions on all risks and key controls and this system option will enforce the conclusion to be entered before the senior can sign the area off.
Allow removal of Review Notes, Audit Points and Opinion Notes
A facility is available to allow you to remove review notes from an audit pack. The option is the option on the utility menu.
The facility will be turned off as the default setting. If you turn it on by placing a tick in the checkbox, the option will be available in the following circumstances:
1. The option to force onscreen completion is off.
2. The option is on and the pack has been fully signed off.
3. The user accessing the pack is at manager level or above.
On selecting the option, the system will display the following:

This is to remind you that the action is irreversible, once removed the notes cannot be recovered. If you indicate that you wish to proceed, the system will remove the notes and advise you how many notes were removed. It will also add a record of the action in the audit trail.
Allow lower levels to edit Risks
The system default is to restrict the editing or deletion of identified risks to the person who raised them, or someone of the same access level or above. This can cause an issue when on site if the risk needs to be updated by a user who has a lower access level, particularly after balancing forward where risks need updating for the following year.
To overcome this issue, the system option can be ticked and it will allow staff with lower level of access to edit the risk than that of the person who created it.
Suppress Field Work Dates
This system option if ticked will hide the options that allow you to record the date field work started and ended if the practice does not wish to record this information.
Use Internal Dialog for .tif files
When files with an extension of .tif are imported they are stored so that they can be displayed in the internal scan dialog. This causes issues if the tif file is not compatible with the internal dialog. Also not all practices wish to use the internal dialog as they have other tools for viewing and annotating .tif files.
If the option is ticked the system will associate the .tif file with scanned documents so it appears in the internal document. If the option is not ticked the system will treat .tif files imported like any other working paper so that it is opened using the Windows association.
Enforce sign-off order
The system default is to enforce the signoff order so that a manager cannot sign off until the senior signs off. If the option is not ticked then all of the sign offs that have been set in the master pack will be available at the same time. These can be senior, manager and partner. This will allow the manager to sign off even if the senior has not and, where present, the partner to sign off even if the senior and manager has not.

When a higher level signs off, if a lower has not yet signed off the button will remain enabled to allow the lower levels to also sign off. Once a level has been signed off, the button will remain enabled if there is no higher level sign off. This will enable the sign off to be reversed. However, if a higher level has signed off, the lower level sign off buttons will become disabled if the lower level has also signed off.
Auto creation of Master Pack documents
With this system option selected the system will create the master pack default standard documents when creating a client, if the standard documents are not to be used this option should remain unticked.
Access to prior year audits
With this system option selected the system will give access to prior year audits to the users assigned to the current audit period when the apply security option is used.
Allow Document File Assemby Period
If selected this allows documents to be added to the audit file for 60 days after the date the audit report has been signed
Data paths tab
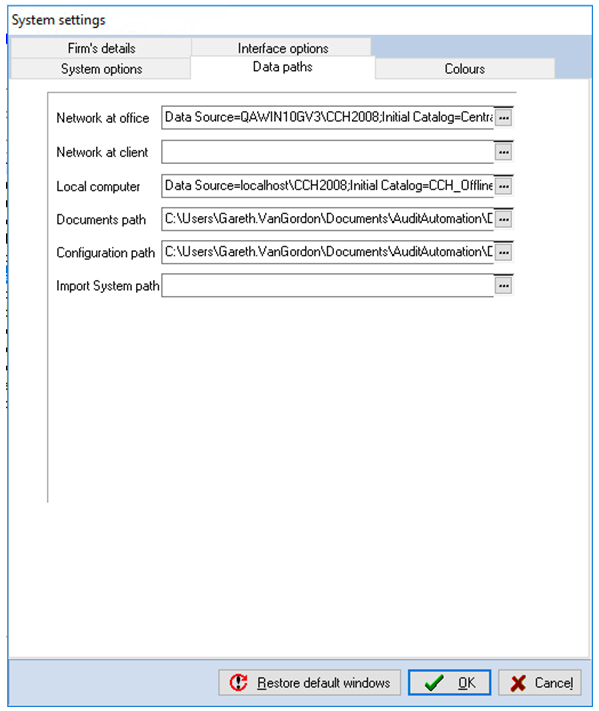
Audit Automation can be configured to operate in three different modes. The User log in dialog contains a Set paths for group that holds three radio buttons, one for each of the three modes of operation; Network at office, Network at client and Local mode. When the dialog is displayed the mode of last access will be selected and the user can change mode prior to pressing <Enter> or clicking on [OK].
The Data paths tab contains the details of the server and database that audit automation will connect to, to allow the user to work in each mode. The network at office and local computer will be set up by the system during installation for the network at office and when a user is travelled for the Local computer. You can change any of the settings by clicking on the button with the 3 dots at the end of the line of the path itself. On doing this the Connect to Server dialog will be displayed from which you can select the server and the name of the database on the server.
The Network at client path can be used to connect to an offline database when onsite. The computers will have to be on the same network and the system will scan the network and list the available connections. We recommend that you set up a peer to peer network at the client using a network hub. One computer will have the master and client loaded on it and that will operate in local mode and share its database.
The Documents path is where documents will be stored when they are checked out of the system for review and for editing
The Configuration option defines the path in which the configuration data is held. This is designed for Terminal Server installations where all users will be using the same copy of the software. In these cases, it allows each user to retain their own settings for the list of audit packs accessed, dialog sizes, colours, etc.
The Import Systems path location allows the default location to be set so that users can have access rights to be able to work with the system definition and mapping files.
To set up this location or change the location click on the button to the right of the path and select a mapped drive that will represent a private folder or home directory for the user, e.g. H:.
Each time Audit Automation is launched, it will look to see if there is a set of configuration files in the directory entered and if none are found will create a default set up for the user. When the user changes system settings or dialog sizes, etc., their changes will be recorded in these private files and will not affect any other user’s settings.
Colours tab
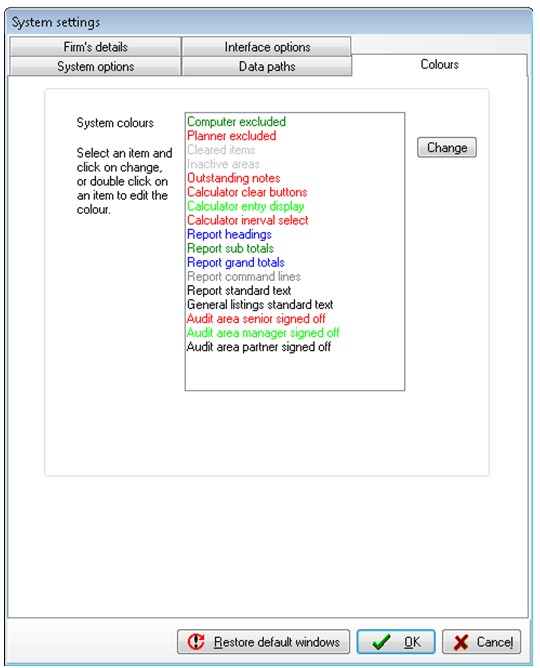
CCH Audit Automation makes use of colours to differentiate between items in listings and for clarity of display. The system will default to a predefined set of colours and these are listed in the Colours tab. Each item in the list is named and shown in the colour that will be used to display it.
To change a colour, either double click on the item, or select it and click on the [Change] button to the right of the list. The standard Windows Colour dialog will be displayed and you may select an alternative colour to use. If you are unsure how to use this dialog refer to your Windows manuals.
Firm's details tab

System settings dialog – Firm’s Address tab
This tab contains 5 edit boxes in which you can enter up to 5 lines of address for your firm. The information entered here can be used in documents created for clients.
Description of Staff Levels
The description that practices use for the various levels available in CCH Audit Automation; partner, manager, senior and junior, vary. We have therefore added the facility for practices to enter their own descriptions for these roles. To accommodate this, in the System settings dialog the Firms’ address tab has been changed to Firm’s details and four new fields have been added to allow the firm to specify the description for each level. These default to the standard descriptions so if these apply to your practice you do not need to change the settings. If you do change the settings, you must close the program and restart it for them to become fully effective.
The system uses the descriptions as follows:
- All menu items that refer to Partner, Manager, etc, will be changed to reflect the user entered names.
- The system will automatically change any wording on the information page that relates to sign off menu items.
- The system will automatically change any references to Partner, Manager, etc. on the File index.
- All references to Partner, Manager etc. in the user interface will be changed.
- All references to Partner, Manager etc. on printed reports will be changed.
Note 1: The system will not change any wording within the master packs themselves, e.g. Audit area descriptions, Checklist and programme titles, questions, tests etc.
Note 2: The user entered descriptions are stored in the ADDRESS.INI file in the program or configuration folder so it can be distributed using the automated software update facility simply by placing the file in the update folder.
Title of combined Audit programme
There is a field within the System settings dialog on the Firm’s details tab where there is a facility for practices to enter their own title for the view of the selected audit procedures. The default description is “Combined audit programme” but this can be changed if desired.

Interface options tab

System settings dialog – Interface Options tab
Treat Enter as Tab
The program can be set to respond in one of two ways when <Enter> is pressed.
- By default, the system will react, in most dialogs, as though you had pressed the <Tab> key and move input focus to the subsequent field. This allows for maximum speed when entering data to the system however, this is not the standard Windows method of operation.
- In standard Windows mode where pressing the <Enter> key will select the default button within the dialog. In most dialogs within Audit Automation, this is the [OK], [Yes] or [Store] button. The button being surrounded by a thicker line than the rest, or a dotted line, indicates this. In this mode pressing <Enter> in most entry forms causes the system to save the current entry and ready the form to accept the next.
If the checkbox called Enter as tab is ticked, the system operates as set out in 1 above, if it is not ticked then it will respond as set out in 2.
Show graphics on buttons
Some of the buttons on Audit Automation dialogs include a small graphic. These graphics can be removed to provide a more Microsoft standard look and feel.
To remove the graphics untick the Show graphics on buttons option. You may change this setting at any time to remove or reinstate the graphics.
Support for multiple language spell checking
The Language for dictionary option is used to select the language of the dictionary used for spell checking. This option defaults to "British", but may be changed to any installed dictionary.
A number of dictionary files are available. To install a dictionary, simply copy it to the Audit Automation application folder. To switch Audit Automation to use the dictionary, enter the name of the file, without the ".DCT" extension in the Language for dictionary field. For example, to use the Dutch dictionary, copy the file DUTCH.DCT and enter “Dutch” in this field.
Restore default windows
As Audit Automation is an MDI application, the system will allow users to vary the size and position of most windows and dialogs and will remember the changes for use the next time that the window or dialog is displayed. If you wish to default to the standard size and positions that are used by Audit Automation when it is first installed, click on the [Restore default windows] button. Once you have finished making changes to the system settings, click on [OK] and the new settings will be saved and the dialog cleared. If you wish to close the dialog without changing the original settings, click on [Cancel].
Ribbon Mode
The software has two user interfaces available (UI) to the user. The new UI can be accessed by selecting the Enable ribbon option on the Interface options tab. When next launching the software the updated UI will be shown.
Using external programs other than MS Word or MS Excel
The facility is provided to allow you to define up to 9 programs that Audit Automation can use to create and store working papers. You can, of course, import any document to the current and permanent files and the system will use the Windows file associations to find the correct program to use to display it for viewing and editing. However, by providing program associations within Audit Automation, you can also create new working papers using the program, and set up templates that can be used as a basis therefore.
Program associations are driven by command line parameters and, once defined, operate in a similar way to the use of Word and Excel. As these are driven by the command line and not OLE, Audit Automation can only load any master templates defined for the association and store them for the client, no code replacement is possible. The documents also cannot be printed via the Audit Automation pack printing options, but have to be printed individually from the applications in question.
Defining Program Associations
Select Program associations from the system maintenance menu. On selecting this option, a dialog will appear in which will be listed any associations already created:
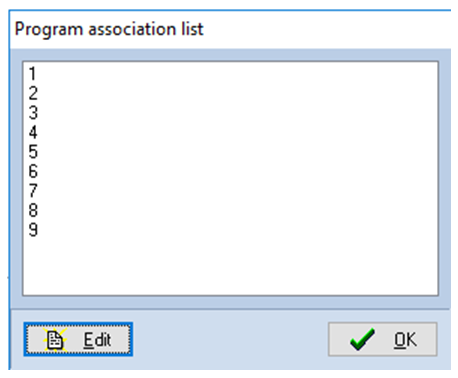
Program association list dialog
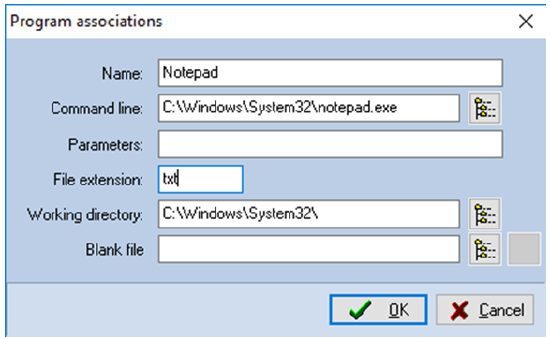
To change an association for one of the nine numbers, double click on the name of the program, or select it and click on edit. The edit dialog will appear showing details of the current definition.
Program associations list dialog
The fields are used as follows:
| Name | The name of the program as it is to appear in the list of associated applications when offered during document creation. |
| Command line | The full path and name of the executable file that is loaded to run the program. You can use the [Browse] button to find the file and enter the details in the edit box. |
| Parameters | Any command line parameters that are to be passed to the application. As a minimum the name of the Audit Automation file to be created/edited must be included in the parameter list and this can be inserted with the “%f” variable. The following are the variables that can be included and are expanded with appropriate data when the program is called: %f The file to be created/edited (including path) %u The initials of the user %p The password entered by the user for Audit Automation %c The code of the client that is loaded. E.g. “/C:%c /F:%f” would result in “/C:TUTORIAL /F:C:\PROACC\AUDIT AUTOMATIONV2\DATA\TUTORIAL\DOCUMENT\G12.CDR” if the tutorial client were loaded and schedule 12 was being edited for section G using Corel Draw. |
| File extension | The extension that the program uses for data files. This will be used to compose the file name for the %f parameter. |
| Working directory | The directory that should be set as the default when the program is launched. Normally this will be the same directory as the program directory and will default to this when you first enter the details of a program in the command line. |
| Blank file | Most programs will only accept an existing file as a parameter. Hence it is not possible to create a new blank file by simply passing the new file name. It is therefore necessary to manually create a blank file for the associated program that Audit Automation can use as the basis for creating a new file, where this is not based on a master file (and for creating new master files.) You can either enter the path and file name or use the [Browse] button to select it. We suggest that blank files are stored in the Audit Automation database so that they can always be accessed. |
Note: It is important to understand that the association program definition is used every time a document is loaded and that the document is linked to the entry by the entry number, from 1 to 9. You should therefore ensure that you do not change the nature of an entry once it is created. For example, if entry 1 were set up as WordPad and documents created and then the definition was changed to Corel Draw, the next time the document was launched it would try and load the WordPad file with Corel Draw.
Association data file: The associations defined using the above routines are stored in a file called AUDIT AUTOMATION.ASS stored in the program directory. If you copy this file with the program update to the central update directory it will be automatically downloaded to each computer when Audit Automation self updates.
Creating Master Templates for Associated programs
The Master template dialog contains a radio button and a drop-down list to allow you to create templates using associated programs. To do this, click on the Other radio button in the type group and the associated drop-down list will become enabled. It will default to association 1 and can be used to select the program to run. Select the program and click on [Edit template] and the blank file will be used to create a new file for the program and it will be displayed using the defined program for edit.

Master template dialog
Associated program icon
All working papers created with associated programs are identified with the common icon  .
.
Creating Client Documents
A similar radio button and drop-down list are present on the Client document dialog to allow you to create documents using associated programs. To create a document that is not based on a master template, click on the Other radio button in the type group and the associated drop-down list will become enabled. It will default to association 1 and can be used to select the program to run. Select the program and click on [Document].
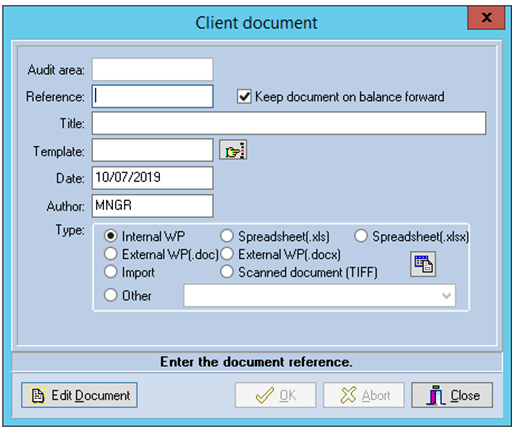
Client document dialog
You will first be asked to confirm that you do not wish to use a template, do this and you will then be asked if you wish to load an existing file. If you indicate that you do the File Open dialog will be presented to allow you to select the file to load and this will be copied to the Audit Automation file name in the Document database. If you indicate that you do not want to load a file, the blank file will be used to create a new file for the program and it will be displayed using the defined program for edit.
If you wish to create a new file using a master template, select the template and the Other radio button will become checked and the appropriate associated program shown in the edit box.