Client Pack window - Navigation

On loading an audit pack, the Client Pack window will be displayed.
This window is displayed in the same mode as that which was used to display the Main window, either in full mode occupying the whole screen or restored as a resizable window.

Pack window in maximized state
You may toggle the Client Pack window between the two states, or minimize it to an icon.
The Client Pack window contains the following:
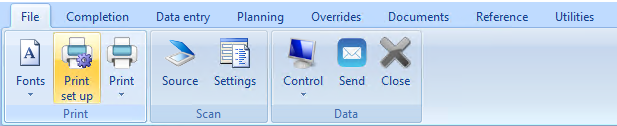
Menu bar
The menu bar contains the following options: 
Toolbar
If not using the ribbon menu, extra toolbars can be repositioned and can be shown or hidden to meet their needs.

To reposition an extra toolbar, drag the toolbar name. To expose or hide the contents of the toolbar, right click on the toolbar.
To add or remove a toolbar, point to the toolbar area and press the right mouse button. A pop up menu will appear listing available toolbars and a tick is shown by each toolbar that is currently displayed. Select the name of a toolbar to add or remove it. The reset option at the foot of the menu restores the system to just show the default toolbars in their default positions.
As indicated, extra toolbars can be moved by dragging toolbar name. You can drag this to the left and right to reposition the toolbar on the line, or up and down to move the toolbar from one line to the next. By default, two lines of toolbars are shown, but you can create further lines by dragging a toolbar down below the last line.
As you move the mouse over the toolbar buttons, the prompt in the status bar will display the button’s function. If you hover over a button for a few seconds a pop up hint will also appear.
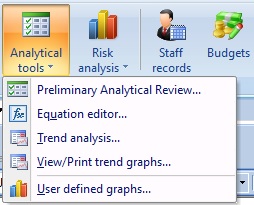
Some of the toolbar icons are followed by a drop-down arrow e.g. 
When you click on the button a drop-down menu appears listing sub-menu options. You can click on any of these options to access the required function. For example, the following drop-down menu lists the Analytical tools sub-menu options.
Navigation panel - Main index
As indicated, the navigation panel will either contain a duplicate of the menu structure, or a main index defined in the master pack to which the client is attached. The index is made up of folders and options. The folders can be nested to any depth and are identified by a folder icon. Options are identified by the same icon that represents the routine used to access the same documents or processes in the CCH Audit Automation menu.
To open a folder, double click on the name of the folder. To run an option, double click on the name of the item.
You may also use the right mouse button to open a pop-up menu of options.
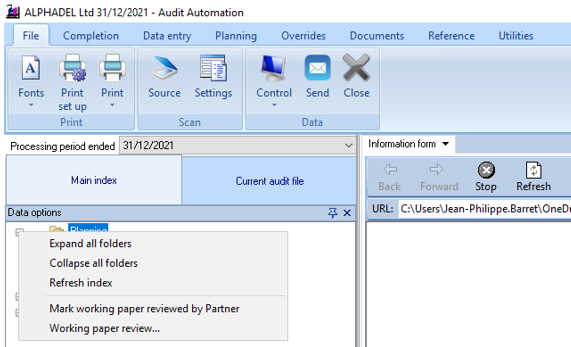
The options available are:
• Expand all folders
• Collapse all folders
• Refresh index
• Mark working paper reviewed by (The appropriate user level will be shown, e.g. Partner, Manager, Senior or Junior)
• Working paper review... If the index item selected is not a folder, this option will appear and allows you to record that you have reviewed the item. This routine is described later in this document.
Some index headings may be too long for the full text to be displayed. As you move the mouse pointer over these items, the full name will be displayed in a pop up hint window.
Status bar
The status bar is at the bottom of the scrren and contains the initials of the user who is currently logged into the system, the current date and time and the period end date.

Work area and information form
When a client is loaded and the navigation panel is being displayed, the system will display the Information form in the work area to the right of the navigation panel. This is an HTML form presented in a closed browser window. The browser is closed as there is no ability for the user to type a freeform URL. The browser can access the internet or an intranet if a connection is present but the user is restricted to accessing pages to which links have been provided either as default in the system or by the designer of the master pack.

To the right of the address is a [Homepage] button that will take you back to the client information home page at any time. There are 3 home pages, one displayed when you are in planning, one when planning has been signed off and you are in completion, the third is shown after the audit has been finalised. Up to a further 10 link buttons can be displayed to the right of the [Homepage] button. The homepage for planning shown above is that from our standard packs, but the information displayed and the links available may vary based on the master pack provider.
Hyperlinks displayed on the form may either be links to external documents, such as information sources, or to internal CCH Audit Automation routines. Hence, clicking on the link to Tailoring questions in the above screen shot will have the same effect as selecting the menu option Reference > Tailoring questions.
Closing an audit pack
To close an audit pack, on the Navigation panel, click on the [x] button on the top corner, or select the File menu followed by [Close].
Multiple document interface
CCH Audit Automation is a multiple document interface program, MDI for short. This means that the system can have more than one window open, each window displaying different data, or providing access to different reports.
The majority of the lists and windows opened when you select options from the menu or toolbar are child windows which can exist alongside other child windows in the work space area. As you open Windows they will obscure existing windows on the screen and there are a number of options available to allow you to manage these windows. The main facilities are as follows:
Moving from window to window
To move from one window to another you can either press <Ctrl> + <Tab>, to move through the open windows in order, or select the name of the tab from the list which appears at top of the main window. These are the two most common ways of selecting windows, however, CCH Audit Automation manages these windows intelligently and will bring an existing window to the front if the option which was used to create that window is selected again.
Minimising windows
All child windows have the ability to be minimised, evident from the [Minimise] button appearing in the caption bar, and clicking on this will reduce the window to an icon at the foot of the work space.
You may restore a window to its original size, by double clicking on its icon, selecting the name of the window from the window menu, or selecting the option which created the window again.
Maximising windows
Where appropriate, windows can be maximised to occupy the whole of the work area. Windows which can be maximised have a [Maximise] button displayed in the caption bar, and clicking on this will expand the window. If you expand one window, all other child windows will be shown maximised if they are brought to the front, irrespective of the method used to achieve this (i.e. <Ctrl> + <Tab>, the Window menu or selecting the CCH Audit Automation option again).
When a window is maximised, its caption buttons are displayed at the far right of the CCH Audit Automation menu bar, and a window can be restored to its normal size by clicking on the [Restore] button.
Closing the audit pack
It is not necessary to close all child windows when you close an audit pack, or close the CCH Audit Automation program. CCH Audit Automation will automatically close all windows prior to shutting down.
Closing a client with documents checked out
When you close a client, the system checks to see if you have any documents checked out and if you do it will show you a list and give you the opportunity to check them in.
This will happen if you close the client and return to the client list, or if you close the program while a client is open.
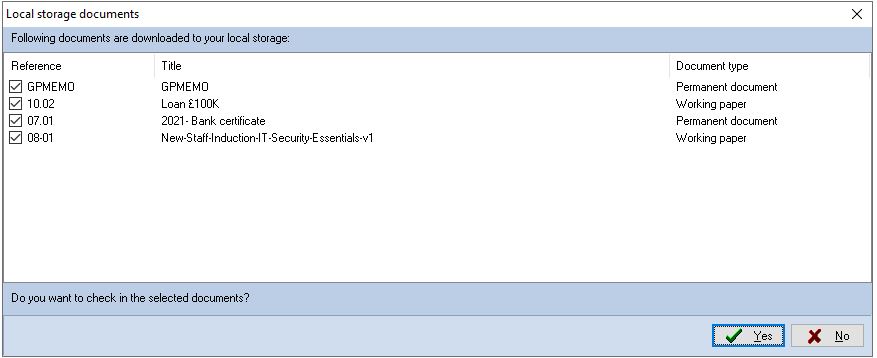
All checked out documents will be ticked and clicking on [Yes] will result in them all being checked in. [No] will leave the documents checked out.
You can check in some of the documents while leaving others checked out by removing the tick by the ones you do not wish to check in.
Warning! If you leave any documents checked out then any changes that you have made to these documents will only be recorded in your local document store and will not be included in any backups created.