Import/Export Definition

Navigate to: File > Maintenance > Accounts > Import/Export Definition > File Structure
To create a new structure

- Ensure the Create File Structure radio button is selected.
- A sample csv file may be chosen to be displayed if required. To do so click on the Browse button, select the file to view (it must be a .CSV comma delimited file) then click View File.
- The
 allows the view to be expanded or collasped.
 - From within the Formatting section, firstly select the File Structure Type to be created from the drop down:
- Transactions, or
- Trial Balance
then complete the selections from within the Formatting section
|
Separator |
Enter the formatting details for the file, selecting from Comma Separated, Line feed separated, or User defined. For User defined enter the separator used in the file, e.g. ‘;’ |
|
Has headers |
If the file that is to be imported using the definition has header information that should be ignored, tick this checkbox, and enter the number of lines that should be ignored. |
|
Number of fields |
Select the number of fields in each record using the scroll buttons. Fields are read in order so if there are any fields that you wish to skip in the file, they should be included in the number entered here and they can be mapped to <None>. On entering the number of fields, the application displays a grid in the lower half of the window representing the number of fields to be mapped. |
|
File Structure Type |
Select the File Structure type using the drop-down arrow. |
|
File Structure Name |
Enter the unique name which you wish to use to identify the file structure. |
|
Delete csv file after successful import |
If this is ticked, then whenever this file structure is used to import data from a csv file, upon completion of the import the csv file will be deleted. A warning message will be displayed |
|
Verify that Import file name matches Client Code? |
If this is ticked the file name must the same as the client code for the client you are working in. |
To map fields, against each field position select the CCH Accounts Production field that the data is to be posted to by clicking in the AP field Name and selecting the field from the drop-down list. Click Save when completed.

To edit an existing structure
- Select the Edit File Structure radio button and a drop down arrow will appear at the end of the File Structure Name field.
- Use the drop-down arrow to select the File Structure Name to be edited.
- This populates the grid to enable you to edit any information and to add new lines.
- Click Save when completed.
To delete a non-standard CCH structure
If a structure is no longer required it may be deleted e.g. an unwanted "test" structure.
First the permission must be activiated, if not already active: #Maintenance #Delete File Structure. The default is to 'not allowed' for all users.
Click Delete File Structure from the ribbon, in the first colum tick the file structure to be deleted and then press the Delete button.
The structures provided by CCH cannot be deleted. These structures will have a tick in the CCH Master column.
Creating a new nominal mapping file
Navigate to: File > Maintenance > Accounts > Import/Export Definition > Nominal Mapping

- To create a new nominal mapping select the Create Mapping File radio button.
- Select the Entity, Master Pack and Chart for the mapping being created.
The mapping file may either be created from scratch by manually entering the information relating to the External Code, optional External Name and the CCH Account Code it is to be mapped to, or it may be imported from a csv file. The latter is often the quicker method.
Creating a mapping within this screen
- If choosing to map on the screen, bypass the Import file Name, Formatting and Mapping Name options.
- Click in the entry row in the grid (under the column header External Code) and enter the information for each row, as follows:
| External Code | The code of the nominal account in the system to be imported from. |
| External Name | The name of the account as entered in the system to be imported from. |
| Account Code | Select the CCH nominal account code that the transaction bearing the external code should be posted to in CCH Accounts Production |
Creating a mapping externally
The file may be prepared in Excel but before import must be saved as .CSV (comma delimited)
The structure of the file will be:
- Column A = External Code
- Column B = External Description
- Column C = CCH Nominal Code
Importing the external .CSV (comma delimited) file
Use the Browse button to select the file you wish to import.
- Set the format of the file to be imported:
- e.g. Comma Separated,
- Tick the Import AP Code box
- Click the Import button to import and display the file. The information is presented in the grid in the lower half of the window.
If the checkbox Import AP Code is not ticked, the first two columns only will be populated.
- After import, the data presented in the grid may be edited, additional rows added, or the account code being mapped to changed.
- If you have mapped to new nominal codes (non-standard CCH codes) these must be created at the master level first so that they are available to be selected from this screen.
- After the mapping has been defined, enter a unique Mapping Name to identify the mapping file and click Save.
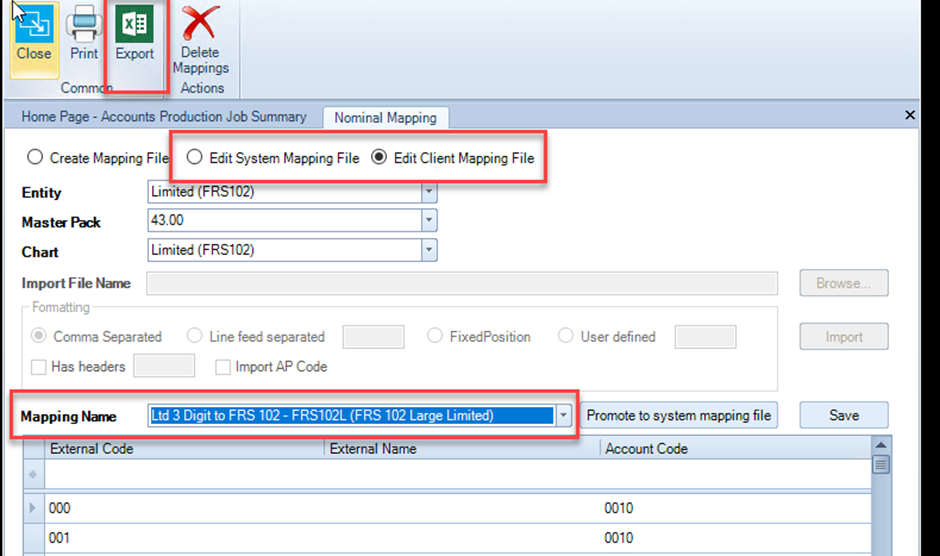
Editing an existing nominal mapping
- Choose Edit System Mapping File or Edit Client Mapping File.
- Select the relevant Entity, and then Master Pack and Chart will be displayed.
- From the drop down to the right of the Mapping Name field, select the name of the mapping to edit, this will load in the grid below.
- The information shown in the grid may be edited and/ or new lines added.
-
After making changes click the Save button.

Converting an existing client mapping to a master mapping file
- Choose Edit Client Mapping File (see above)
- Select the relevant Entity, and then Master Pack and Chart will be displayed.
- From the drop down to the right of the Mapping Name field, select the name of the mapping to edit, this will load in the grid below, at this point the Promote to system mapping file button will also be activated.
- Click on the Promote to system mapping file button

- Enter /amend the name of the mapping

- Click OK
This will be available to use for any client using the entity and master pack (plus future master packs) indicated when promoted.
Exporting a mapping file to an external file
Select either the System mapping file or the Client mapping file by choosing Edit System Mapping File or Edit Client Mapping File
Click Export on the top ribbon.
Nominal Mappings Converter
File > Maintenance > Accounts > Import/Export Definition > Nominal Mappings Converter
If previously a Nominal Mapping set was created, for example using the old UK GAAP nominals to import data from third party applications into CCH Accounts Production, then these will need to be updated in order to reflect the new Chart of Accounts used in the FRS 102 master packs.
The concept is to 'link up' two existing nominal mappings to create a new third mapping


- In the From section above, select the existing mapping that you wish to convert.
- For example "Xero to CCH Ltd 3 digit
- In the "To" section, select the required FRS 102 entity and then select a mapping from the available list. This mapping must include a common link to the mapping selected above.
- For example "CCH Ltd 3 digit to FRS 102" (note: we have changed the names since this was released but if you are creating your own ensure you have a matching name)
- The grid at the bottom of the screen will display the new mapping, the original 3rd party nominal codes will be displayed in the External columns, and the FRS 102 nominal codes will be displayed in the Account Code column.
- If no matching mapping can be made, then a warning message is displayed on the screen

- Enter the name for your mapping in the box Enter New Mapping Name
- Click OK.
A new Nominal Mapping will be created in your system, which can then be used when importing data in future from the 3rd party application into the FRS 102 chart.
Note: that mappings cannot be edited from this screen. You are advised to first save the new mapping and then amend it if required in the normal way.