CCH Interactive Checklist: SQL 2019

Introduction
CCH Interactive Checklist (CCH IC) is software that provides functionality to allow you to complete checklists in respect of your clients in an efficient and effective environment. It is the software provided with the CCH UK GAAP and IFRS checklists.
The system:
- Allows you to manage all checklists relating to a client from a single list showing current and prior checklists.
- Automatically tailors the checklist based on answers as you provide them, automatically removing questions that are not relevant to the client and ensuring you only have to answer relevant questions.
- Provides alerts to answers that are potential issues.
- Includes facilities for you to enter comments on any question with the ability to turn any comment into a note that requires clearing.
- Provides a clean on screen display of questions, references, comments and notes, answers provided, who answered each question and when.
- Allows easy navigation of checklist content, including:
o Display the full checklist or just a subsection;
o Filters to allow the display of the data you are interested in, for example, to only show unanswered questions, notes that need clearing or questions with comments;
o Only show questions where the answer in the current checklist is different to the previous period’s checklist. - Accepts answers to questions either using the keyboard or mouse.
- Provides for the on screen recording of checklist review.
Planning the Installation
You may either install the software locally on each computer or install it on a central file server so that authorised users can access the software from a single location. Even if you plan to install the software on a server, we recommend that you initially install it locally with a local database to familiarise yourself with the software before proceeding with the server installation.
Local installations
If you opt for a local installation then you can have a local database to hold your data, or set the system to access a network database. You can also have both a local database and a network database if you wish.
Network database
If you store your checklists in a database held on a network server, the checklists will be accessible from any computer on the network.
Local database
If you have a local database, the checklists it contains will only be accessible when you are logged onto your computer and you will be able to use the software out of the office. As indicated, you may have both a local and network database and we provide options for you to backup individual checklists that you have completed locally and restore them to your network database.
Network Installation
Opting for a network installation means that you will only have to install the software once, on the network, and all users will run the software from the file server. The benefit of this is that you will have access to the software from any workstation and in future you will only need to install software updates once. With a network installation it would not be logical to have a local database, all users would access the data from a network server.
Both Local and Network Installations
It is also possible to have a mixture of both network and local installations, maybe with a local installation on one or two computers that you may wish to take out of the office to use, and with other users running the software from the network.
SQL Database
The software stores its data in a SQL database and, as indicated, this can either be a database stored on a network server or you can have a local instance of SQL on your computer to host the data. By default, the routines will install a local instance of Microsoft SQL Server Express 2019 and create a local database for you.
If you carry out a local install of the software and SQL, the routines will create a local database for you and set the software up to make use of this.
If you carry out a network installation, or a local installation without SQL, when you first run the software you will need to create a database to hold your data and details of how to do this are set out in a later section.
Licencing
The maximum number of users who may be set up to access the software is governed by your licence. Hence, if you have a 10 user licence then only 10 users may appear in the user list. If you reach you licence limit then please contact your account manager to obtain the right to add additional users.
Downloading and extracting the installation files
Please follow the separate instructions provided to download the installation files and save the file to your hard disk in a temporary folder. In the example shown below the folder C:\Temp has been used. The file downloaded is called CCH Interactive Checklist V8.zip and contains a two EXE file that will carry out the installations of SQL Express if required and the checklist software.
Installation (local)
The following instructions are for carrying out a local installation on your computer. Please refer to the separate server installation instructions if you are going to carry out a server installation.
SQL Server Express 2019
By default, the routines will install SQL Server Express 2019 and set up a local database to hold your checklist data. If you do not want it to do this, for example if you already have SQL server installed, you may skip the SQL Installation and only install the checklist software as described later in these instructions.
Installing SQL Express
To install SQL Express, run the file C:\Temp\ CCH Interactive Checklist Installer V8\ Setup.exe by double clicking on it in Windows explorer.

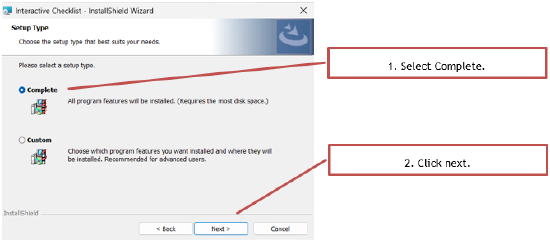
You will be presented with a series of dialogs as follows:

If you are presented with a User Access Control dialog similar to the following, click on Yes.


Note:
The default directory in which the software will be installed on your local computer is C:\Program Files\CCH ProSystem\Interactive Checklist for 32 bit operating systems and, C:\Program Files (x86)\CCH ProSystem\Interactive Checklist for 64 bit systems.
- If you installed SQL Express 2019 as details above, the checklist install will continue following the restart of the system.
- If you are installing the checklist software into an existing SQL environment the checklist software can be install be selecting the interactive checklist EXE.


Following the installation the SQL server instance needs to be restarted via SQL Server configuration manager.

Launching the software
You can launch the software using one of the shortcuts provided:
From the Desktop:

Quick Start Guide
You will need to manually create a connection to the database the first time that you launch CCH Interactive Checklist. This can either be created on a network server so that all users have access to the same data, or you can create a local database if you have Microsoft SQL Server Express installed on your computer.
On launching the software you will be presented with the Login dialog:

We recommend that you name the database “Checklists” so that it is easily identifiable by our support team should you need to seek assistance. The following example will create a database called Checklist in the local instance of SQL Express:

Note: that you will not be able to use the Test button as the database has not yet been created. Click OK and the systems will display the following question:

Please refer to Appendix 2 for how to change this setting.
On returning to the Login dialog, the available connection will be listed:

Installing the checklists
Before the software can be used the latest checklists need to be installed. To install the checklists please see Appendix 2 Installing the checklists.
Creating your first client

Note: The lead partner and office entries are optional, however completing them will make it easier to find clients later on.
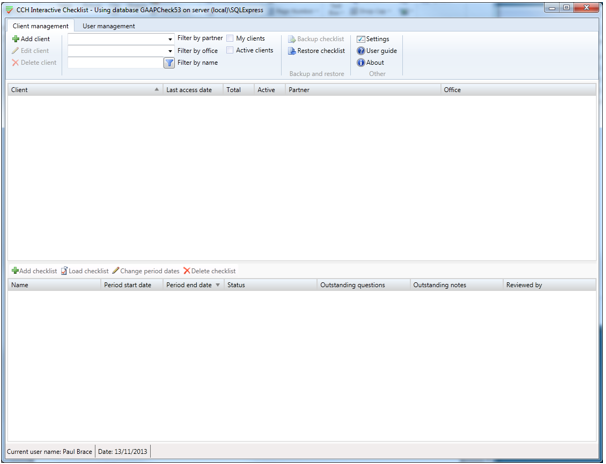
The client will appear in the client list displayed in the top grid:

Creating your first checklist
Select the client by clicking on the name in the top grid and the Add checklist option in the dividing toolbar will become active.

The Add checklist dialog will appear and as this is the first checklist created for a client, the Select group field will be blank and the period start dates will both be set to the current date.

The checklist will be created and loaded for completion.

Click on Tailoring questions in the navigation area on the left to load and display the contents of the checklist on the right.

Click on a row in the checklist to move focus to the completion area and you can then navigate through the checklist using the up and down arrow keys and answer questions using the keyboard shortcuts shown in the answer panel that appears at the foot of the window.
Please refer to the user guide for more information about managing and completing checklists.
To close a checklist and return to the Client management display, select Close checklist from the ribbon bar:

The Client management window will be displayed with the details of the new checklist created shown in the lower panel.

Double click on the name of the checklist to return to the Checklist completion window.
User Guide
Full details of how to use the system and the functionality that it provides are contained in the user guide that can be downloaded from the website and is also available from the User Guide option on the ribbon bar.

We strongly recommend that you read the user guide in full to ensure that you get the most from this new system.
Appendix 1
If you did not install SQL Express you will need to manually create a connection and database the first time that you launch CCH Interactive Checklist. This can either be created on a network server so that all users have access to the same data, or you can create a local database if you have Microsoft SQL Server Express installed on your computer.
On launching the software you will be presented with the Login dialog:

We recommend that you name the database “Checklist” so that it is easily identifiable by our support team should you need to seek assistance. The following example will create a database called Checklist in the local instance of SQL Express:

Note: That you will not be able to use the Test button as the database has not yet been created.
Click OK and the systems will display the following question:

Note: If you see the following message when you try and create a new database or login it probably means that you do not have Mixed Authentication selected for your SQL instance.

Please refer to Appendix 2 for how to change this setting.
On returning to the Login dialog, the available connection will be listed:

Appendix 2: Installing the checklists
Downloading and Installing the update files
Create a temporary folder to hold the downloaded file, assumed to be C:\TEMP in the following instructions.
- Locate and click the Download button to download the update installer file into the previously created temporary folder C:\TEMP. The downloaded file is called CCH Interactive Checklist Update 8.0.
If you are presented with a User Accounts Control warning, please click on Yes to proceed. You will be presented with a series of dialogs as follows:


You will see a brief display of a progress bar while the installation progresses and on completion the following Installation Complete dialog will be displayed:

You are now ready to apply the update to your database – please complete the process by following the steps on the next page.
Update the checklist database
The final step is to run the update on each database you have created to hold checklist data. If you have a single centralised database, you will only need to do this once and the new checklists will be available to all users. If you have multiple local databases, you will need to follow the steps outlined below on each database.
Launch the CCH Interactive Checklist software, select the database to be updated and log in as someone with System Manager rights.

The Checklist updates dialog will appear listing the new checklist and new versions of your existing checklists. If you do not see the checklists listed in the dialog below you have either selected a database that has already been updated or the update files have not been correctly installed on this instance of the software.

The system will now run the scripts to add the new checklists to your database displaying progress messages as each checklist is added.

The following message will appear after the process is complete:


The database is now updated.