CCH Group Packs v12

Obtaining and installing the update
Downloading
Click here and then select CCH Group Master Pack, read the instructions on the download page and save the file to disk and store it in a temporary directory on your hard drive, (assumed to be “C:\TEMP” in the following instructions). Next, follow the steps outlined below.
Important: To receive software product news updates, you will need to Register on our Support Portal. (Registration Code and Practice Code required) and join our CCH Audit Automation Group to receive POSTS.
Installing
- Click on [Start] and then on Run...
- Enter C:\TEMP\CCH_Group_Master_Pack_v12.exe, or select the file using the [Browse] button, and click on [OK].
- Follow the instructions on the screen, see below for installation options.
The above assumes that you downloaded the file to C:\TEMP, if you stored it elsewhere, enter the path you used in step 2 above. During the installation process you will be asked for a password, this is provided in the notification of the availability of the packs.
Installation options
The installation program will offer you our standard default directory called PROACC\AUDITV3 on Drive C. If you have installed ProSystem AA, or store your master formats elsewhere, you must change the directory to that which you used for the original installation. The master formats have been allocated the following codes:
| IGROUP12 |
CCH – ISA Group Audit Pack v.12 |
- If you have created your own master with these codes, installing these masters will overwrite it.
- If you have done this, you should rename your master formats before proceeding, or contact us for advice on how you can rename our masters.
Charge rate tables
The master packs contain charge rate tables that will need to be updated to reflect your firm’s level of hourly charges. The table may be imported from an existing pack, thereby removing the need for you to enter it manually. To do this, load Audit Automation, log in as the System Manager, and select the option to edit an existing master pack. Enter the code of the pack to be updated and click on [OK]. Select Risk model > Look up tables and then the Charge rate table tab. Finally select [Import charge rates] and select the pack from which the table is to be imported.
Specialised charts of accounts and working papers
If you are importing from a third party accounting package, it is likely that you will either have changed the alpha codes in your master packs, or have imported a new chart of accounts and working papers from a chart update routine. If you have used a supplied routine, simply follow the original instructions to install the updated chart in each of the new master packs. If you have amended the alpha codes, you can copy the amended chart of accounts to the new masters by copying the files called CHART.DBF and CHART.MDX from an old master pack to the new ones now installed. If you require assistance to achieve this, contact the support line.
Changing master packs for an existing client
To link an existing client to a new pack, proceed as follows:
- Select File > Edit control data > Control data from the menu bar.
- Select the Master pack code edit box and either enter the code of the new pack or select it using the [Pick] button.
- Click on [OK].
The system will ask you to confirm that you wish to change the master pack in use and then present a dialog with options. If you are changing from one version of a master pack to the next, e.g. IGROUP11 to IGROUP12, select the option to Merge the new master programmes with the current customised programmes, if you are changing to a different pack concept, e.g. IFULL21 to IGROUP12, select the option to Clear the current customized programmes and Replace the working paper index so that you obtain the revised index from the new master.
Note: it is advised that users should not change master packs once planning has been signed off. Prior to planning sign off master packs can be updated but users should be aware of changes in the update that may have an effect on work already completed during the planning stage.
Always ensure that you have a current backup of the client’s data before changing master packs as this is a complicated process and if anything happens to interrupt the change, the client data may be corrupted.
Changes made to the master packs
This update incorporates the following changes:
Audit Pack changes
- Going concern statement reworded in line with the revised ISA 570.
- References updated as necessary.
Subsidiary company areas
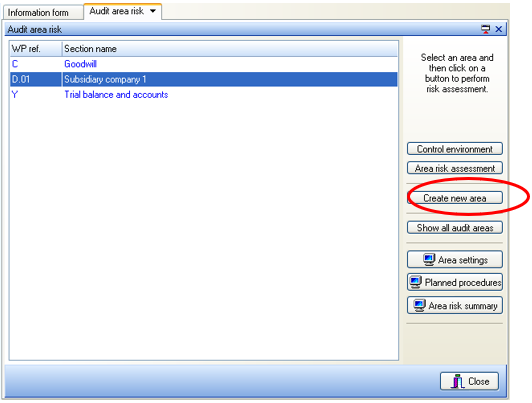
Section D of the current audit file is titled ‘D.01 Subsidiary company 1’ and contains a standard audit programme in respect of the work to be performed for each subsidiary. This area can be replicated any number of times to reflect the planning and work for each subsidiary.
To do this; highlighting the area D.01 in Audit area risk window and click [Create new area].

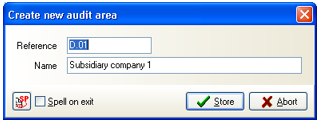
The system will display the Create new audit area dialog to allow you to enter a unique reference for the new area, say D.02 and the name to be used for the area which will no doubt be the name of the subsidiary.

Master audit pack documentation
Copies of these manuals are included in the Guidance folders within the master packs and hence will always be available from the Help menu when you have a client loaded. There are 2 items on the menu that will always relate to the master pack to which the current client is connected:
- Master pack manual
- Master pack manual appendix
