Xero and Finsit

What is Open Integration?
Open Integration is a smart set of technologies that enable the efficient transfer of financial data from bookkeeping products to and from our CCH Central suite. It pulls in the full nominal ledger transaction history and stores that data in its own secure cloud database. You are then able to consume that data in a variety of ways.
You can pull data from Open Integration into CCH Accounts production giving you instant access to the full nominal ledger of the client you are working on. You are also able to push advisor journals back into Open Integration from CCH Accounts Production allowing you to quickly post back your year-end journal adjustments into your client’s bookkeeping software.
Once a business has been connected to Open Integration, our secure cloud database will synchronise overnight, every night. You can also synchronise on demand to ensure you are working with the latest live data.
Open Integration can also be used as a source for making quarterly submissions to HMRC under their Making Tax Digital for Income Tax pilot and, of course, when it goes live.
Please note: the following, Multi-currency and Divisonalised accounting is currently not supported.
- Multi-currency is not supported
CCH Open Integration does not currently cater for bookkeeping systems using multi- currency. - Divisionalised accounting
Open Integration does not currently cater for division/dimension accounting.
Accessing Open Integration
Open Integration is an integral part of CCH OneClick. In order to access Open Integration you must have an activated CCH OneClick account. Please speak to your administrator for your OneClick credentials.
On the CCH OneClick Dashboard, click on the Tile 'Open Integration'
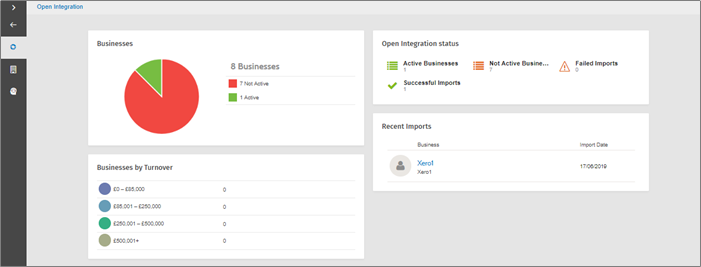
The Open Integration dashboard displays data such as how many businesses have been connected to a bookkeeping solution. The status includes successful or any failed imports from the bookkeeping solutions and recent imports.
Setup and Configuration
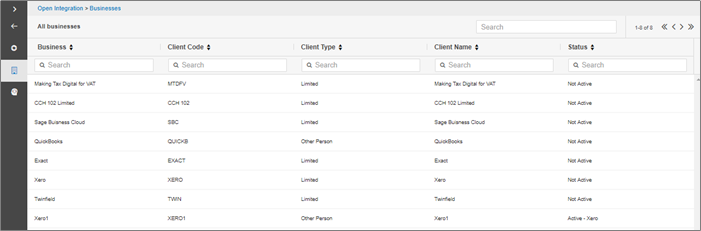
- The list is populated from CCH Central. The team security settings are respected so employees only see clients they are allowed to access within CCH Central.
Tip - you can search for the Business by Business name, Client code, Client Type, or by Status.
Note: If the Status is Not Active this means the Business has not been configured to a bookkeeping source.
Connecting a Business to Xero
1. Click onto to the relevant business
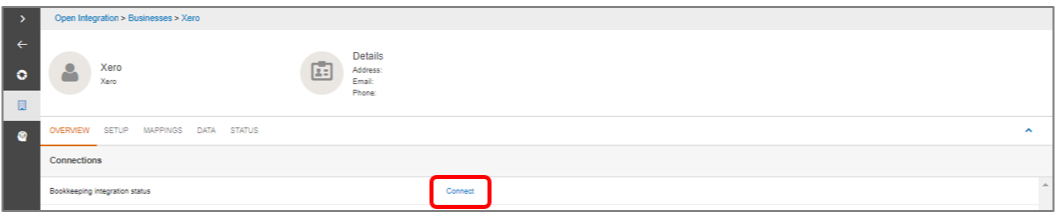
2. Click on Connect
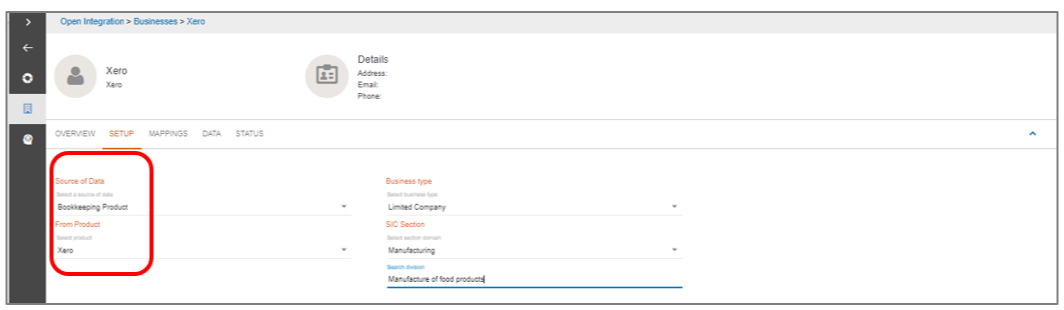
3. Select Bookkeeping Product below Source of Data
4. Select Xero from the list of Bookkeeping Products
5. Select the relevant Business Type from the list
6. Select the description from the list of SIC codes
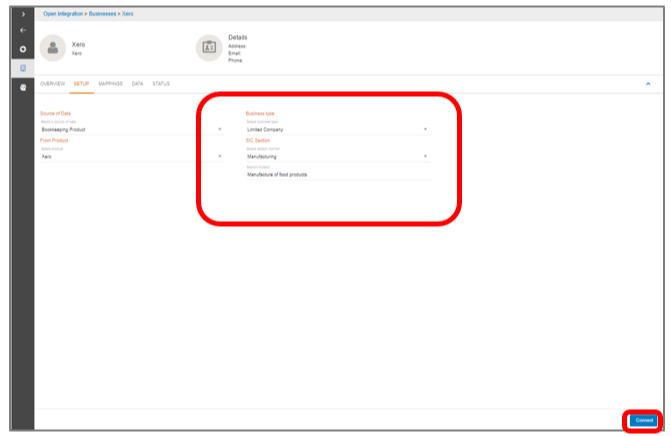
7. Click Connect. This will launch the external Xero account.
8. Select the relevant organisation from the list
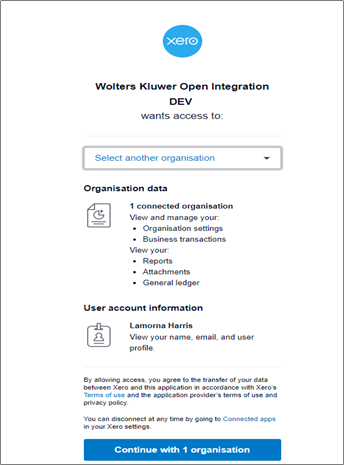
9. Click on continue with 1 organisation Did not ask me to enter my user credentials
10. Enter your user credentials such as Email and Password
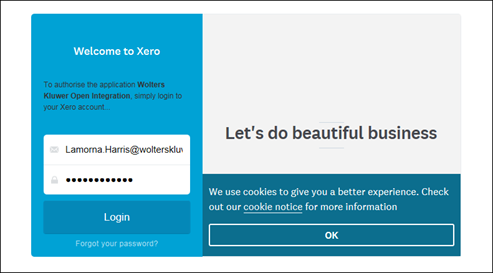
11. Click on Login
12. Select the relevant Organisation
13. Click on Allow Access
Overview
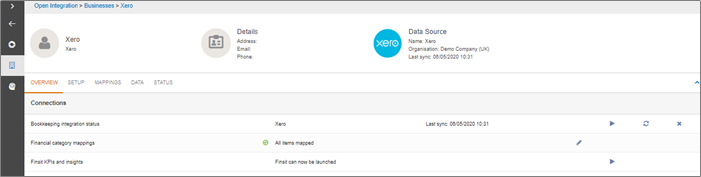
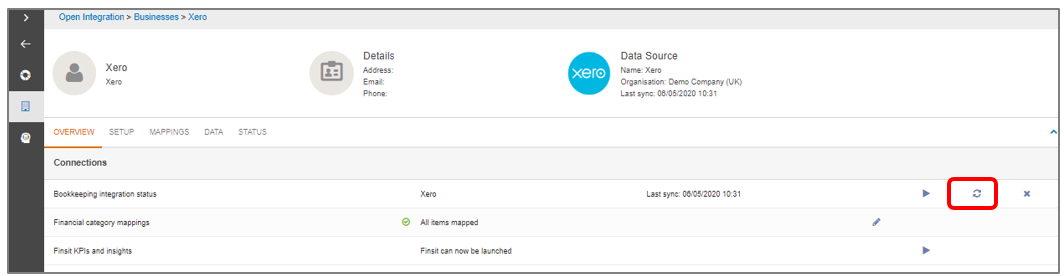
The Overview screen displays information such as:
- Bookkeeping integration status – when the data was last synchronised
 An option to launch Xero directly from CCH Open Integration
 An option to synchronise the data on demand
 An option to discount the data from Xero
- Financial category mappings – in this example indicating that all nominal codes have been mapped
- An option to launch finsit the advisors financial reporting tool
Mappings
The mapping screen is only applicable to quarterly reporting (MTD) for income Tax and finsit the advisors financial reporting tool. The mappings for the production of the accounts are stored within CCH Accounts Production.
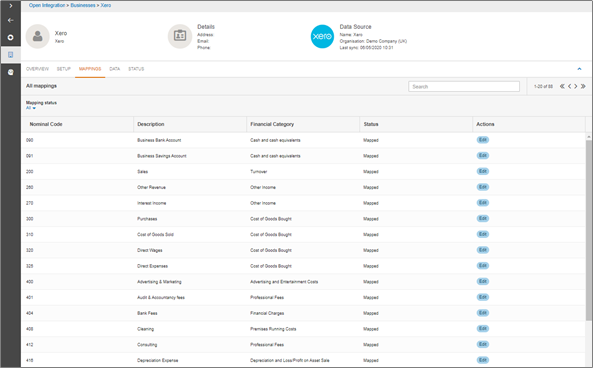
- Standard mapping files are provided for Xero
- These mappings display the financial reporting category that each nominal code from Xero Bookkeeping Data will be mapped into for HMRC quarterly reporting and finsit
Data Tab
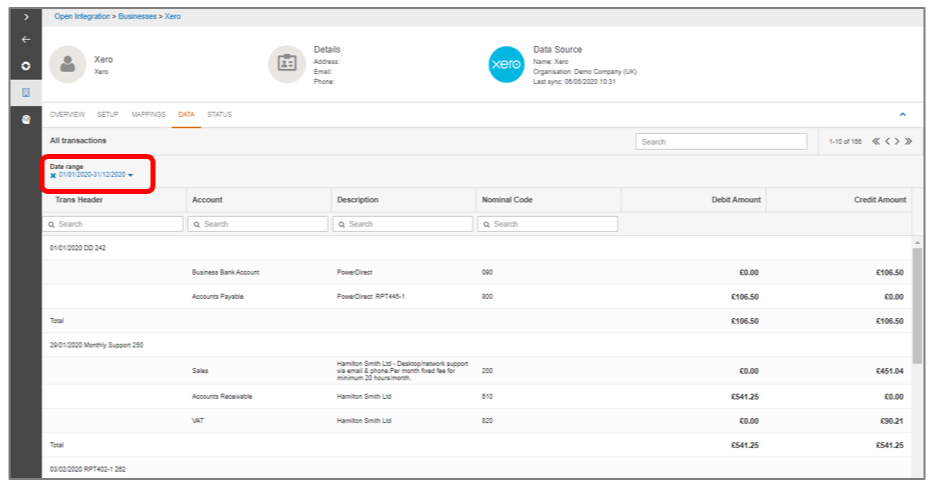
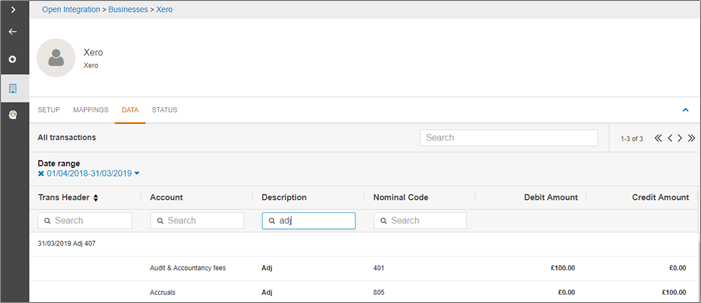
- Change the date range to view transactions for a given period
- Once connected to Xero, the data will be synchronised automatically. The data is then updated each evening displaying all daily transactions within the specified date range.
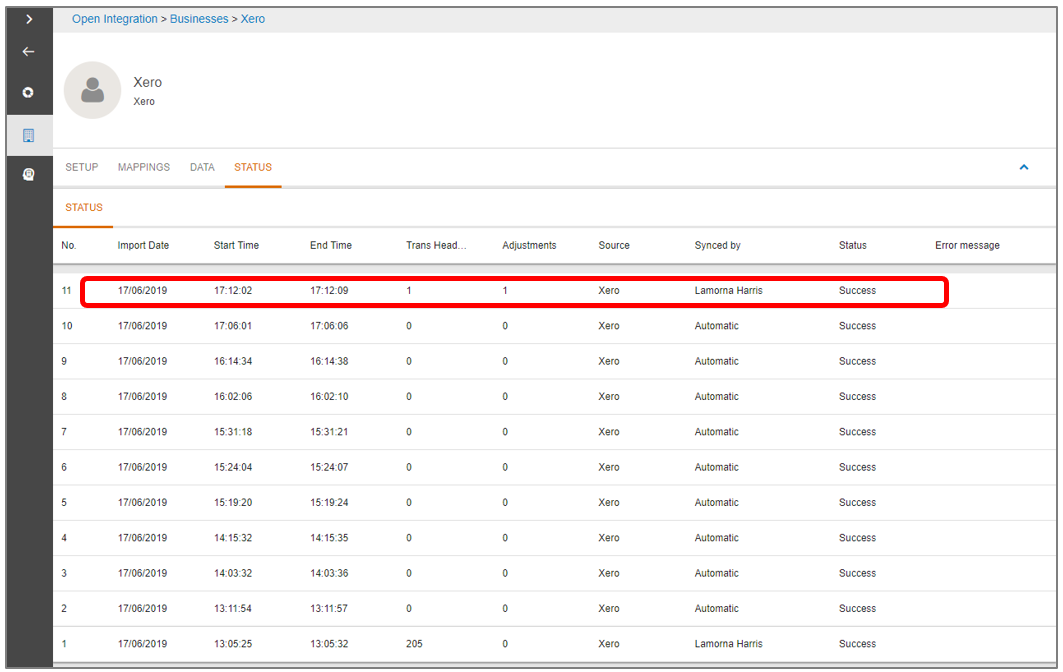
Checking the Status

View the status of imported data, successes and failures. View data which has been synced on demand and by whom
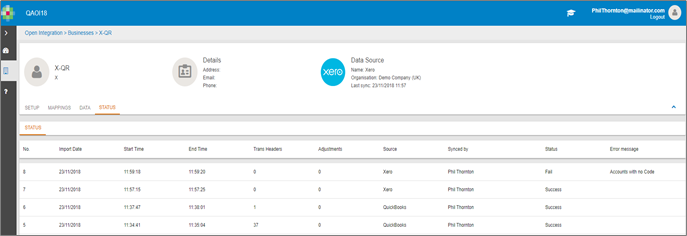
- If Accounts with no Code is displayed under Error message, this is due to Bank Accounts in Xero not having a nominal code. These will need to be added in order to be able to synchronise the data.
Sync on Demand
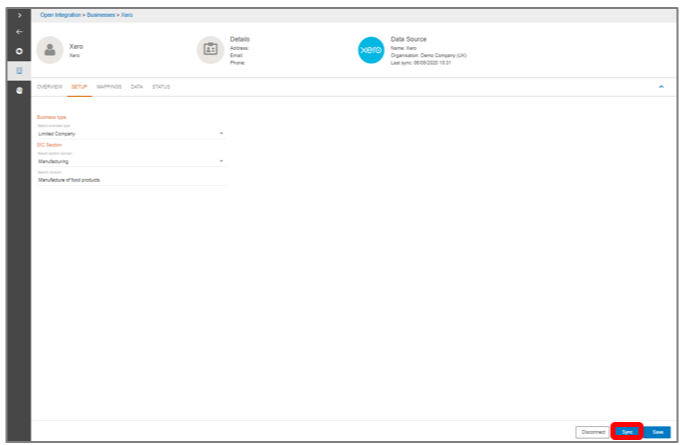
Note: If you do not wish to wait until the automatic pull of data you can Sync on demand. To Sync on Demand, click on the sync button or this can also be done via the Overview tab.
Disconnecting a Business from Xero
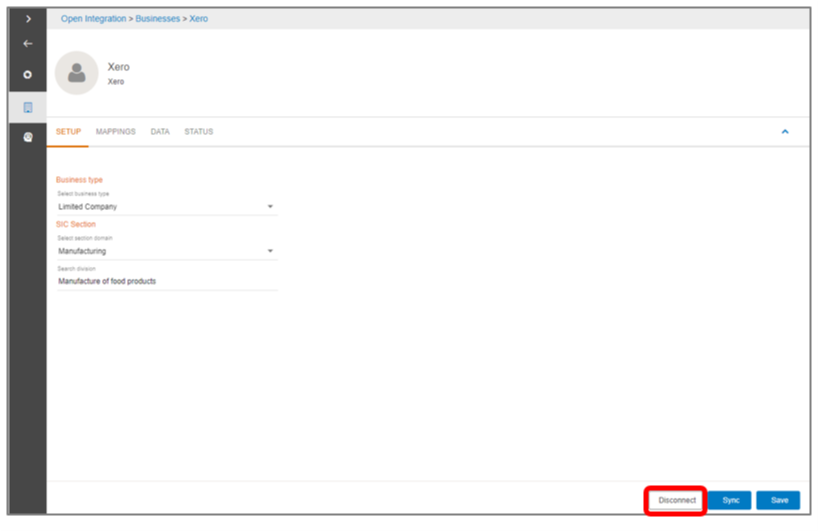
Click on the Disconnect button to discount a business from Xero, or this can also be done via the Overview tab
Integrating with CCH Accounts Production
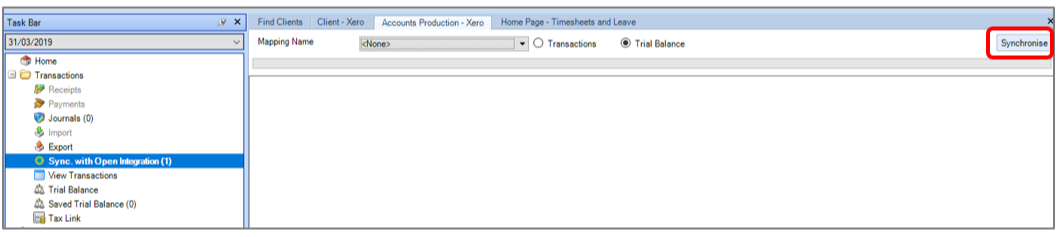
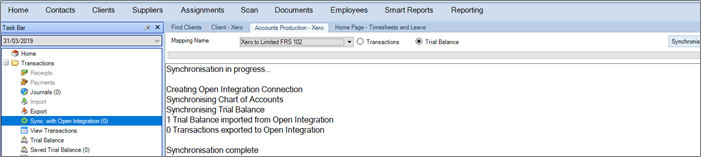
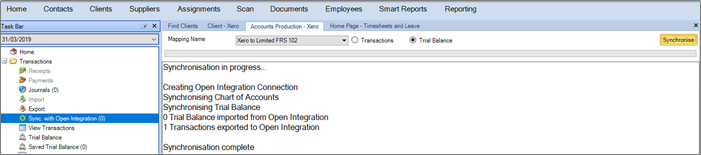
Within the Accounting period click on Sync. With Open Integration
- You have a choice to either synchronise transactions or trial balance
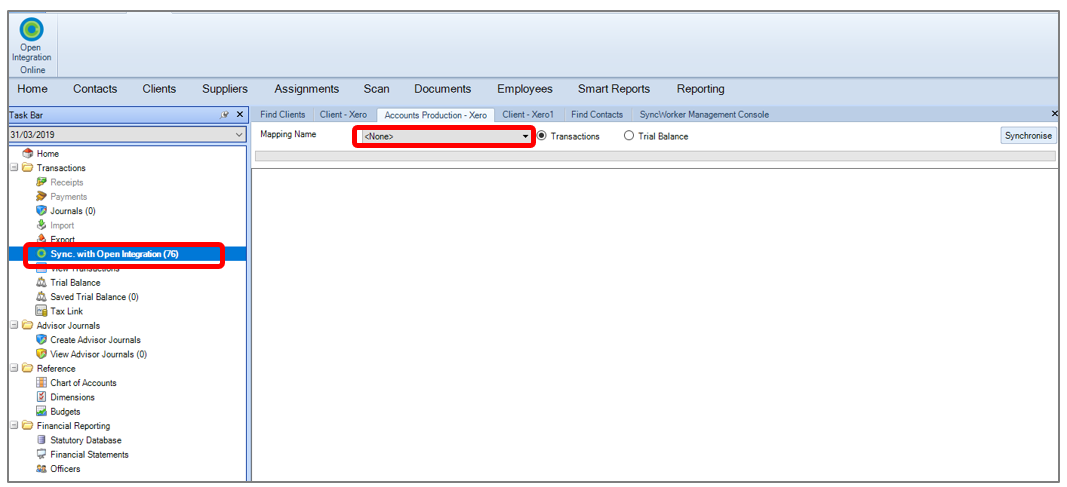
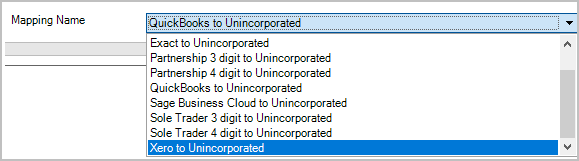
- The first time the data in synchronised into CCH Accounts Production the mapping will default to none, this is because if you have created your own bespoke chart within Xero which uses the same codes as CCH Accounts Production, then no mapping is required.
- If you want to select for example Xero Limited to FRS 102 or a bespoke client mapping, then this can be done by clicking on the down arrow next to the mapping name.
- If the new unincorporated Master Pack is in use, then the mapping will be shown as in the screen below.
Synchronising Transactions
1. Select transactions as shown in the above screen shot
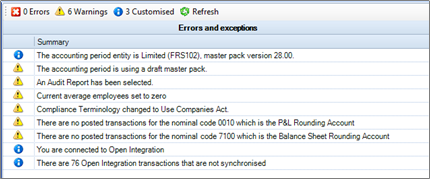
- Sync. With Open Integration displays the 'Total' number of transactions that are available to be synchronised from both CCH Accounts Production to Open Integration and Open Integration to CCH Accounts Production
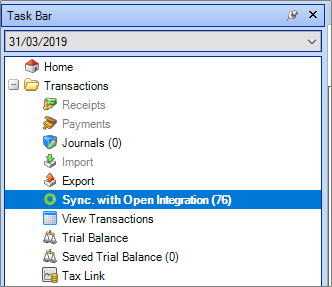
- The Errors and Exception panel also displays the 'Total' number of transactions that are available to be synchronised from both CCH Accounts Production to Open Integration and Open Integration to CCH Accounts Production.
2. Click on Synchronise
3. Click on OK

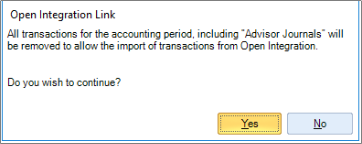
Alert: please be aware that switching between transactions or trial balance will remove all transactional history.
4. Click on Yes
5. Click on Synchronise
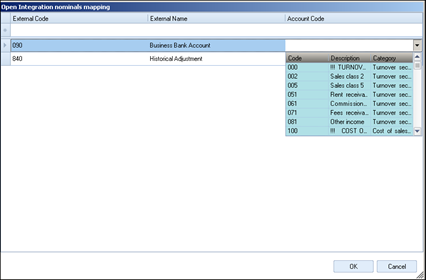
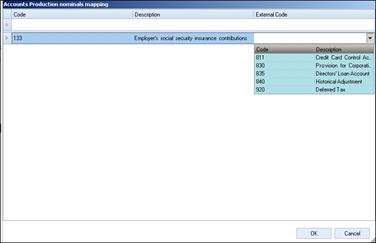
6. If prompted, select the relevant nominal code/codes to be mapped
7. Once all codes are mapped click on OK
Note: for more detail on working with mappings refer to online help, either by clicking on the link or by pressing F1 function key within CCH Central.
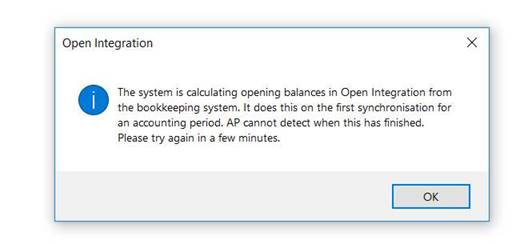
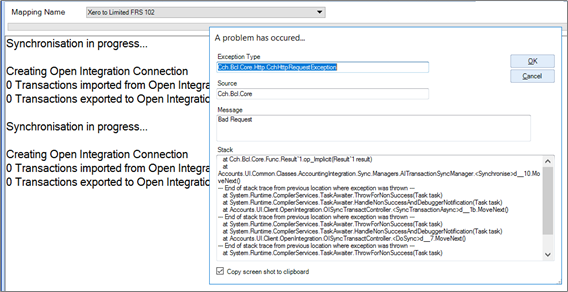
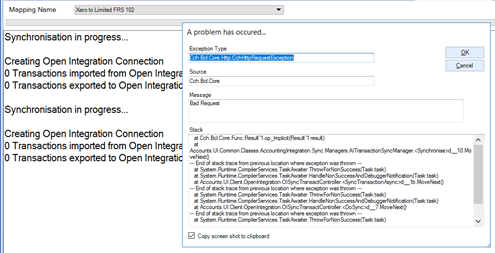
- Before checking the Trial Balance or Transactions, make sure the synchronisation is complete, otherwise the following message is displayed.
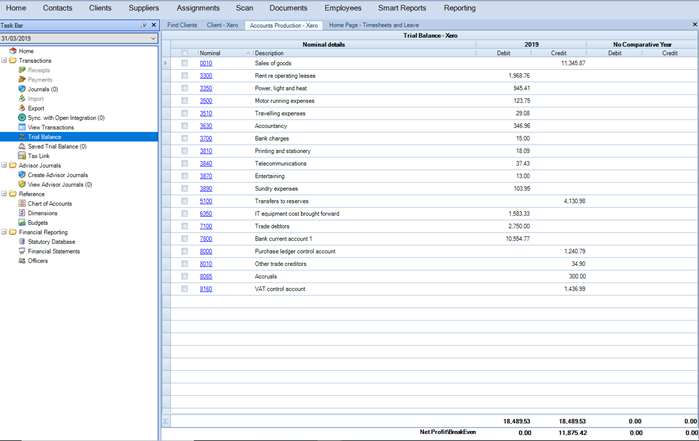
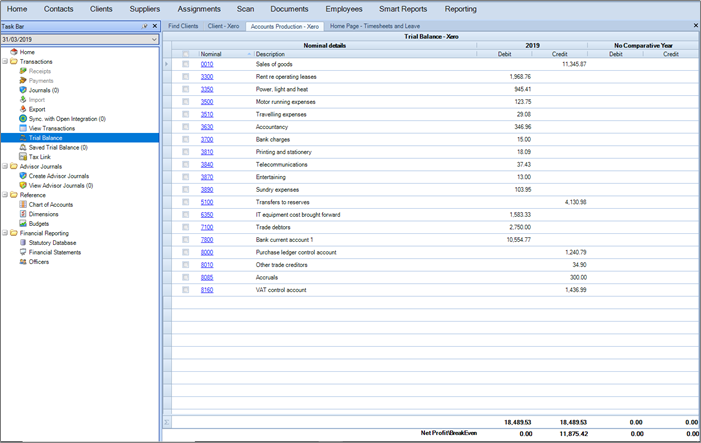
8. Check the trial balance
Note: Once the data has been synchronised, transactions within CCH Account Production cannot be edited. Either post a journal in Xero or an advisor journal within CCH Accounts Production to make changes to existing transactions.
Synchronising the Trial Balance
1. Within the Accounting period click on Sync. With Open Integration
2. Select trial balance
- Sync. With Open Integration displays the trial balance available to be synchronised from Open Integration to CCH Accounts Production.
- The first time the data in synchronised into CCH Accounts Production the mapping will default to none, this is because if you have created your own bespoke chart within Xero which uses the same codes as CCH Accounts Production, then no mapping is required.
- If you want to select for example Xero Limited to FRS 102 or a bespoke client mapping, then this can be done by clicking on the down arrow next to the mapping name.
- If the new unincorporated Master Pack is in use, then the mapping will be shown as in the screen below.
3. Click on Synchronise

4. Click on OK
5. Click on Yes
Alert: please be aware that switching between transactions or trial balance will remove all transactional history.
6. Click on synchronise

7. If prompted, select the relevant nominal code/codes to be mapped
8. Once all codes are mapped click on OK
Note: For more detail on working with mappings refer to online help, either by clicking on the link or by pressing F1 function key within CCH Central.
- Before checking the Trial Balance or Transactions, make sure the synchronisation is complete, otherwise the following message is displayed.
9. Check the trial balance
Note: once the data has been synchronised, transactions within CCH Account Production cannot be edited. Either post a journal in Xero or an advisor journal within CCH Accounts Production to make changes to existing transactions.
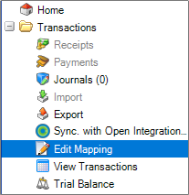
Edit Client Mapping
1. If you need to edit the client mapping, then this can be done by selecting Edit client mapping from the menu bar
2. Select the Account code you wish to edit and type in the code or part of the description. If you want to create a new code in CCH Accounts Production press F10.
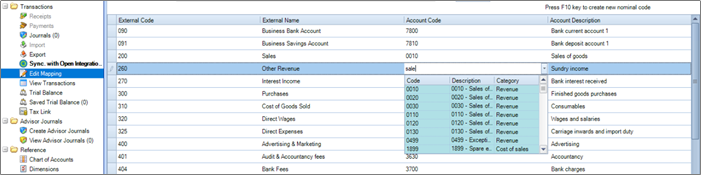
3. Click on Save. The client mapping will include the client code, so it is easily identified as a client mapping.
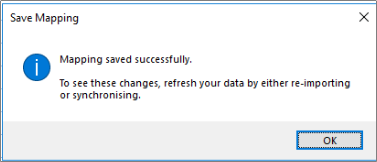
4. The data will need to be re-synchronised to see the changes
Pushing adjustments back into Xero
The only type of journal that can be posted back to Xero are Adjusting journals within the Advisor journals.
Reclassification is used to reclassify nominal ledger postings for the year end accounts within CCH Accounts Production. Potential Journals are used for “what if” scenarios, if you wish to create a journal save and review the Potential Report to see the effect this adjustment would have on profits.
1. To post an adjustment back to Xero click on Advisor Journals and select type Adjusting
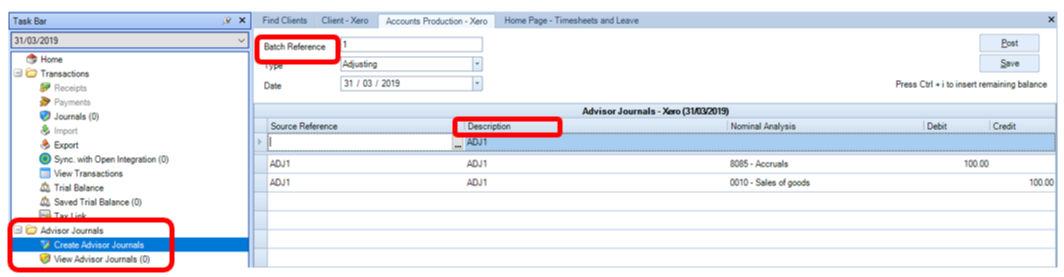
Note: You must include a Batch reference and a description as Xero validates on these fields. You cannot post manual journals to Bank accounts or control accounts within Xero, refer to knowledge base article 10524 for help.
- The Advisor journals can be posted at the time of creating them or saved and can be posted at a later date.
2. Click on Post
- If you decide that the journal needs unposting, this can be done by selecting unpost
3. Click on Unpost
- Adjusting journals need to be approved before they can be synchronised back to Xero.
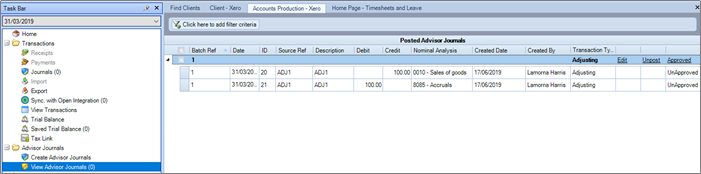
4. Post all required adjusting journals
5. Select the journals to be approved
6. Click on Approval

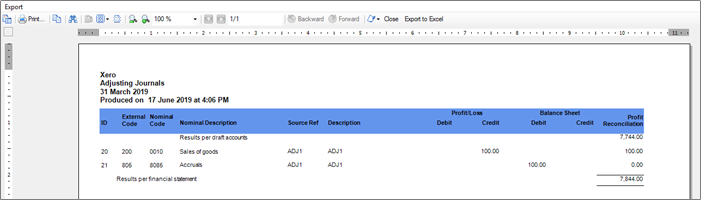
7. Select Adjusting Journals Report to view the detail

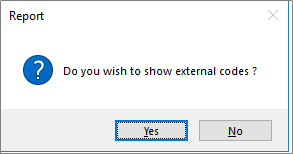
8. Select Yes or No to display the external code. I.e. the Xero nominal code
9. Click on Sync with Open Integration
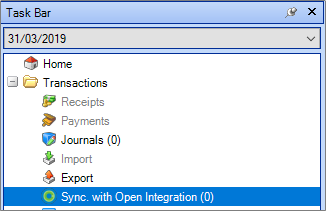
10. Click on Synchronise
11. If prompted, Select the relevant nominal code/codes to be mapped
Note: if the nominal code does not exist within the list of available codes, create the code in Xero first.
For more detail on working with mappings refer to online help, either by clicking on the link or by pressing F1 function key within CCH Central.
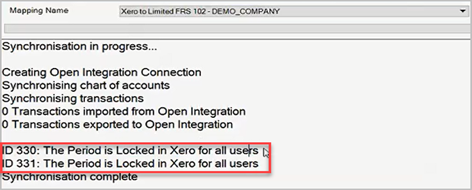
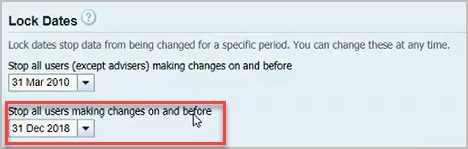
- Like many book-keeping systems Xero has the ability to “lock” a financial/accounting period to prevent users accidently editing a period that has been finalised. During synchronisation, if the message below is displayed, the period will need to be unlocked within Xero.
- If you do not wish to wait until the automatic pull of data you can Sync on demand.
12. Within Xero check the journal
13. Select Accounting > Reports > Journal Reports
14. Change the filter on the date range
15. Click on Update
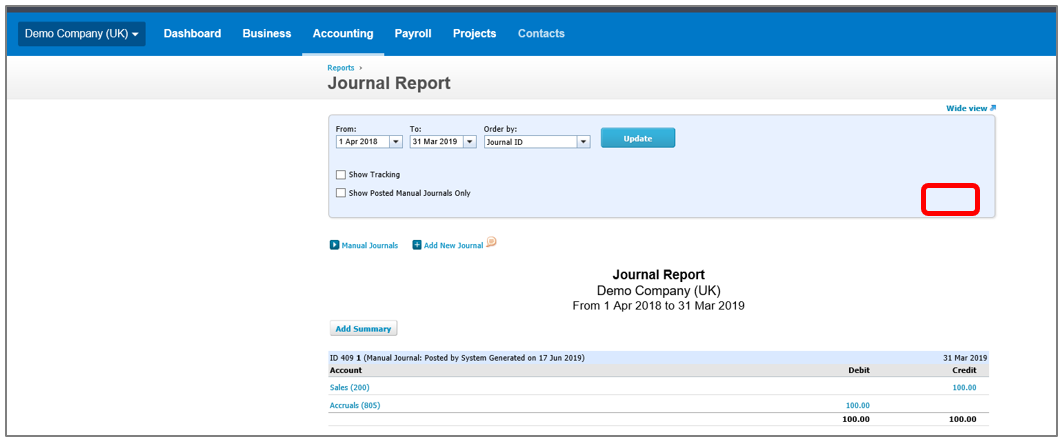
- Within Open Integration the adjustments will be displayed on the Status tab
- The adjustments will also be displayed on the Data tab
Known Issues
To view the current known issues refer to Knowledgebase article 6434 Open Integration section.