Setting up users - CCH Trust Accounts

The system can be set up in three ways:
- No user IDs. When CCH Trust Accounts is first installed no user IDs exist. In this case any user who can run the CCH Trust Accounts executable, WTRUMP32.EXE, can access client data and can perform any function within the software.
- User IDs used. In this case the System Manager creates user IDs for each user. These users IDs control what the user can do. Before the user can access CCH Trust Accounts he must sign in giving his user ID and his password if one has been set up. To make the process a little faster the system offers the user's network login name as the default user ID. So if user IDs are set up that match the network login names then the user only needs to enter his password. If he has no password, then he just needs to press Return.
- Automatic Login. In this case the System Manager sets up users IDs as before, ensuring that the user IDs match the network login names. In Database Parameters he also ticks the option to enable Automatic Login. Now when the user signs in, the system looks at the network login name and if it matches a CCH Trust Accounts user ID then the user is taken straight into Trust Accounts bypassing the login screen.
Creating a User in CCH Trust Accounts
Users are created in Activities > System Management > Manage Users.
Click New to create a new user.

The Add/Edit system users screen is shown:

Enter the User ID (this can be the same as the CCH Central user name, or specified using the Automatic Login option as shown above), and their Full Name.
The Date of Birth and Export file extension do not need to be completed.
If a password is required click on the Password button and set a password for the user.
To link the CCH Trust Accounts user to the CCH Central user (and therefore have controlled access to the CCH Central client list), click on Central user.
Then enter the CCH Central user name (as used to log into CCH Central), and the box should close. If the username does not exist in CCH Central then the following message will be seen:
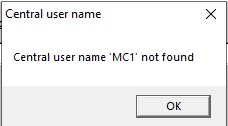
Check and re-enter correctly to clear the error.
System Access Rights
Users are created in Activities > System Management > Manage Users. When a user is created rights can be specified for:
- System Management. Whether the user can access the System Management menu.
- Securities Maintenance. Whether the user can change data relating to Securities. This means the data on the master Securities list. This does not give the user any rights over client investment data. Even without access rights for Securities Maintenance a user can still look up securities.
- Common File Maintenance. Whether the user can change other master or 'common' data.
Local User Access Rights
After the user is created he is given 'Local User rights' to access client data. The idea is that on a C-Tree database there can be multiple client databases sharing the same securities and common data. This configuration is known as a 'split database' and users with a split database have more than one client list. Giving a user local user rights means that the user is able to see the clients in the current client database. Most users only use a single client database and on SQL Server split databases are not allowed. But Local User rights are still required even with a single client database.
To set up Local User rights, click the Local Users button.

The users which do not have local user rights are shown on the left hand side; those that do are shown on the right. To add rights to a user click the Add -> button. The local user rights are requested:
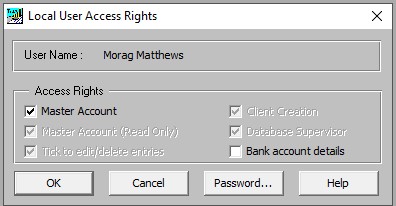
- Master Account. This gives the user full rights to any client on the database, even if some clients have been set up to only allow certain users to access them. Master Account rights are also required to use features that affect, or report on, all clients, e.g. cross-client reports such as those run from Transaction Reporter. They also give the user the right to change master accounts pages which can easily be done by accident. For these reasons it is recommended that Master Account access rights are not given to most users.
- Master Account (Read only). Gives the user read-only rights to any client. A user with Master Account (Read only) rights cannot update any client on the database whatever his other rights.
- Client Creation. Allows the user to create clients.
- Database Supervisor. Similar to System Management rights but the user cannot create new users and can only allocate Local User access rights for the current client database.
- Edit/delete entries. Allows the user to edit or delete entries. However a user with Master Account access rights can always do this.
- Bank account details. This option only applies if the system is licensed for Bank Links. It gives rights to edit payer and payee bank account details. Giving Master Account rights does not automatically give rights to edit Bank Account Details.
Useful Information! In practice it is recommended that most users are given only Client Creation rights and perhaps the right to Edit/delete entries.
Other Features
This is as far as most firms need to go in setting up users but there are two further features that some firms use:
- Client Access rights: These enable certain users to access certain clients, although a user with Master Account or Master Account (Read only) rights can access any client whatever the Client Access rights.
- Groups: If several users all have the same rights then they can be added to a group and access rights are then allocated to the group rather than user by user. However, this feature is not as useful as it seems as Local User rights still need to be allocated to the individual members of the group. So it is currently recommended that groups are not used on CCH Trust Accounts.
Details of these and other features are described in the Help system under User Management System.
2019.1 Update
Tighter User Access Control on viewing clients
Currently users can be prevented from accessing a client by assigning the client to specific users. This is performed in Edit Client > Access.
- The user must be a “Local User”, i.e. have been given access rights to the database using Activities > System Management > Manage Users > Local Users. In practice, most firms make all users Local Users (except if they have linked C-Tree databases which is very unusual).
- Rather than setting up every user than can access every client individually, it is more common to create Groups of users and then allocate the Group to the client.
- If a client has no users or groups that have access to it then all users can access the client.
- Instead of using Edit Client > Access, to allocate a client to specific users, it can be quicker to allocate a user or group to specific clients. This can be done through Activities > System Management > Manage Users > Client Access.
The above procedure prevents unauthorised users from accessing a client. They can still see all clients on the Client List, but they receive the message “Access to client denied” if they try to go into a client to edit or view the client data.
This release tightens the access rules so that users without the right to access a client can no longer even see the client on the Client List. This is useful in a situation where a firm has multiple offices and does not want users in one office even seeing the client names of clients in the other office.
- This change only applies to the SQL Server version of Trust Accounts. The C-Tree version is unaffected as checking access rights on every client when running a client list would take too long on a C-Tree database.
- When clients are set up, the option Client Access must be used to specify who can access them. Otherwise everyone can. (You can see which clients have no access rights using Reports > List of Clients > User Access.)
- When setting up users or groups, be careful which users have access rights to System Management. Also check which Local Users have access to Master Accounts, Master Account (Read only), Database supervisor. All these users have rights to see all clients or could give themselves those rights.
Link to Central – Team Security
A related change is that when a client was created that was linked to Central, the user who was creating the client could select from the full Central client list, including clients to which they did not have access under Central’s Team Security system. (In Central, this is set up on the client on the Responsibility tab). This has now been fixed and users can only select from clients that they would be able to see on the Central client list. The same issue occurred if you tried to link an existing Trust Accounts client to a Central client, using Edit Client > Link.
To control access, the System Manager must set up each user’s Central User Name, i.e. login, in Activities > System Management > Manage Users > Edit > Central user. Trust Accounts does not request the user’s password.
Notes
- This change applies to both C-Tree and SQL Server Trust Accounts.
- If you forget to set up the Central User Name on the users in Trust Accounts, you are warned when you come to create a new client linked to Central, or to link an existing client. The warning reads, “The Central User Name needs to be set up for user <username>. See Activities > System Management > Manage Users > Edit > Central user”.
- If network authentication is in use in Central then the user name can be entered as domain\user, e.g. WKUK\Fred.Bloggs.