SQL Server Connection String

Introduction
Trust Accounts can hold its data in one of two types of database:
- A C-Tree database is an old-fashioned shared file database. Its advantage is that it is very easy to install and to move to a different server. Its disadvantage is that its file sizes are limited to 2GB and it is unsuited for use by more than about 5 concurrent users.
- A SQL Server database typically runs on its own server and is accessed via a service. It is harder to install and to move to a new server. But it is suitable for much higher data volumes and more concurrent users.
Database administrators generally prefer SQL Server as other products such as Central use them as well and using SQL Server promotes standardisation. It is possible to upgrade a C-Tree Trust Accounts database to SQL Server.
You can tell which version of Trust Accounts you are running from within Trust Accounts.
- Select File > Info > Database Files. The first database file listed is “Client Details”.
- If its FileName begins “mssql(…”, then you are running the SQL Server version of Trust Accounts.
- If the FileName looks like an ordinary path to a file, then you are running the C-Tree version.
This section on “SQL Server Connection String” mostly applies to users who are running the SQL Server version of Trust Accounts. But it also applies to users running the C-Tree version of Trust Accounts and wish to use a full connection string to access Central.
Limitations in the old method of specifying the SQL connection string
When an application connects to SQL Server it uses a “connection string” to specify which database it wants to connect to and how the connection should be made. Previously the user specified some fields needed to build the connection string and Trust Accounts then built it and used it to connect to the databases. This was done for two databases, for the connection to Trust Accounts and the connection from Trust Accounts to Central. The fields that could be specified were:
- For the connection to Trust Accounts: The server and database.
- For the connection to Central: The server, database, user id (aka SQL login) and password.
This approach to creating the connection string was simple but somewhat limiting:
- You can connect to a SQL database using either “SQL Server authentication” (i.e. with a user id and password) or “Windows authentication” which uses the user’s network login details to determine whether the user can access the database. The old method only supported SQL Server authentication, whereas many practices would prefer to use Windows authentication.
- The server name mentioned above can also hold an “instance name”. For instance, the field for the server name could hold “MyServer\MyInstance”. An alternative method of specifying the instance name is to use a port number, e.g. “MyServer,1234”. This has become more popular recently as it is more secure. The old method did not support specifying an instance name using a port number.
- It is possible to encrypt the traffic between the workstation and SQL Server. A popular method of doing this is to use a standard called TLS1.2. The old method did not support using communication encrypted using TLS1.2.
To overcome these limitations, it is now possible to specify the full connection string.
Specifying the Trust Accounts Connection String
The Trust Accounts SQL Server connection string can be specified in one of two ways:
- In DATABASE.INI. This is a text file that is shared by all users and only needs to be set up once. It is described in the Trust Accounts Help under Technical Information > Technical Information – Setting up a Trust Accounts Database.
- In the Registry of each user’s workstation.
The Trust Accounts Connection String in DATABASE.INI
The old method of specifying a connection in DATABASE.INI involved creating a “section” with a heading in square brackets and 3 lines underneath, e.g.
[Birmingham Trust Accounts]
Common=mssql(server=MYSERVER\CCHSQL;database=TRUSTBIR)
Client=mssql(server=MYSERVER\CCHSQL;database=TRUSTBIR)
SecStock=mssql(server=MYSERVER\CCHSQL;database=TRUSTBIR)
This method still works.
Note
- Trust Accounts expects 3 lines even though the database must be the same for all three. This is for compatibility with C-Tree databases.
- These 3 lines must be for “Common”, “Client” and “SecStock” and each connection string must be enclosed in “mssql(” and “)”.
- Each line can only contain two parameters, the “server” and the “database”.
- Trust Accounts creates the actual connection string that is used by the program to connect to SQL Server by taking the text between “mssql(” and “)” and adding extra parameters for a “driver”, a user ID and a password for SQL Server authentication. (Your IT Department should have the details of how the user ID and password are specified.)
he new method now allows you to specify more parameters of the connection string, e.g.
[Perth Trust Accounts]
Common=mssql(driver={SQL Server};Trusted_Connection=Yes;server=MYSERVER\CCHSQL; database=TRUSTPER)
Client=mssql(driver={SQL Server};Trusted_Connection=Yes;server=MYSERVER\CCHSQL; database=TRUSTPER)
SecStock=mssql(driver={SQL Server};Trusted_Connection=Yes;server=MYSERVER\CCHSQL; database=TRUSTPER)
Note
- Again, there must be 3 lines with the same database specified for each.
- Trust Accounts creates the actual connection string in a similar way to before: it takes the text between the “mssql(” and “)” parts and adds the user ID and password. The differences are that it does not add a driver and the user can specify extra parameters, e.g. “Trusted_Connection” in the above example. The use of different parameters is discussed below.
- When we say that a full connection string can be specified, this is not strictly accurate as the user ID and password are specified elsewhere.
The Trust Accounts Connection String in the Registry
Specifying the Trust Accounts connection string in the Registry is done through the menu option File > Open > Configuration > Edit on each user’s workstation. There is no need to use the Registry Editor. The Edit screen now appears as follows:
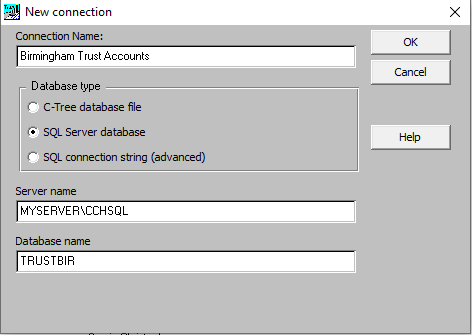
Note
- There is a new radio button called SQL Connection string (advanced) which lets you set the full connection string.
- This screenshot shows the equivalent setting for the one set up in DATABASE.INI for the Birmingham database.
If the SQL Connection string (advanced) radio button is selected the screen looks as follows:
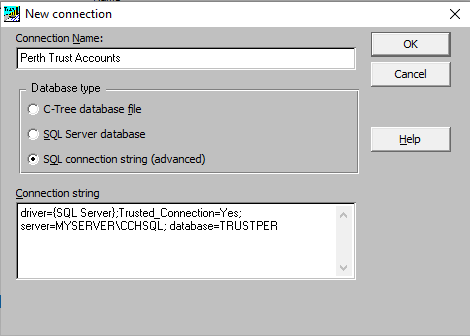
Note:
- The above screen shows the equivalent setting for the one set up above in DATABASE.INI for the Perth database.
- On adding a connection, the Database Type radio buttons are enabled, but when editing a connection, they are not. If you need to change the Database Type, you may need to delete the connection and recreate it.
Specifying the Connection string in the Registry is slightly easier than editing DATABASE.INI when there are a small number of workstations, but if there are more than about 5 workstations, using DATABASE.INI is easier.
You should not mix the 2 methods. If you create a DATABASE.INI file, its settings will be visible in File > Open > Configuration > Edit. But if you edit them there, they are saved back into the Registry, creating 2 settings for the same database which is likely to cause a problem.
Specifying the Central Connection String
Trust Accounts is connected to Central so that the accounts can be produced from Accounts Production. The connection is set up in Activities > System Management > Database Parameters > Other > Central. This screen now appears as follows:
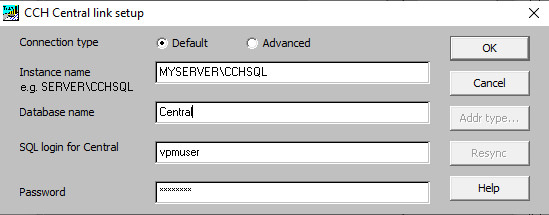
There are 2 new radio buttons at the top of the screen. After upgrading to Trust Accounts 2020.1, the Default radio button is selected and the settings shown are the same as on the previous release.
Using the Advanced option, you can enter a full connection string directly:
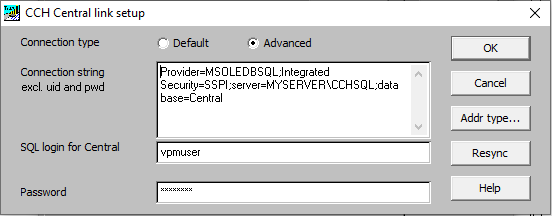
The above connection string uses Windows authentication when Trust Accounts connects to Central. This is explained below.
Uses of a full connection string
Using a full connection string allows users to specify extra parameters to change how Trust Accounts connects to SQL Server. Most of these parameters are beyond the scope of these notes and users should ask their IT Department for assistance on setting them up. Assistance from CCH would probably be chargeable.
Windows Authentication
A connection string such as
driver={SQL Server};Trusted_Connection=Yes;server=MYSERVER\CCHSQL;database=TRUSTPER
switches Windows authentication on. The extra parameters over the old method are:
- driver={SQL Server}
A driver is a program that is used to access a database. The {SQL Server} driver is properly called the “Microsoft SQL Server ODBC Driver”, or SQLODBC. It ships with Windows, so users do not need to install it. Unfortunately, Microsoft no longer maintains it. So although it can be used to turn on Windows authentication, it cannot be used for the next two examples and a different driver is needed instead.
- Trusted_Connection=Yes
The Trusted_Connection parameter tells SQL Server to use Windows authentication and to ignore any user ID and password that Trust Accounts adds to the connection string.
Using a port number to specify an instance name
This can be done with a connection string such as the following:
Provider=MSOLEDBSQL;Integrated Security=SSPI;server=MYSERVER,1234;database=TRUSTPER
Apart from using port number 1234 instead of \CCHSQL, the changes, compared to the previous example, are as follows:
- Provider=MSOLEDBSQL
A Provider is similar to a driver. In practice, the terms are used interchangeably, even by Microsoft.
Comparing the MSOLEDBSQL and {SQL Server} drivers, there are two differences:
- The MSOLEDBSQL driver is more modern and can be used for situations that the old {SQL Server} driver cannot.
- The MSOLEDBSQL driver needs to be installed on each workstation as it is not shipped with Windows.
The MSOLEDBSQL driver is properly called the “Microsoft OLE DB Driver for SQL Server”. It is up to date and is currently recommended by Microsoft. Some relevant links are as follows:
- Microsoft recommends its use: here.
- A download for the MSOLEDBSQL driver: here.
- A fairly simple explanation of some of these drivers: here.
- A more technical and older history of Microsoft’s various SQL server drivers: here.
- Integrated Security=SSPI
This parameter is the usual way to tell SQL Server to use Windows authentication. However, it does not work with the old {SQL Server} driver that we used before and we had to use Trusted_Connection=Yes.
Connecting to a SQL server which uses TLS1.2
A SQL Server instance can be set up to accept only communications that are encrypted using the TLS1.2 standard. How to do this is beyond the scope of these notes, but it should be familiar to your IT Department. Here we just show the required connection string:
Provider=MSOLEDBSQL;server=MYSERVER\CCHSQL;database=TRUSTPER
This is similar to the previous example. But we have removed the Integrated Security parameter for Windows authentication. So this connection string uses SQL Server authentication. The important point is that the MSOLEDBSQL driver must be used, not the {SQL Server} driver. We could add Windows authentication to this connection string, if required, or refer to the instance name using the port number.